
1. Introduction
Thank you for choosing the Smart Sensor AR867 Digital Thermometer Hygrometer. This device is designed to provide accurate measurements of indoor and outdoor temperature, as well as indoor humidity. It features a clear LCD display, calendar, and alarm clock functions, making it a versatile tool for monitoring your environment. Please read this manual carefully before use to ensure proper operation and to maximize the product's lifespan.
2. Safety Information
- Do not expose the device to extreme temperatures, direct sunlight, or high humidity.
- Avoid dropping the device or subjecting it to strong impacts.
- Keep the device away from water and other liquids.
- Do not attempt to disassemble or repair the device yourself. Contact qualified personnel for service.
- Dispose of used batteries responsibly according to local regulations.
- Keep batteries out of reach of children.
3. Package Contents
- 1 x Smart Sensor AR867 Digital Thermometer Hygrometer
- 1 x Outdoor Temperature Probe (attached)
- 1 x User Manual
Note: 1 x AAA 1.5V battery is required and not included in the package.
4. Product Features
- Large LCD display for clear and easy reading.
- Simultaneous display of indoor/outdoor temperature, indoor humidity, and time.
- Selectable temperature units: Celsius (°C) or Fahrenheit (°F).
- Selectable time display format: 12-hour or 24-hour.
- Records maximum and minimum temperature/humidity values.
- Integrated calendar function (1999/1/1 - 2048/12/31).
- Alarm clock function.
- Freeze point alarm function (-1°C to 4°C).
- Low power consumption with high stability and accuracy.
5. Setup
5.1 Battery Installation
- Locate the battery compartment cover on the back of the device.
- Slide the cover downwards to open the compartment.
- Insert one AAA 1.5V battery, ensuring the correct polarity (+/-).
- Replace the battery compartment cover by sliding it upwards until it clicks into place.

This image shows the rear of the Smart Sensor AR867 device with the battery compartment open, revealing the slot for a single AAA battery. The stand is also visible.
5.2 Placement
- Place the main unit indoors in a location where you want to monitor the indoor temperature and humidity. Ensure it is not in direct sunlight or near heat sources/vents.
- The outdoor temperature probe can be extended outside through a window or door frame. Ensure the probe tip is exposed to the outdoor environment but protected from direct rain or snow.
6. Operating Instructions
6.1 Understanding the Display and Buttons

This diagram illustrates the main components of the Smart Sensor AR867. It highlights the LCD screen, temperature display, humidity display, clock display, clock button, set button, and the indoor/outdoor switch button.
- LCD Screen: Displays all information.
- Temperature Display: Shows indoor or outdoor temperature.
- Humidity Display: Shows indoor humidity.
- Clock Display: Shows current time.
- MAX/MIN Button: Press to view maximum/minimum recorded temperature and humidity. Hold to reset.
- IN/OUT Button: Switches between indoor and outdoor temperature display.
- SET Button: Used to enter settings mode and confirm selections.
6.2 Initial Power On and Display
Upon battery installation, the device will power on and display current indoor temperature, indoor humidity, and the default time. The outdoor temperature will be displayed when the external probe is connected and selected.
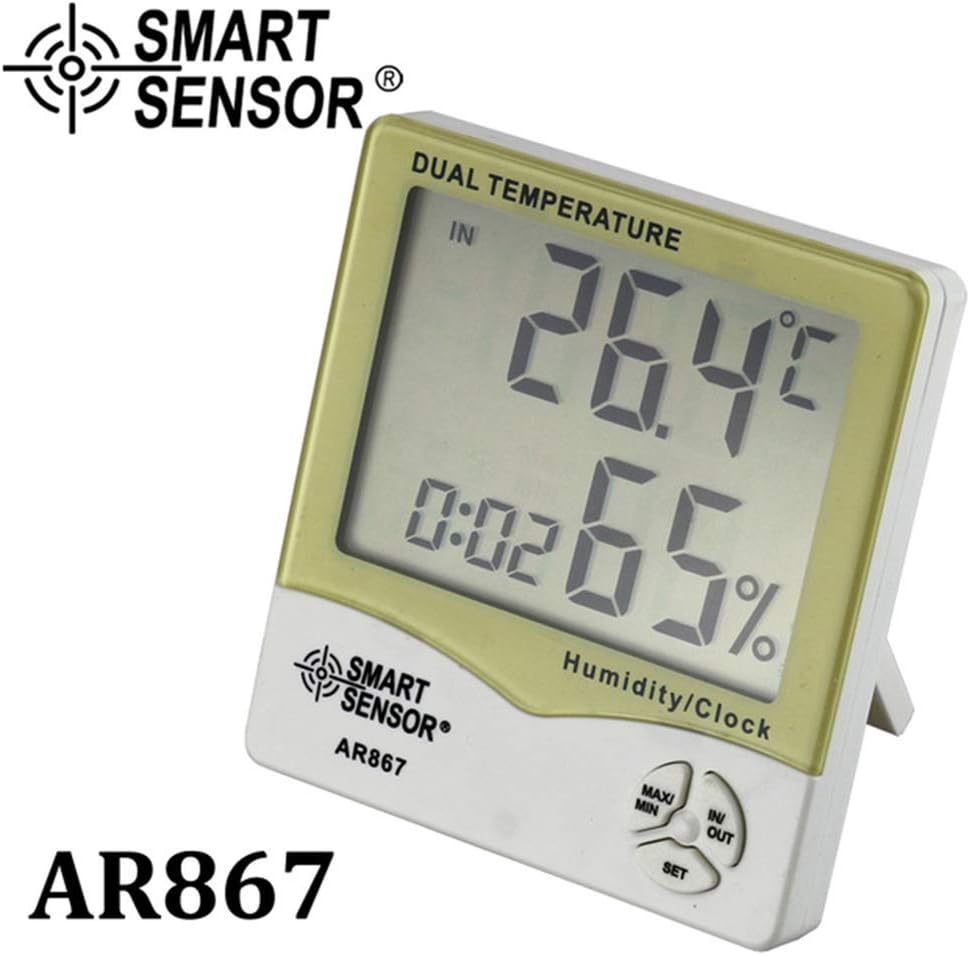
This image shows the Smart Sensor AR867 displaying an indoor temperature of 26.4°C and indoor humidity of 65%.

This image shows the Smart Sensor AR867 displaying an outdoor temperature of 30.2°C and indoor humidity of 76%, with the external temperature probe visible.
6.3 Setting Time and Date
- Press and hold the SET button for a few seconds until the year display starts flashing.
- Use the MAX/MIN button to adjust the year. Press SET to confirm and move to the next setting (month, day, hour, minute).
- Repeat step 2 for month, day, hour, and minute.
- After setting the minutes, press SET to exit the time/date setting mode.
6.4 Switching Temperature Units (°C/°F)
In normal display mode, press the IN/OUT button to toggle between Celsius (°C) and Fahrenheit (°F) temperature units.
6.5 Switching 12/24 Hour Display
In normal display mode, press the SET button briefly to switch between 12-hour and 24-hour time formats.
6.6 Viewing MAX/MIN Readings
- Press the MAX/MIN button once to display the maximum recorded temperature and humidity.
- Press the MAX/MIN button again to display the minimum recorded temperature and humidity.
- Press the MAX/MIN button a third time to return to the current readings.
- To clear the MAX/MIN records, press and hold the MAX/MIN button for approximately 3 seconds while MAX/MIN values are displayed.
6.7 Using the Alarm Clock
- In normal display mode, press the SET button twice to enter alarm setting mode. The alarm hour will flash.
- Use the MAX/MIN button to adjust the alarm hour. Press SET to confirm and move to alarm minutes.
- Use the MAX/MIN button to adjust the alarm minutes. Press SET to confirm.
- To activate/deactivate the alarm, press the IN/OUT button while in alarm setting mode. An alarm icon will appear/disappear on the display.
- Press SET to exit alarm setting mode.
7. Maintenance
- Clean the device regularly with a soft, dry cloth. Do not use abrasive cleaners or solvents.
- If the display becomes dim or the device functions erratically, replace the battery.
- When not in use for extended periods, remove the battery to prevent leakage.
8. Troubleshooting
- No display: Check battery installation and ensure polarity is correct. Replace with a new AAA battery if necessary.
- Inaccurate readings: Ensure the device is placed away from direct heat sources, cold drafts, or direct sunlight. For outdoor temperature, ensure the probe is correctly positioned and protected.
- Buttons not responding: Remove and reinsert the battery to perform a soft reset. If the issue persists, replace the battery.
9. Specifications
| Feature | Specification |
|---|---|
| Materials | ABS |
| Color | Yellow |
| Indoor Temperature Range | -10°C ~ +50°C (14°F ~ 122°F) |
| Outdoor Temperature Range | -50°C ~ +70°C (-58°F ~ +158°F) |
| Temperature Accuracy | ±2°C |
| Temperature Resolution | 0.1°C (0.1°F) |
| Humidity Measurement Range | 20%RH - 99%RH |
| Humidity Measurement Accuracy | ±5%RH |
| Humidity Resolution | 1%RH |
| Freeze Point Alarm | -1°C ~ 4°C |
| Calendar Range | 1999/1/1 - 2048/12/31 |
| Battery | 1 x AAA 1.5V (not included) |
| Product Dimensions | 10.8 x 10 x 2.2 cm (4.25 x 3.93 x 0.86 inches) |
| Product Weight | 126g |

This image provides a visual representation of the Smart Sensor AR867's dimensions, showing its length, width, and thickness.
10. Warranty and Support
This product comes with a standard manufacturer's warranty against defects in materials and workmanship. For specific warranty details, please refer to the documentation provided with your purchase or contact your retailer. For technical support or inquiries, please reach out to the customer service department of your place of purchase.


