1. Introduction
Thank you for choosing the MOXNICE Automatic Pet Feeder. This device is designed to provide scheduled and controlled feeding for your pets, ensuring they receive appropriate portions even when you are away. Featuring an 8-liter capacity, an integrated HD camera, and voice recording capabilities, this feeder allows for remote monitoring and interaction via a dedicated mobile application.
Please read this manual thoroughly before operating the feeder to ensure proper setup and safe use.
2. Safety Information
- This appliance is for indoor use only.
- Do not immerse the main unit in water or other liquids.
- Use only dry pet food with a diameter less than 12mm. Wet food or treats are not suitable.
- Keep the feeder out of reach of children and pets to prevent tampering or injury.
- Ensure the power adapter is securely connected and the cable is not damaged.
- Unplug the feeder before cleaning or if it will not be used for an extended period.
- Do not attempt to disassemble or repair the feeder yourself. Contact customer support for assistance.
3. Package Contents
Verify that all items are present in the package:
- MOXNICE Automatic Pet Feeder Main Unit
- Food Bowl
- Power Adapter
- User Manual (this document)
4. Product Overview
Familiarize yourself with the components of your MOXNICE Automatic Pet Feeder.
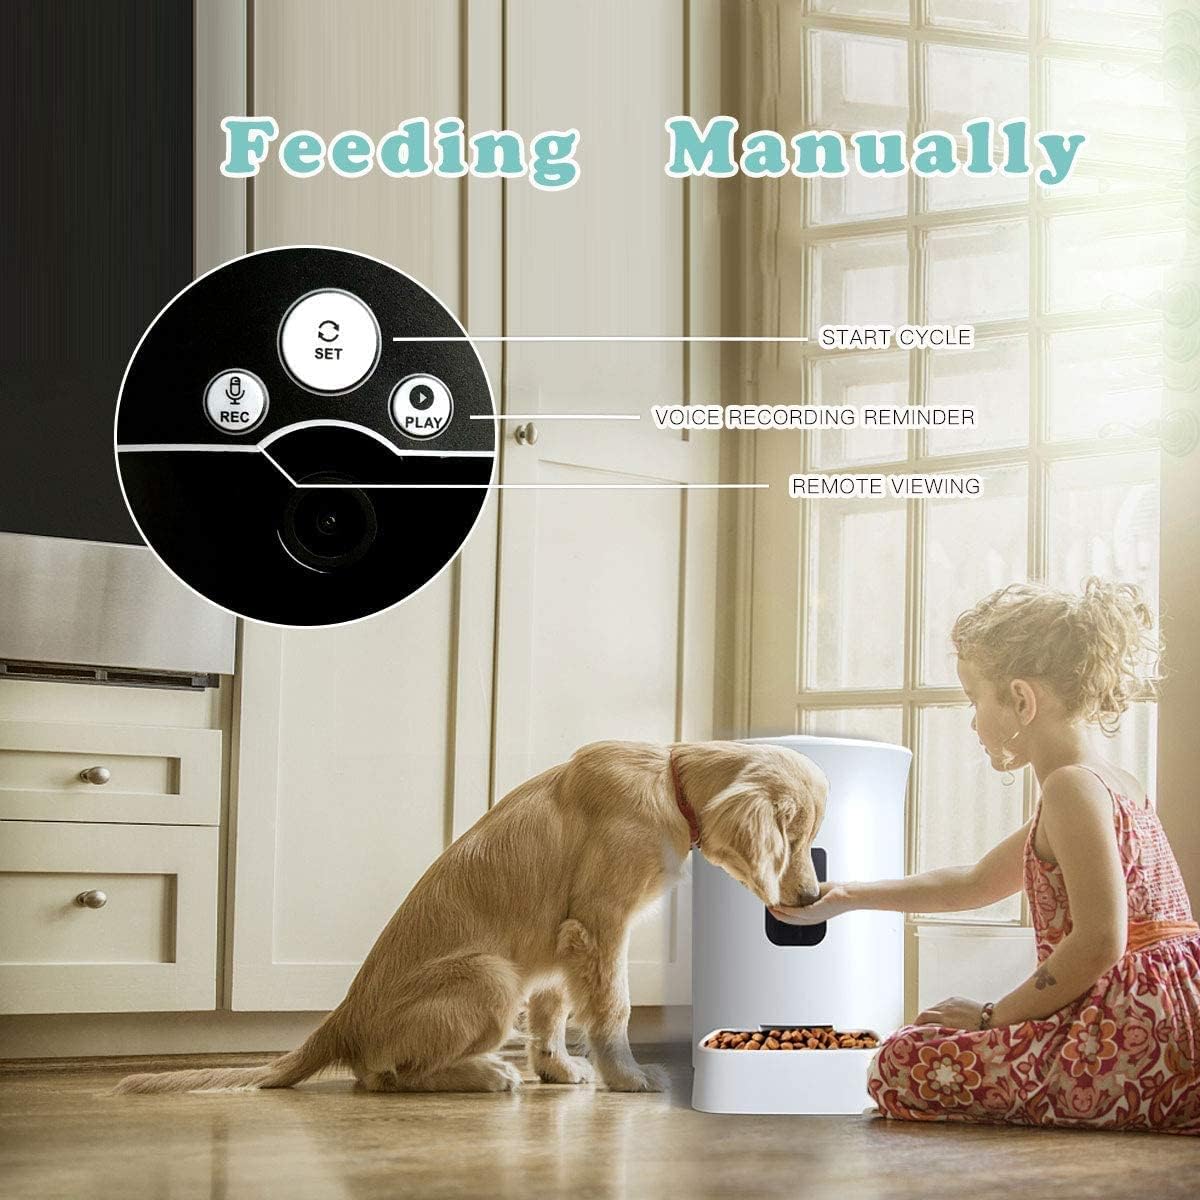
Image 1: The MOXNICE Automatic Pet Feeder main unit with its detachable food bowl.

Image 2: Detail of the feeder's control panel, including buttons for recording, settings, and playback, along with the camera lens.
- Food Barrel: Large capacity container for dry pet food.
- Lid: Secures the food barrel, preventing spills and maintaining freshness.
- Control Panel: Includes buttons for manual feeding, voice recording, and settings.
- HD Camera: For remote video monitoring and two-way audio communication.
- Food Outlet: Dispenses food into the bowl.
- Food Bowl: Detachable bowl for pet consumption.
- Power Port: Connects to the power adapter.
5. Setup
5.1 Unpacking and Placement
- Carefully remove all components from the packaging.
- Place the feeder on a flat, stable surface in a dry, indoor location.
- Ensure there is adequate space around the feeder for your pet to access the food bowl comfortably.
5.2 Power Connection
- Connect the power adapter to the power port on the back of the feeder.
- Plug the adapter into a standard wall outlet. The feeder will power on.
- Optional: If your model supports battery backup (check product specifications), install D-cell batteries (not included) in the battery compartment at the bottom of the unit. This ensures continued operation during power outages.
5.3 App Download and Device Pairing
- Download the companion mobile application (e.g., 'Smart Life' or 'Tuya Smart' - refer to packaging or quick start guide for specific app name) from your device's app store (App Store for iOS, Google Play Store for Android).
- Open the app and create an account or log in.
- Follow the in-app instructions to add a new device. This typically involves selecting 'Pet Feeder' or 'Smart Camera', then following prompts to connect the feeder to your home Wi-Fi network (2.4GHz only).
- Ensure your phone is connected to the same 2.4GHz Wi-Fi network during the pairing process.
5.4 Food Loading
- Open the lid of the food barrel.
- Pour dry pet food into the barrel. The feeder has an 8-liter capacity, capable of holding approximately 4.0KG of pet food.
- Close the lid securely to maintain food freshness.

Image 3: The 8-liter capacity food barrel, designed to store approximately 4.0KG of dry pet food.
5.5 Attaching the Food Bowl
Slide the food bowl into the designated slot at the base of the feeder until it clicks into place. Ensure it is firmly attached to prevent accidental dislodgement by your pet.
6. Operating Instructions
6.1 Manual Feeding
To dispense food manually, press the 'SET' button on the feeder's control panel (refer to Image 2). Each press will dispense one portion of food. You can also initiate manual feeding through the mobile application.
6.2 Scheduled Feeding via App
- Open the mobile application and select your feeder device.
- Navigate to the 'Schedule' or 'Feeding Plan' section.
- Set desired feeding times and the number of portions for each meal. The feeder supports up to 20 servings, with each serving being approximately 10-12 grams.
- Save your settings. The feeder will now automatically dispense food according to your schedule.
6.3 Voice Recording and Playback
You can record a short voice message to play during feeding times:
- Press and hold the 'REC' button on the control panel (refer to Image 2) until you hear a beep.
- Speak your message clearly into the microphone.
- Release the 'REC' button when finished.
- To play back the recorded message, press the 'PLAY' button (refer to Image 2).
- You can also manage voice recordings through the mobile application.
6.4 Video Monitoring and Two-Way Audio
The integrated HD camera allows you to monitor your pet remotely:
- Open the mobile application and select your feeder device to view the live camera feed.
- Use the microphone icon in the app to speak to your pet (two-way audio).
- Use the speaker icon to hear your pet's environment.
7. Maintenance
7.1 Cleaning the Feeder
Regular cleaning ensures hygiene and proper operation:
- Unplug the feeder from the power outlet before cleaning.
- Remove the food bowl and wash it with mild soap and water. Rinse thoroughly and dry completely before reattaching.
- Wipe the interior of the food barrel with a clean, damp cloth. Ensure no food residue remains. Dry thoroughly.
- Wipe the exterior of the feeder with a soft, dry cloth. Do not use abrasive cleaners or immerse the main unit in water.
7.2 Refilling Food
Monitor the food level regularly. When the food barrel is low, refill it as described in Section 5.4. Ensure the lid is closed tightly after refilling.
8. Troubleshooting
- Feeder is offline in the app:
- Check if the feeder is powered on and connected to a stable Wi-Fi network.
- Ensure your Wi-Fi router is functioning correctly and the feeder is within range.
- Restart the feeder by unplugging and replugging it.
- If the issue persists, try re-pairing the device with the app (refer to Section 5.3).
- Food not dispensing:
- Check if the food barrel has enough food.
- Ensure the food outlet is not blocked by food particles or debris.
- Verify that the scheduled feeding times are correctly set in the app.
- Confirm the feeder is online and connected to the app.
- Camera shows black and white image:
- The camera may automatically switch to night vision (black and white) in low-light conditions.
- Ensure there is sufficient ambient light in the room for a color image.
- Voice recording not working:
- Ensure you are pressing and holding the 'REC' button correctly.
- Check the app settings for any microphone permissions or recording options.
9. Specifications
| Feature | Specification |
|---|---|
| Brand | MOXNICE |
| Model | B08DTYYG16 |
| Material | Polyethylene Terephthalate |
| Capacity | 8 Liters (approx. 4.0KG dry food) |
| Product Dimensions | 38.15 x 22.45 x 36.28 cm |
| Weight | 3.06 kg |
| Target Species | Cat, Puppy |
| Recommended Use | Dry Food (diameter < 12mm) |
| Special Features | HD Camera, Voice Recording, App Control, Scheduled Feeding |
10. Warranty and Support
For warranty information and customer support, please refer to the documentation included with your purchase or contact MOXNICE customer service directly. Keep your purchase receipt as proof of purchase for any warranty claims.