1. Introduction and Overview
The WORKPRO 20V Cordless Angle Grinder Kit is a versatile and portable power tool designed for grinding, cutting, and polishing various materials. Its cordless design offers freedom of movement for both indoor and outdoor applications. Equipped with a powerful 20V 4.0Ah Lithium-Ion battery and a fast charger, this tool ensures stable and long-lasting performance. This manual provides essential information for safe and effective operation, maintenance, and troubleshooting to help you achieve optimal results.

Figure 1.1: Complete WORKPRO 20V Cordless Angle Grinder Kit.
2. Important Safety Information
Always read and understand all safety warnings and instructions before operating this power tool. Failure to follow the warnings and instructions may result in electric shock, fire, and/or serious injury.
2.1 General Power Tool Safety
- Work Area Safety: Keep your work area clean and well-lit. Cluttered or dark areas invite accidents. Do not operate power tools in explosive atmospheres, such as in the presence of flammable liquids, gases, or dust.
- Electrical Safety: Avoid body contact with earthed or grounded surfaces (e.g., pipes, radiators, ranges, refrigerators). There is an increased risk of electric shock if your body is earthed or grounded.
- Personal Safety: Always wear eye protection. Use hearing protection when operating the tool for extended periods. Wear appropriate clothing; avoid loose clothing or jewelry. Keep hair, clothing, and gloves away from moving parts.
- Tool Use and Care: Do not force the power tool. Use the correct power tool for your application. It will do the job better and safer at the rate for which it was designed. Disconnect the battery pack from the power tool before making any adjustments, changing accessories, or storing power tools.
2.2 Specific Angle Grinder Safety
- Always use the guard provided with the tool. Ensure the guard is securely attached and positioned for maximum safety.
- Use only grinding wheels and cutting discs that are specifically designed for an angle grinder and are rated for the tool's maximum RPM.
- Secure the workpiece. Use clamps or a vise to hold the workpiece firmly. This frees both hands to operate the tool safely.
- Maintain a firm grip on the tool with both hands during operation.
- Be aware of kickback. Kickback is a sudden reaction to a pinched or snagged rotating wheel. Always maintain proper footing and balance.
3. Package Contents
Your WORKPRO 20V Cordless Angle Grinder Kit includes the following components:
- 1 x Cordless Angle Grinder
- 1 x 4.0Ah Lithium-Ion Battery
- 1 x Fast Charger
- 1 x Rubberized 3-Position Anti-Slip Auxiliary Handle
- 1 x Grinding Wheel Protector
- 1 x Cutting Wheel Protector
- 5 x Metal Cutting Wheels (4-1/2”)
- 5 x Grinding Wheels (4-1/2”)
- 1 x Spanner

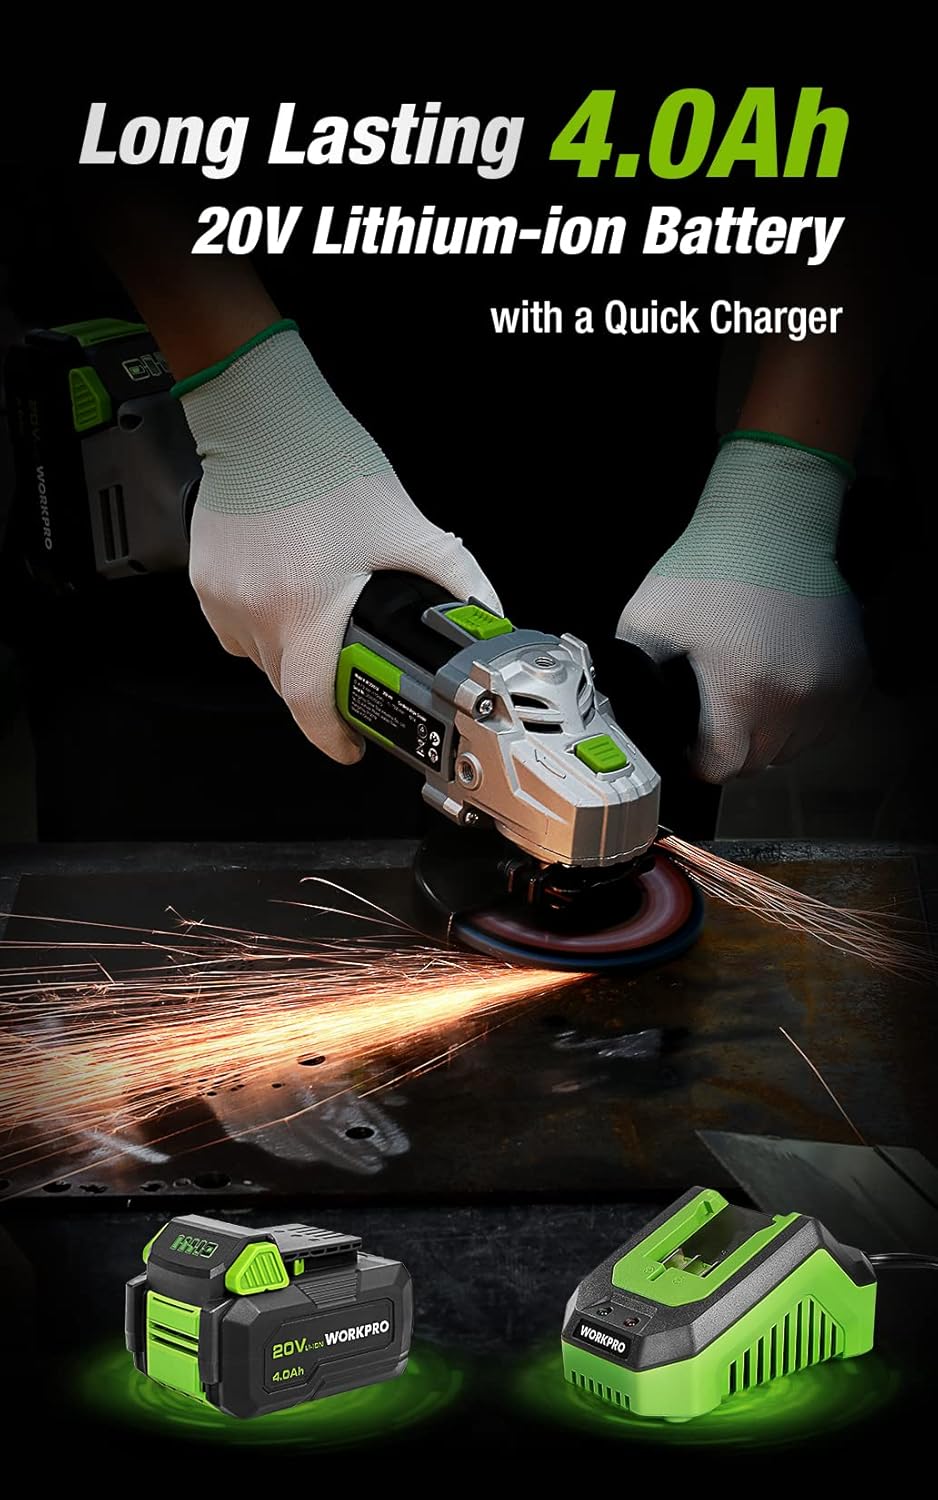
Figure 3.1: Included discs, guards, and spanner. Figure 3.2: 4.0Ah Lithium-Ion Battery and Fast Charger.
Video 3.1: An overview of the WORKPRO 20V Cordless Angle Grinder Kit and its components.
4. Setup
4.1 Attaching the Auxiliary Handle
The auxiliary handle can be installed in three different positions (left, right, or top) to provide optimal comfort and control for various tasks and user preferences. Simply screw the handle into the desired threaded opening on the grinder head.

Figure 4.1: The 3-position anti-slip auxiliary handle for enhanced ergonomics.
4.2 Installing Wheel Guards
Select the appropriate wheel guard (grinding or cutting) for your task. The guards feature a quick-installation mechanism that does not require additional tools. Align the guard with the grinder head and snap it into place, ensuring it is securely fastened and positioned to deflect sparks and debris away from you.
4.3 Installing Grinding/Cutting Discs
- Ensure the battery is removed from the grinder.
- Press and hold the spindle lock button located on the grinder head.
- Place the inner flange onto the spindle.
- Position the desired grinding or cutting disc onto the spindle, ensuring it sits flush against the inner flange.
- Place the outer flange onto the spindle, on top of the disc.
- Use the provided spanner to tighten the outer flange clockwise until the disc is securely fastened. Release the spindle lock.
4.4 Charging the Battery
Before first use, fully charge the 4.0Ah Lithium-Ion battery. Connect the fast charger to a standard power outlet. Slide the battery pack onto the charger until it clicks into place. The charger's indicator light will show the charging status (e.g., red for charging, green for fully charged). Once fully charged, remove the battery from the charger.
Video 4.1: Demonstrates the quick installation of the guard and disc, and battery charging process.
5. Operating Instructions
5.1 Powering On/Off
The angle grinder features an ergonomic two-step operational switch located in the center of the top for convenient access by both left- and right-handed users. To turn the tool ON, push the switch forward and then up. To turn the tool OFF, simply push the switch down.

Figure 5.1: The two-step operational switch for safe and convenient use.
5.2 Grinding Operations
For grinding tasks, ensure the grinding wheel protector is installed and a grinding disc is securely attached. Hold the grinder firmly with both hands, maintaining a stable stance. Apply light, even pressure to the workpiece, allowing the 7500 RPM speed to do the work. Move the grinder smoothly across the surface to achieve desired results. The tool's lightweight design (3.5 pounds without battery) helps reduce hand pressure during extended use.


Figure 5.2: Grinding metal with the WORKPRO Angle Grinder, demonstrating sparks and stable operation.
5.3 Cutting Operations
When cutting, use the cutting wheel protector and a suitable cutting disc. Position the workpiece securely. Start the grinder before making contact with the material. Guide the disc through the material with steady, controlled movements. Avoid twisting or binding the disc, which can cause kickback. The tool's ergonomic design and rubberized grip provide a better user experience during cutting tasks.
Video 5.1: Demonstrates metal grinding and cutting, as well as PVC cutting, highlighting flexible use.
6. Maintenance
Regular maintenance ensures the longevity and optimal performance of your WORKPRO Angle Grinder.
6.1 Cleaning
- After each use, clean the tool with a soft, dry cloth.
- Periodically clear dust and debris from the ventilation openings to ensure proper heat dissipation. The grinder features a stereo circulating heat dissipation system with multiple vents for more uniform heat dissipation.
- Do not use water or chemical cleaners.

Figure 6.1: Stereo Circulating Heat Dissipation through multiple vents.
6.2 Battery Care
- Store batteries in a cool, dry place away from direct sunlight and extreme temperatures.
- Do not store fully discharged batteries for long periods. Recharge them periodically.
- Avoid exposing the battery to moisture or water.
6.3 Disc Inspection and Replacement
- Inspect grinding and cutting discs before each use for cracks, chips, or excessive wear. Replace damaged or worn discs immediately.
- Always use the correct type and size of disc for your application.
7. Troubleshooting
This section addresses common issues you might encounter with your angle grinder.
| Problem | Possible Cause | Solution |
|---|---|---|
| Tool does not start | Battery not charged Battery not properly inserted Switch not fully engaged | Charge battery fully Ensure battery is clicked into place Push switch fully forward and up |
| Reduced performance/speed | Low battery charge Overheating Worn or incorrect disc | Recharge battery Allow tool to cool down; clear vents Replace disc with appropriate type |
| Excessive vibration | Damaged or unbalanced disc Improperly installed disc/flanges | Replace disc Reinstall disc and flanges correctly, ensuring spindle lock is released |
8. Specifications
Technical details for the WORKPRO 20V Cordless Angle Grinder Kit:
- Brand: WORKPRO
- Model Number: W125051A
- Power Source: Battery Powered
- Battery Type: 20V 4.0Ah Lithium-Ion
- Maximum Rotational Speed: 7500 RPM
- Disc Diameter: 4-1/2 inches
- Material: Aluminum (housing)
- Color: Green
- Item Weight (without battery): 3.5 pounds (approx. 1.59 kg)
- Product Dimensions: 13.58"L x 5.91"W x 7.48"H
- Manufacturer: HANZGHOU GREATSTAR INDUSTRIAL CO.LTD
- UPC: 820909764120
9. Warranty and Support
For detailed warranty information or technical support, please refer to the official user guide PDF provided with your product or visit the WORKPRO website. You can access the user guide here.


