1. Introduction
Thank you for choosing the Walfront Q1 True-RMS Digital Multimeter. This device is designed for accurate measurement of various electrical parameters, including AC/DC voltage, AC/DC current, resistance, and temperature. It also features continuity and diode test functions. This manual provides essential information for safe and effective operation of your multimeter.
2. Safety Information
Please read all safety warnings and operating instructions carefully before using this product. Failure to follow these instructions may result in electric shock, fire, or serious injury.
- Do NOT exceed the maximum input values stated in the specifications for any measurement function.
- In current mode, diode mode, continuity mode, or temperature mode, DO NOT apply power to the circuit being tested.
- DO NOT use the product if the batteries or battery cover are not properly installed.
- Turn the product off and remove the test leads from the test points before changing batteries or fuses.
- The input voltage must NOT exceed 36 V DC or 25 V AC when in the current measurement setting.
- Always ensure the correct function and range are selected before making a measurement.
- Use caution when working with voltages above 30V AC RMS, 42V peak, or 60V DC. These voltages pose a shock hazard.
3. Product Overview
The Walfront Q1 Digital Multimeter is a compact and versatile tool for electrical measurements. It features a large digital display with an analog bar graph, auto-ranging capabilities, and various measurement functions.

Figure 3.1: Front view of the Walfront Q1 True-RMS Digital Multimeter, showing the display, function buttons, and input jacks.

Figure 3.2: The Walfront Q1 Digital Multimeter accompanied by its various accessories, including test leads, temperature probe, and storage case.
3.1 Components
- Digital Display: Shows measurement values, units, and function indicators. Includes an analog bar graph.
- Function Buttons: For selecting measurement modes, range, data hold, and other features.
- Input Jacks: Terminals for connecting test leads (COM, VΩHz, mA, µA).
- Test Leads: Red and black leads for connecting to circuits.
- Temperature Probe: For temperature measurements.
- Storage Case: For protecting and carrying the multimeter and its accessories.
4. Setup
4.1 Battery Installation
The multimeter requires batteries for operation. Ensure the device is powered off and test leads are disconnected before proceeding.
- Locate the battery compartment on the back of the multimeter.
- Use a screwdriver to open the battery cover.
- Insert the required batteries, observing correct polarity (+ and -).
- Replace the battery cover and secure it with the screw.

Figure 4.1: View of the battery compartment on the back of the multimeter, showing where batteries are inserted.
5. Operating Instructions
5.1 Power On/Off
- To power on the multimeter, press the red power button.
- To power off, press and hold the red power button for more than 2 seconds. The device also features an auto-power-off function to conserve battery life.
5.2 General Measurement Steps
- Connect the black test lead to the 'COM' input jack.
- Connect the red test lead to the appropriate input jack for your measurement (e.g., 'VΩHz' for voltage/resistance, 'mA' or 'µA' for current).
- Select the desired measurement function using the function buttons. The multimeter features auto-ranging, which automatically selects the correct measurement range.
- Connect the test leads to the circuit or component you wish to measure.
- Read the measurement value on the digital display.
5.3 Specific Measurement Functions
- Voltage Measurement (AC/DC): Select the voltage function. Connect leads in parallel with the circuit. The multimeter can accurately measure AC and DC voltage.
- Current Measurement (AC/DC): Select the current function (mA or µA). Connect leads in series with the circuit. Caution: Ensure the circuit is de-energized before connecting leads for current measurement.
- Resistance Measurement: Select the resistance function. Connect leads across the component. Ensure the component is isolated from power.
- Temperature Measurement: Select the temperature function (often labeled °C/°F). Connect the temperature probe to the appropriate input jacks. Place the probe in contact with the object whose temperature is to be measured.
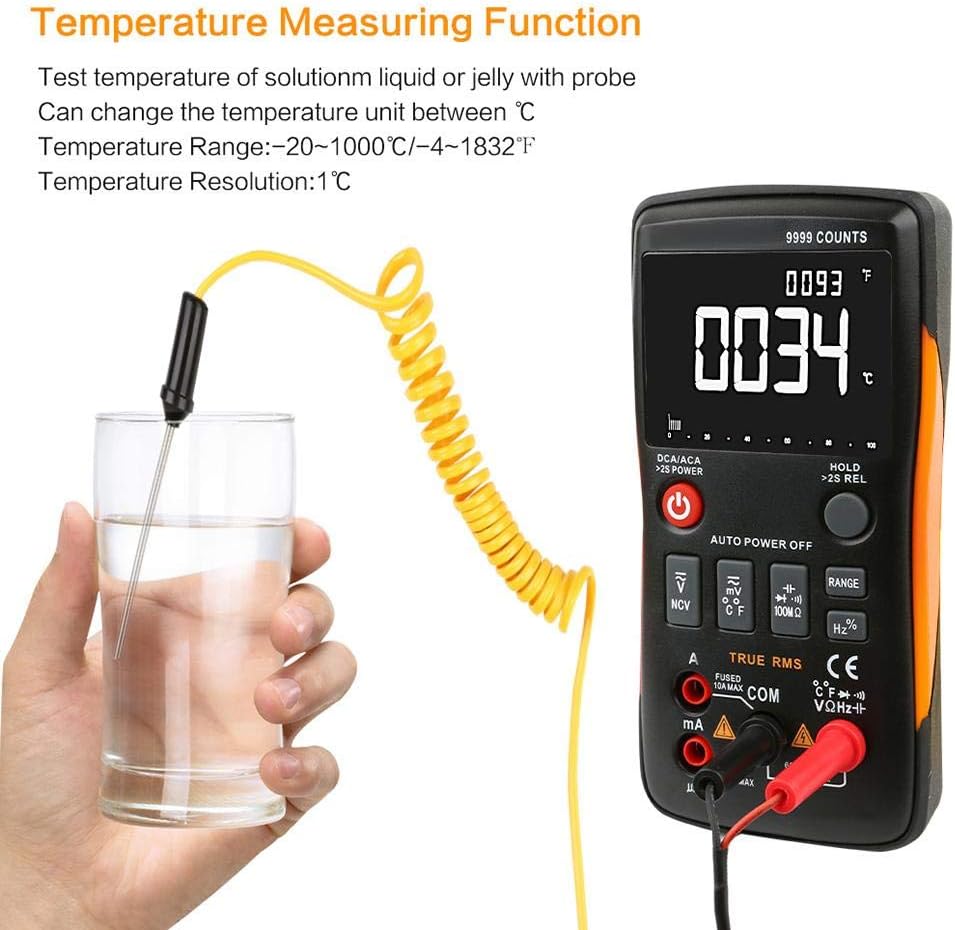
Figure 5.1: The multimeter displaying a temperature reading while the probe is immersed in a liquid, demonstrating its temperature measurement capability.
- Continuity Test: Select the continuity function. The multimeter will emit an audible tone if a continuous path exists (low resistance).
- Diode Test: Select the diode function. Connect leads across the diode to measure its forward voltage drop.

Figure 5.2: A technician using the Walfront Q1 Digital Multimeter to test an electrical component, highlighting its practical application.
5.4 Additional Features
- Data Hold: Press the 'HOLD' button to freeze the current display reading. Press again to release.
- Maximum Hold: Some models may offer a maximum hold function to capture the highest reading. Refer to the specific button labels on your device.
- Backlight: The display backlight can be activated for better visibility in low-light conditions.
6. Maintenance
6.1 Cleaning
Wipe the multimeter casing with a damp cloth and mild detergent. Do not use abrasives or solvents. Ensure the device is dry before use.
6.2 Battery Replacement
When the low battery indicator appears on the display, replace the batteries as described in Section 4.1. Always use the specified battery type.
6.3 Fuse Replacement
If the current measurement function stops working, the fuse may need replacement. Refer to the safety warnings regarding fuse replacement. Only replace with a fuse of the specified type and rating.
7. Troubleshooting
- No Display: Check battery installation and charge level. Replace batteries if necessary.
- Incorrect Readings: Ensure test leads are properly connected to the correct input jacks and the correct function is selected. Verify the circuit is properly connected.
- No Current Measurement: Check the fuse. Replace if blown.
- 'OL' or 'OVERLOAD' on Display: The measured value exceeds the selected range. The auto-ranging feature should typically handle this, but if it persists, ensure the input is within the device's maximum specifications.
8. Specifications
| Specification | Value |
|---|---|
| Brand | Walfront |
| Model Number | Walfrontq0gb3sz4rt |
| Power Source | Battery Powered |
| Style | Digital |
| Item Weight | 400 Grams (14.1 ounces) |
| Item Dimensions (L x W x H) | 5.71 x 2.87 x 1.18 inches |
| Measurement Type | Multimeter (True-RMS) |
| Upper Temperature Rating | 40 Degrees Celsius (approx.) |
| Display Counts | 9999 Counts |
| Auto Ranging | Yes |
| Data Hold | Yes |
| Backlight | Yes |
9. Warranty and Support
For warranty information and technical support, please refer to the documentation included with your purchase or contact Walfront customer service directly. Keep your purchase receipt for warranty claims.
