1. Introduction
This manual provides essential instructions for the safe and efficient operation, installation, and maintenance of your ATLAS Automotive Equipment 9KBPX 2-Post Lift/Hoist. Please read this manual thoroughly before installation or operation to ensure proper usage and to prevent potential hazards.
2. Safety Information
Always prioritize safety when operating the lift. Failure to follow safety guidelines can result in serious injury or equipment damage.
- Read the Manual: Understand all operating and safety procedures before use.
- Qualified Personnel: Installation and major maintenance should only be performed by qualified technicians.
- Proper Foundation: Ensure the concrete floor meets minimum thickness and strength requirements for anchoring.
- Load Capacity: Never exceed the 9,000 lbs (4082 kg) maximum lifting capacity.
- Vehicle Positioning: Always center the vehicle on the lift arms and ensure proper contact with the lift points.
- Safety Locks: Always engage the safety locks after raising the vehicle to the desired height. The lift is equipped with a spring-loaded Secondary Lock System (SLS) that automatically engages if a chain slackens or breaks.
- Overhead Clearance: Be aware of the minimum ceiling height requirement (9'6") and ensure adequate clearance for the vehicle being lifted. The lift includes a safety feature that will shut off the system if the vehicle reaches an excessive height, preventing damage.
- Clear Area: Keep the area around the lift clear of personnel and obstructions during operation.
- Emergency Stop: Familiarize yourself with the location and operation of the emergency stop control.
3. Product Overview and Features
The ATLAS 9KBPX is a robust 2-post baseplate style lift designed for versatility and reliability in automotive service environments, particularly those with lower ceiling heights.
- Compact Design: Baseplate style allows for installation in garages with ceilings as low as 9'6".
- High Capacity: 9,000 lbs lifting capacity suitable for a wide range of vehicles, from small cars to light-duty trucks.
- Symmetric Arms: Equipped with symmetric arms and automatic arm restraints for stable and secure vehicle positioning.
- Dual Hydraulic Chain Drive: Utilizes dual hydraulic chain drive cylinders for smooth and powerful lifting.
- Included Accessories: Comes with an 8-piece truck adapter set and essential mounting hardware.
- Chain Over Roller System: Features a chain over roller piston lift carriage system for reliable operation.
- Cable Equalization: A cable equalization system ensures synchronized locking and evenly raised arms.

Figure 1: ATLAS 9KBPX 2-Post Lift with a black SUV in a raised position.
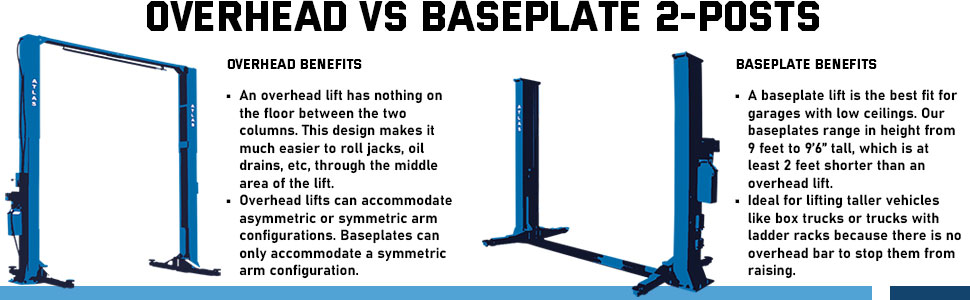
Figure 2: Comparison of Overhead vs. Baseplate 2-Post Lifts, highlighting the baseplate's suitability for low ceilings and lifting taller vehicles without overhead obstruction.
4. Specifications
| Feature | Detail |
|---|---|
| Model | 9KBPX (XH-9KBPX) |
| Lifting Capacity | 9,000 lbs (4082 kg) |
| Minimum Ceiling Height | 9'6" (2.90 m) |
| Max Lifting Height (Standard) | 74 1/2" (6' 2 1/2") |
| Max Lifting Height (with Truck Adapters) | 80 3/4" (6' 8 3/4") |
| Overall Height | 111 1/2" (9' 3 1/2") |
| Width Outside Columns | 124 7/8" (10' 4 7/8") |
| Width Inside Columns | 110" (9' 2") |
| Drive Thru Width | 101" (8' 5") |
| Overall Width (with Power Unit) | 142" (11' 10") |
| Thickness of Column Steel | 0.2" |
| Item Weight | 1450 pounds (657.7 kg) |
| Product Dimensions | 113 x 40 x 22 inches (287 x 101.6 x 55.9 cm) |

Figure 3: Detailed dimensions of the ATLAS 9KBPX 2-Post Lift, including overall height, width, and drive-thru width.

Figure 4: Close-up view of the chain over roller piston lift carriage system, illustrating the hydraulic fluid mechanism and cable equalization.
5. Setup and Installation
Proper installation is critical for the safe and reliable operation of your lift. Refer to the detailed instructions provided in the separate installation guide for comprehensive steps. Key steps include:
- Unpacking and Inspection: Carefully unpack all components and inspect for any shipping damage or missing parts.
- Site Preparation: Ensure the installation site has a level concrete foundation of adequate thickness and strength, as specified in the installation guide.
- Column Placement and Anchoring: Position the columns accurately and secure them to the concrete floor using the provided anchor bolts.
- Floor Plate Installation: Install the floor plate between the columns, ensuring proper alignment and securing it with screws.
- Hydraulic System Setup: Install the power unit, connect the hydraulic hoses, and fill the reservoir with the recommended hydraulic oil.
- Cable Routing: Route the equalization cables and safety tripwires according to the diagrams, ensuring they are free from obstructions and properly tensioned.
- Lifting Arm Installation: Attach the symmetric lifting arms to the carriages, ensuring the pins are securely in place and the spring retainers are installed.
- Electrical Connection: Connect the power unit to the appropriate electrical supply as per local codes and the manufacturer's specifications.
- Initial Test Run: Perform a test run without a vehicle to check for proper operation, fluid levels, and engagement of safety mechanisms.
6. Operating Instructions
Follow these steps for safe and effective operation of your ATLAS 9KBPX lift:
- Prepare the Vehicle: Drive the vehicle onto the lift, ensuring it is centered between the columns.
- Position Lift Arms: Swing the symmetric arms into position, ensuring the lift pads make solid contact with the vehicle's designated lift points. Use the included truck adapters or height adjustment pads as needed to achieve proper contact and clearance.
- Raise the Vehicle: Press and hold the 'UP' button on the power unit. The lift will raise, and you will hear the safety locks engage at various intervals.
- Engage Safety Locks: Once the vehicle reaches the desired working height, slightly lower the lift until the safety locks fully engage and the weight of the vehicle rests on them. This is indicated by an audible 'click' and the lift settling slightly.
- Lower the Vehicle: To lower the vehicle, first slightly raise the lift to disengage the safety locks. Then, pull the safety release handle and simultaneously press the pressure relief handle on the power unit. The vehicle will begin to descend. Ensure the area beneath the vehicle is clear.
- Remove Vehicle: Once the lift arms are fully lowered, carefully drive the vehicle off the lift.
7. Maintenance and Care Instructions
Regular maintenance ensures the longevity and safe operation of your lift.
- Daily Use: Check if the safety device can lock into place and if the linkage is functioning properly. If there are any potential hazards, repair or replace them promptly.
- Weekly Inspection: Inspect the steel wire for looseness or broken strands. Observe the sliding blocks on the internal platform of the columns and apply grease as needed. If wear on one side exceeds 20%, it will no longer be securely gripped by the columns and should be replaced in a timely manner.
- Bi-Weekly Check: Inspect all hydraulic hose connections for leaks or ruptures, and repair or replace them as necessary.
- Monthly Maintenance: Check if all screws and nuts are tightened properly. After a test run, retighten all screws and nuts.
8. Troubleshooting
This section provides basic troubleshooting steps for common issues. For complex problems, contact qualified service personnel.
- Lift Does Not Raise: Check power supply, hydraulic fluid level, and ensure no safety mechanisms are engaged preventing upward movement.
- Lift Lowers Unevenly: Inspect equalization cables for proper tension and condition. Check hydraulic system for leaks or air.
- Unusual Noises: Investigate any grinding, squealing, or clunking sounds. This may indicate worn components, lack of lubrication, or mechanical interference.
- Hydraulic Leaks: Immediately identify and repair any hydraulic fluid leaks. Check hose connections, seals, and cylinders.
9. Warranty and Support
For warranty information, technical support, or to order replacement parts, please contact ATLAS Automotive Equipment customer service. Keep your purchase receipt and model number (9KBPX) readily available when contacting support.
Manufacturer: Atlas Automotive Equipment
Contact Information: Refer to your purchase documentation or the manufacturer's official website for the most current support details.


