Introduction
Thank you for purchasing the DIGITNOW Digital Turntable Stylus Force Scale Gauge. This precision instrument is designed to accurately measure the tracking force of your turntable's tonearm, ensuring optimal playback performance and prolonging the life of your vinyl records and cartridge. With its high accuracy and easy-to-read display, it is an essential tool for any audiophile.
Safety Information
- Keep the device away from water and excessive moisture.
- Do not expose to extreme temperatures or direct sunlight.
- Handle with care; this is a precision instrument.
- Keep out of reach of children.
- Dispose of batteries properly according to local regulations.
Package Contents
- DIGITNOW Digital Turntable Stylus Force Scale Gauge
- Calibration Weight (5g)
- Button Batteries (2x)
- Protective Leather Sheath
Product Overview
The DIGITNOW Stylus Force Gauge features a compact design with a clear LCD backlight display for easy reading. It includes a non-magnetic weighing platform and intuitive controls for mode selection and tare function.

Image: The DIGITNOW Digital Turntable Stylus Force Scale Gauge, showcasing its compact design, blue LCD display, and the weighing platform with the protective cover detached.

Image: Detailed view of the stylus force gauge, pointing out the mode (M), power (circle with line), and tare (T) buttons, the non-magnetic aluminum weighing platform, and the considerate protective cover design.

Image: The stylus force gauge positioned on a turntable platter, with a tonearm's cartridge resting on its weighing platform, demonstrating its use. The blue LCD clearly shows a reading of "5.00".
Setup
1. Battery Installation
- Locate the battery compartment on the underside of the gauge.
- Open the battery cover.
- Insert the two included button batteries (e.g., AG12 or LR43) according to the polarity markings (+/-).
- Close the battery cover securely.
2. Calibration
It is recommended to calibrate the gauge before first use and periodically thereafter to ensure accuracy.
- Place the gauge on a stable, level surface.
- Press the power button to turn on the gauge. Wait for the display to show "0.00".
- Press and hold the 'M' (Mode) button until the display shows "CAL".
- Release the 'M' button. The display will then flash "5.00g" (or the calibration weight value).
- Carefully place the included 5g calibration weight onto the center of the weighing platform.
- The display will show "PASS" and then return to "0.00g". Calibration is complete.
- Remove the calibration weight.

Image: A visual guide illustrating the setup steps: (1) Opening the battery compartment and inserting batteries, (2) Placing the calibration weight on the scale, and (3) The scale ready for use with a turntable.
Operating Instructions
- Place the stylus force gauge on the turntable platter, ensuring it is level and stable. For accurate measurement, the height of the weighing platform should ideally be at the same level as a record surface.
- Press the power button to turn on the gauge. The display will show "0.00g".
- If the display does not show "0.00g", press the 'T' (Tare) button to zero the reading.
- Gently lower the tonearm's stylus onto the center of the weighing platform. Ensure the stylus tip rests directly on the small circular indentation on the platform.
- Read the tracking force value displayed on the LCD screen.
- Adjust your turntable's tonearm counterweight or anti-skate settings as needed to achieve your desired tracking force. Refer to your turntable and cartridge manufacturer's recommendations for optimal tracking force.
- Once measurement is complete, gently lift the tonearm.
- The gauge will automatically turn off after a period of inactivity to conserve battery life. You can also press the power button to turn it off manually.
Changing Measurement Units
Press the 'M' (Mode) button repeatedly to cycle through available measurement units: grams (g), ounces (oz), troy ounces (ozt), pennyweights (dwt), carats (ct), grains (gn), and taels (TL).

Image: A composite image demonstrating the stylus force gauge in action on various turntables, highlighting its role in accurately setting tracking force for optimal vinyl playback and cartridge longevity.
Maintenance
- Cleaning: Use a soft, dry cloth to clean the surface of the gauge. Do not use abrasive cleaners or immerse the device in water.
- Storage: Store the gauge in its protective leather sheath when not in use to prevent dust and damage. Keep it in a cool, dry place.
- Battery Replacement: If the display becomes dim or the gauge does not turn on, replace both batteries.
Troubleshooting
| Problem | Possible Cause | Solution |
|---|---|---|
| Gauge does not turn on. | Dead or incorrectly installed batteries. | Check battery polarity; replace batteries. |
| Inaccurate readings. | Not calibrated; unstable surface; external vibrations; dirty platform. | Perform calibration; place on a stable, level surface; avoid vibrations; clean the weighing platform. |
| Display shows "O-Ld" (Overload). | Weight exceeds maximum capacity (5.00g). | Remove excess weight immediately to prevent damage. |
| Display shows "UnSt" (Unstable). | Unstable surface or vibrations. | Place the gauge on a firm, level surface free from vibrations. |
Specifications
- Model: M006-US-X
- Capacity: 0.01g - 5.00g
- Accuracy: ±0.01g
- Units: g, oz, ozt, dwt, ct, gn, TL
- Display: Blue LCD Backlight
- Power: 2 x Button Batteries (e.g., AG12/LR43)
- Auto Off: Yes (after inactivity)
- Dimensions: Approximately 3.78"L x 1.65"W x 0.71"H (96mm x 42mm x 18mm)
- Weight: Approximately 2.39 ounces
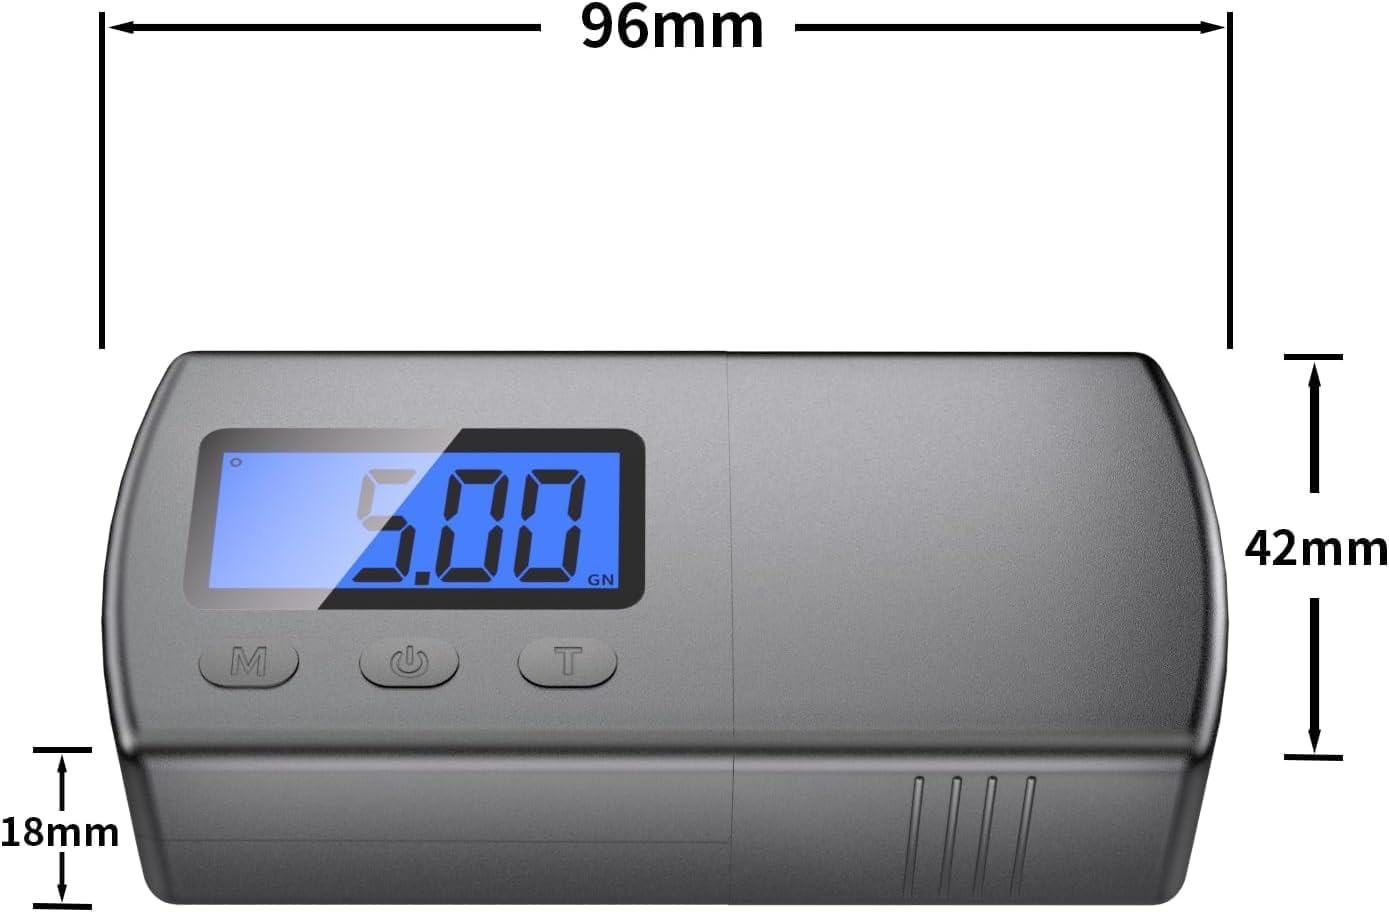
Image: Technical drawing illustrating the precise dimensions of the stylus force gauge in millimeters.
Warranty and Support
For warranty information or technical support, please contact DIGITNOW customer service. Refer to the product packaging or the official DIGITNOW website for contact details.
Website: www.digitnow.com (Example link, actual link may vary)


