
Retevis RT85
Retevis RT85 Dual Band Two Way Radio Instruction Manual
Model: RT85 | Brand: Retevis
Introduction
This manual provides detailed instructions for the safe and efficient operation of your Retevis RT85 Dual Band Two Way Radio. Please read this manual thoroughly before using the device to ensure proper function and to prevent damage.
Package Contents
Verify that all items listed below are included in your package:
- 1 x RT85 two-way radio
- 1 x Battery
- 1 x Antenna
- 1 x Charger
- 1 x User Manual (this document)
- 1 x Sling

Product Overview
Familiarize yourself with the various parts and controls of your Retevis RT85 radio.
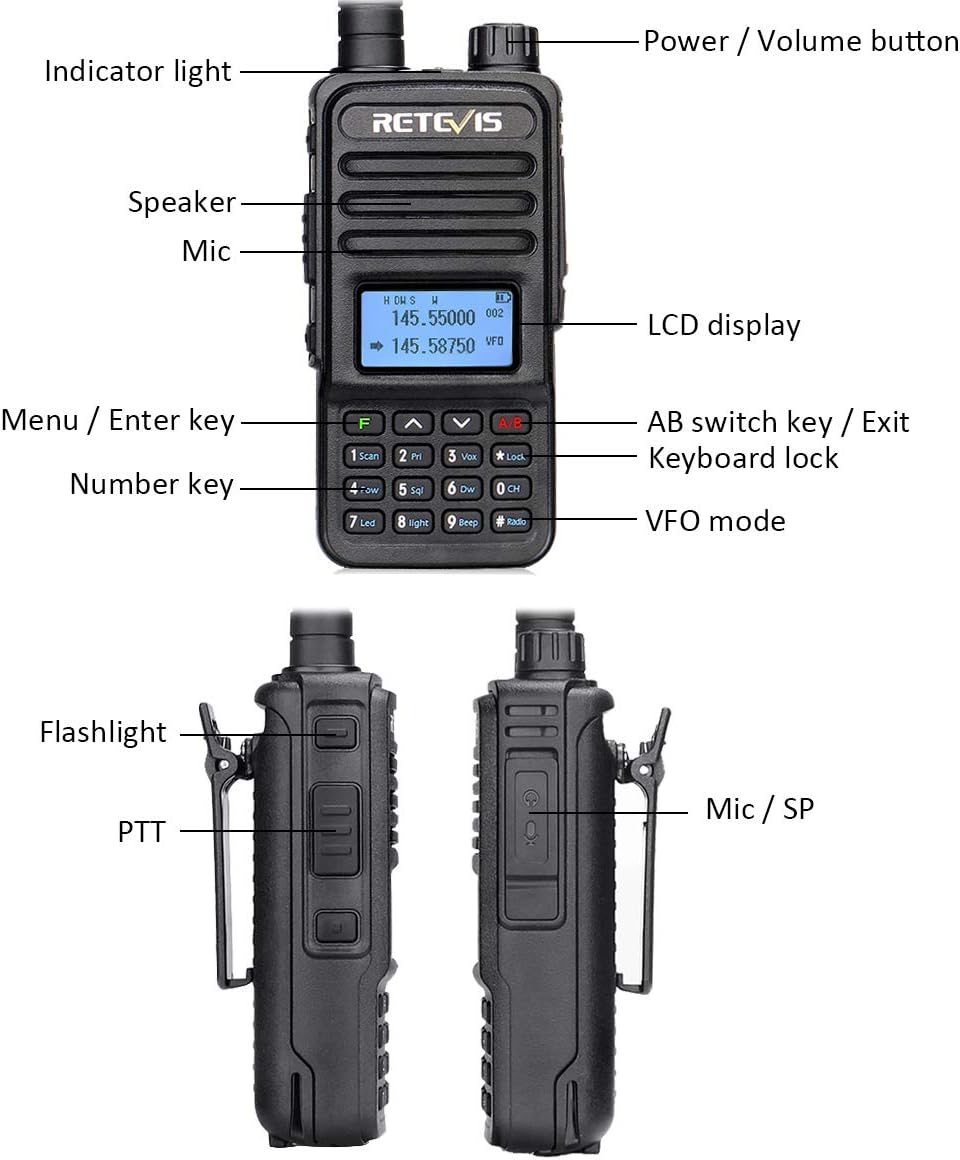
- Indicator Light: Shows radio status (e.g., transmitting, receiving, charging).
- Power / Volume Button: Turns the radio on/off and adjusts audio volume.
- Speaker: Outputs audio.
- Mic: Microphone for voice input.
- LCD Display: Shows frequency, channel, and other operational information.
- Menu / Enter Key: Accesses and confirms menu selections.
- AB Switch Key / Exit: Switches between A and B frequency bands or exits menu.
- Keyboard Lock: Locks/unlocks the keypad.
- Number Keys: For direct frequency input and menu navigation.
- VFO Mode: Variable Frequency Oscillator mode for direct frequency tuning.
- Flashlight: Built-in LED light for illumination.
- PTT (Push-to-Talk) Button: Press to transmit, release to receive.
- Mic / SP Jack: Port for external microphone or speaker accessories.
Setup
1. Battery Installation
- Align the battery pack with the grooves on the back of the radio.
- Slide the battery pack upwards until it clicks into place.
- To remove, press the battery release latch and slide the battery downwards.

2. Antenna Installation
- Screw the antenna clockwise into the connector on the top of the radio until it is finger-tight. Do not overtighten.
3. Charging the Battery
- Insert the AC adapter into a power outlet.
- Place the radio (with battery installed) or the battery alone into the charging tray.
- The indicator light on the charger will show charging status (typically red for charging, green for fully charged).
- A full charge typically takes several hours.

Operating Instructions
Power On/Off and Volume Control
- To power on, rotate the Power/Volume knob clockwise.
- To power off, rotate the Power/Volume knob counter-clockwise until it clicks.
- Adjust the volume by rotating the Power/Volume knob.
Channel Selection and Dual Band Operation
- The RT85 supports 200 channels. Use the Up/Down arrow keys or the number pad to select a channel.
- Press the A/B key to switch between the A (upper) and B (lower) frequency displays for dual-band monitoring.
- In VFO (Variable Frequency Oscillator) mode, you can directly input frequencies using the number pad.
VOX Function (Voice Operated Transmit)
VOX allows transmission without pressing the PTT button. The radio will transmit automatically when it detects your voice.
- To activate/deactivate VOX, navigate to the VOX setting in the menu and select the desired level.
Keyboard Lock
The keyboard lock prevents accidental key presses.
- Press and hold the #Lock key to toggle the keyboard lock on or off.
Emergency Alarm Function
In an emergency, the alarm function can be activated to alert others.
- Refer to the radio's menu for specific instructions on activating the emergency alarm.
LED Flashlight
The built-in LED flashlight provides convenient illumination.

- To turn the flashlight on/off, press the dedicated flashlight button (refer to the product overview diagram for location).
Programming with CHIRP
The Retevis RT85 supports programming via CHIRP software, allowing for easy management of channels and settings from a computer.
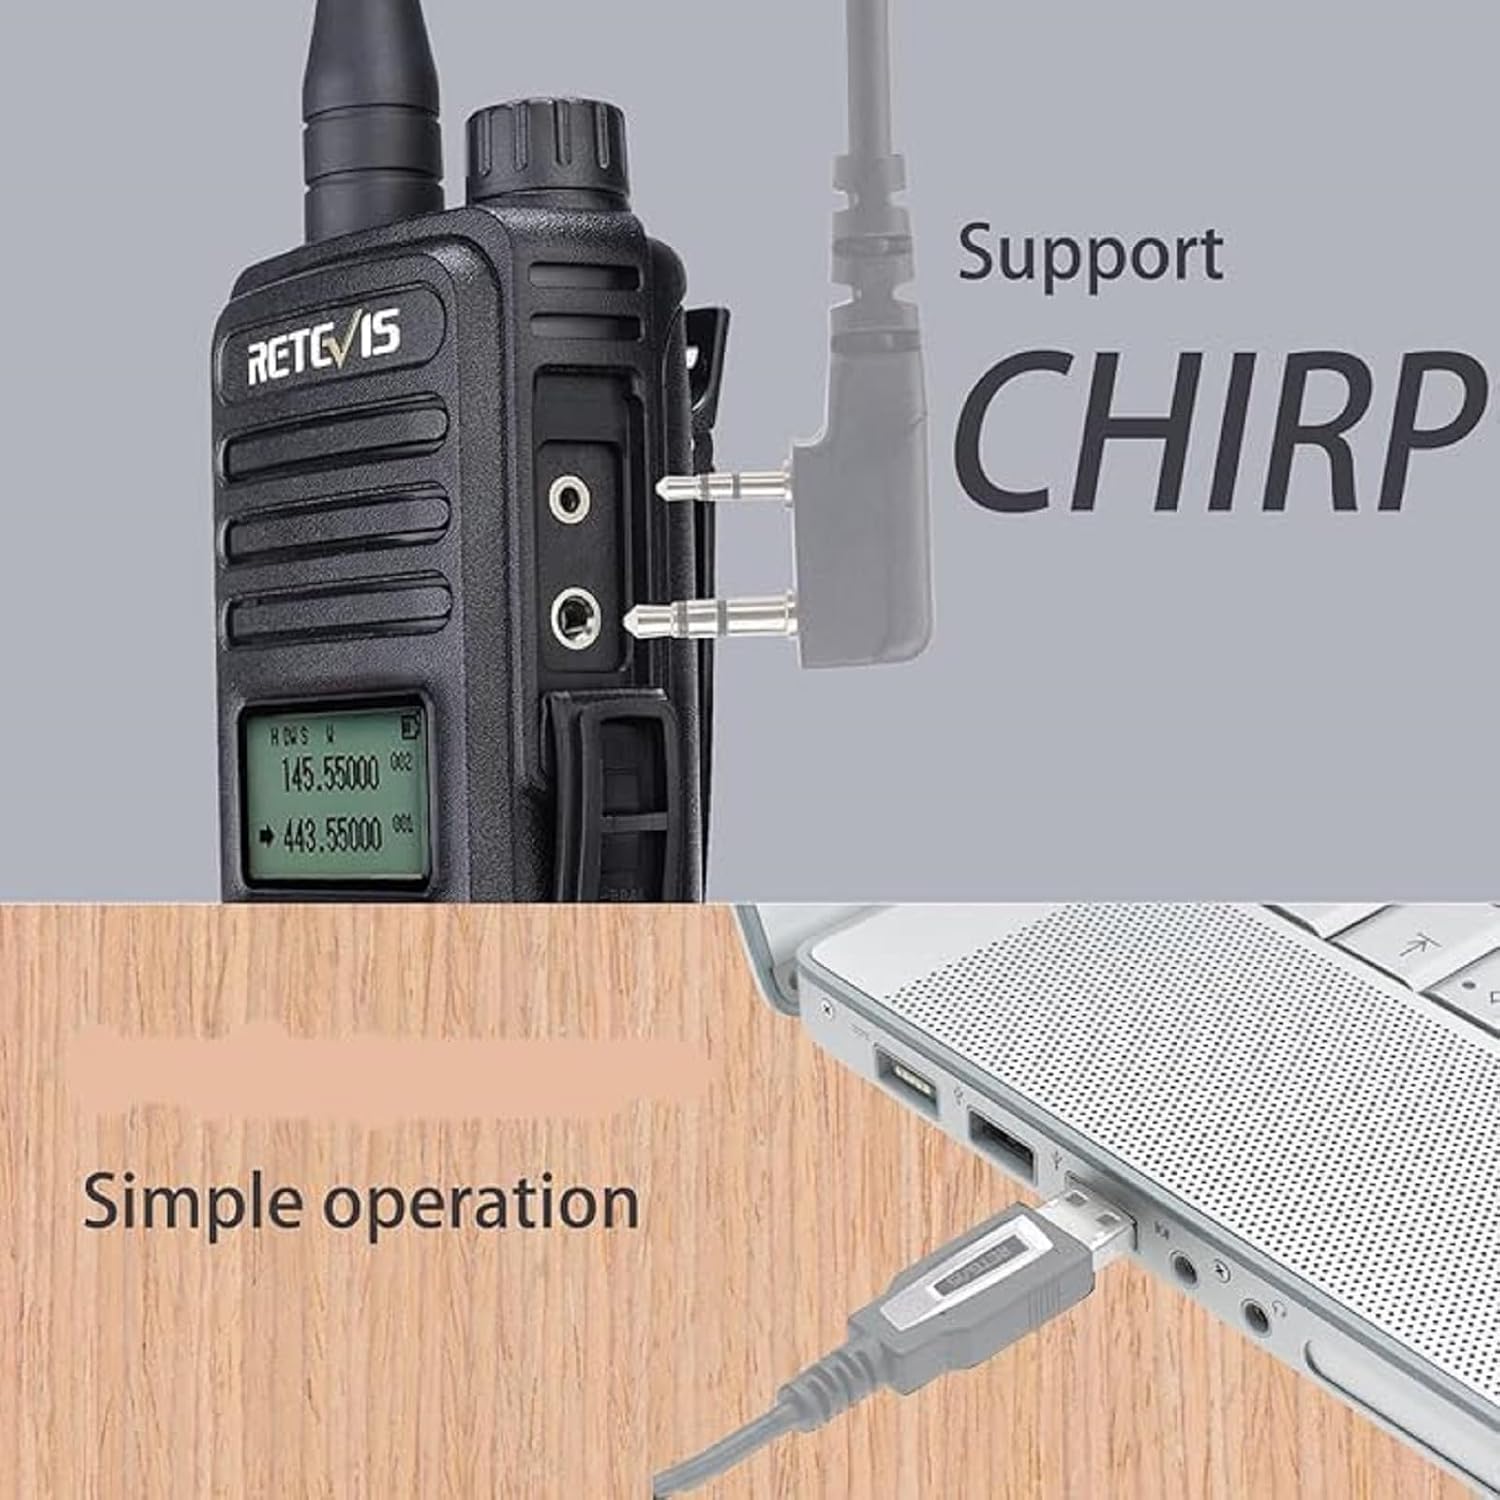
- Connect the radio to your computer using a compatible programming cable.
- Open CHIRP software and follow the instructions to read/write radio data.
CTCSS and DCS Tones
50 CTCSS (Continuous Tone-Coded Squelch System) and 104 DCS (Digitally Coded Squelch) tones are available to filter out unwanted signals and ensure private communication.
- These tones can be set for each channel through the radio's menu or via programming software.
Auto Squelch
The auto squelch feature ensures clear communication by suppressing background noise when no signal is present.
- The squelch level can typically be adjusted in the radio's menu to suit environmental conditions.
Maintenance
Battery Care
- Charge the battery fully before first use.
- Avoid overcharging or completely draining the battery to prolong its lifespan.
- Store the battery in a cool, dry place when not in use for extended periods.
- The radio features a low battery alarm to remind you to charge.
- Power saving function extends battery life during standby.
Cleaning
- Wipe the radio with a soft, damp cloth. Do not use harsh chemicals or solvents.
- Ensure the radio is dry before use or charging.
Troubleshooting
| Problem | Possible Cause | Solution |
|---|---|---|
| Radio does not power on | Battery is depleted or not installed correctly. | Ensure battery is fully charged and properly seated. |
| Cannot transmit or receive | Incorrect frequency/channel, squelch level too high, or antenna not connected. | Verify frequency/channel settings. Adjust squelch. Check antenna connection. |
| Poor audio quality | Low battery, incorrect squelch, or interference. | Charge battery. Adjust squelch. Move away from sources of interference. |
| Keyboard is unresponsive | Keyboard lock is active. | Press and hold the #Lock key to unlock the keyboard. |
Specifications
| Model Number | FA9195A (RT85) |
| Item Weight | 8 ounces |
| Product Dimensions | 4.76 x 2.32 x 1.34 inches |
| Battery Type | 1 Lithium Ion battery (included) |
| Voltage | 7.4 Volts (DC) |
| Display Type | LCD |
| Number of Channels | 200 |
| Special Features | Dual Band, 200 channels for secure calls |
| Water Resistance Level | Water Resistant |
| Manufacturer | Retevis |
| ASIN | B08DLFC4SX |
| FCC ID | 2ASNS RT85 |
| Serial Number Example | 2007R0851100142 |
Warranty and Support
Retevis provides a 2-year warranty for the radio body and a 1-year warranty for accessories. A 30-day no-reason return policy is also offered.
Beyond the warranty period, maintenance services are available, with buyers responsible for associated costs. For support, contact Retevis on Amazon, and they will respond within 12 hours.
For further assistance, please visit the official Retevis store: Retevis Store on Amazon
Additional Resources
No official product videos with relevant metadata were provided in the product data to embed in this manual.
Related documentsRT85


Ask a question about this manual
Ask about setup, troubleshooting, compatibility, parts, safety, or missing instructions. Manuals+ will review the question and use this page’s manual context to help answer it.