1. Introduction
The Kungber SPS3010B is a professional-grade adjustable DC power supply designed for various applications including laboratory research, production line testing, electrical maintenance, and battery charging. It provides a stable and precise output of 0-30V and 0-10A, with a high-resolution 4-digit LED display for accurate readings of voltage, current, and power. This manual provides essential information for the safe and efficient operation of your device.
Key Features:
- High precision 4-digit LED display for voltage, current, and power.
- Adjustable output from 0-32V and 0-10A with 0.01V/0.01A resolution.
- Automatic switching between Constant Voltage (C.V.) and Constant Current (C.C.) modes.
- Coarse and fine adjustment knobs for precise control.
- Comprehensive safety protections: Ground wire, overvoltage (OVP), overcurrent (OCP), overpower (OPP), overtemperature (OTP), and short-circuit protection (SCP).
- Integrated 5V/2A USB-A and USB-C fast charging ports.
2. Safety Instructions
To ensure safe operation and prevent damage to the device or injury, please read and follow these safety instructions carefully:
- Always connect the power supply to a grounded outlet.
- Do not operate the device in wet or damp conditions.
- Ensure proper ventilation; do not block the cooling fan or vents.
- Do not open the casing; there are no user-serviceable parts inside. Refer all servicing to qualified personnel.
- Before connecting or disconnecting any load, ensure the power supply is turned off or the output is disabled.
- Verify the voltage and current settings before applying power to your circuit or device.
- Avoid short-circuiting the output terminals for extended periods, even with protection enabled.
- Keep the device away from flammable materials and explosive gases.
3. Package Contents
Please check the package contents upon receipt:
- 1 x Kungber SPS3010B DC Laboratory Power Supply
- 1 x Output Power Cable (test leads)
- 1 x Input Power Cable (AC power cord)
- 1 x User Manual
4. Product Overview

This image displays the front panel of the Kungber SPS3010B power supply, highlighting the digital display, coarse and fine adjustment knobs for voltage and current, output terminals (positive, negative, and ground), and the integrated USB-A and USB-C fast charging ports. Buttons for OCP (Overcurrent Protection), Battery mode, and Output control are also visible.

A detailed view of the 4-digit LED display, which simultaneously shows the set or measured voltage (V), current (A), and calculated power (W). The display also indicates the active mode (C.V. for Constant Voltage, C.C. for Constant Current) and includes an Ah (Ampere-hour) reading for battery charging.

This image shows the rear panel of the power supply, specifically highlighting the integrated cooling fan. The fan is crucial for dissipating heat generated during operation, ensuring the device maintains optimal performance and longevity. Proper airflow around this area is essential.
Front Panel Components:
- LED Display: Shows Voltage (V), Current (A), Power (W), and Ampere-hours (Ah). Indicates C.V. (Constant Voltage) and C.C. (Constant Current) modes.
- OCP Button: Activates/deactivates Overcurrent Protection.
- BATTERY Button: Toggles battery charging mode.
- OUTPUT Button: Enables/disables the DC output.
- A-COARSE Knob: Coarse adjustment for output current.
- V-COARSE Knob: Coarse adjustment for output voltage.
- A-FINE Knob: Fine adjustment for output current.
- V-FINE Knob: Fine adjustment for output voltage.
- USB-A Port: 5V/2A fast charging output.
- USB-C Port: 5V/2A fast charging output.
- Output Terminals: GND (Ground), - (Negative), + (Positive) for connecting loads.
5. Setup
Follow these steps to set up your power supply:
- Placement: Place the power supply on a stable, flat surface with adequate ventilation. Ensure the rear cooling fan is not obstructed.
- Power Connection: Connect the supplied AC input power cable to the power input socket on the rear of the unit and then to a grounded wall outlet.
- Initial Check: Before connecting any load, ensure the OUTPUT button is in the OFF position (output disabled).
6. Operating Instructions
6.1 Powering On/Off
- To Power On: Locate the power switch on the rear panel of the unit and flip it to the 'ON' position. The LED display will illuminate.
- To Power Off: Flip the power switch on the rear panel to the 'OFF' position.
6.2 Adjusting Voltage and Current

This diagram illustrates the function of the coarse and fine adjustment knobs. The coarse knobs (A-COARSE, V-COARSE) are used for large adjustments, affecting the first two digits of the display. The fine knobs (A-FINE, V-FINE) allow for precise adjustments, controlling the last two digits, enabling accurate setting of voltage and current values.
- Setting Voltage: Use the V-COARSE knob for large adjustments and the V-FINE knob for precise, small adjustments. The voltage value will be displayed on the LED screen.
- Setting Current: Use the A-COARSE knob for large adjustments and the A-FINE knob for precise, small adjustments. The current value will be displayed on the LED screen.
- Pre-setting Output: It is recommended to set the desired voltage and current limits before enabling the output to the load.
6.3 Constant Voltage (C.V.) and Constant Current (C.C.) Modes
The power supply automatically switches between C.V. and C.C. modes depending on the load and the set limits:
- Constant Voltage (C.V.): When the load resistance is high, the output voltage remains constant at the set value, and the output current is determined by the load. The 'C.V.' indicator on the display will be lit.
- Constant Current (C.C.): When the load resistance is low or a short circuit occurs, the output current remains constant at the set limit, and the output voltage drops. The 'C.C.' indicator on the display will be lit.
6.4 Enabling/Disabling Output
- After setting the desired voltage and current, press the OUTPUT button to enable the DC output. The 'OUTPUT' indicator will light up.
- To disable the output, press the OUTPUT button again. The 'OUTPUT' indicator will turn off.
6.5 Overcurrent Protection (OCP)
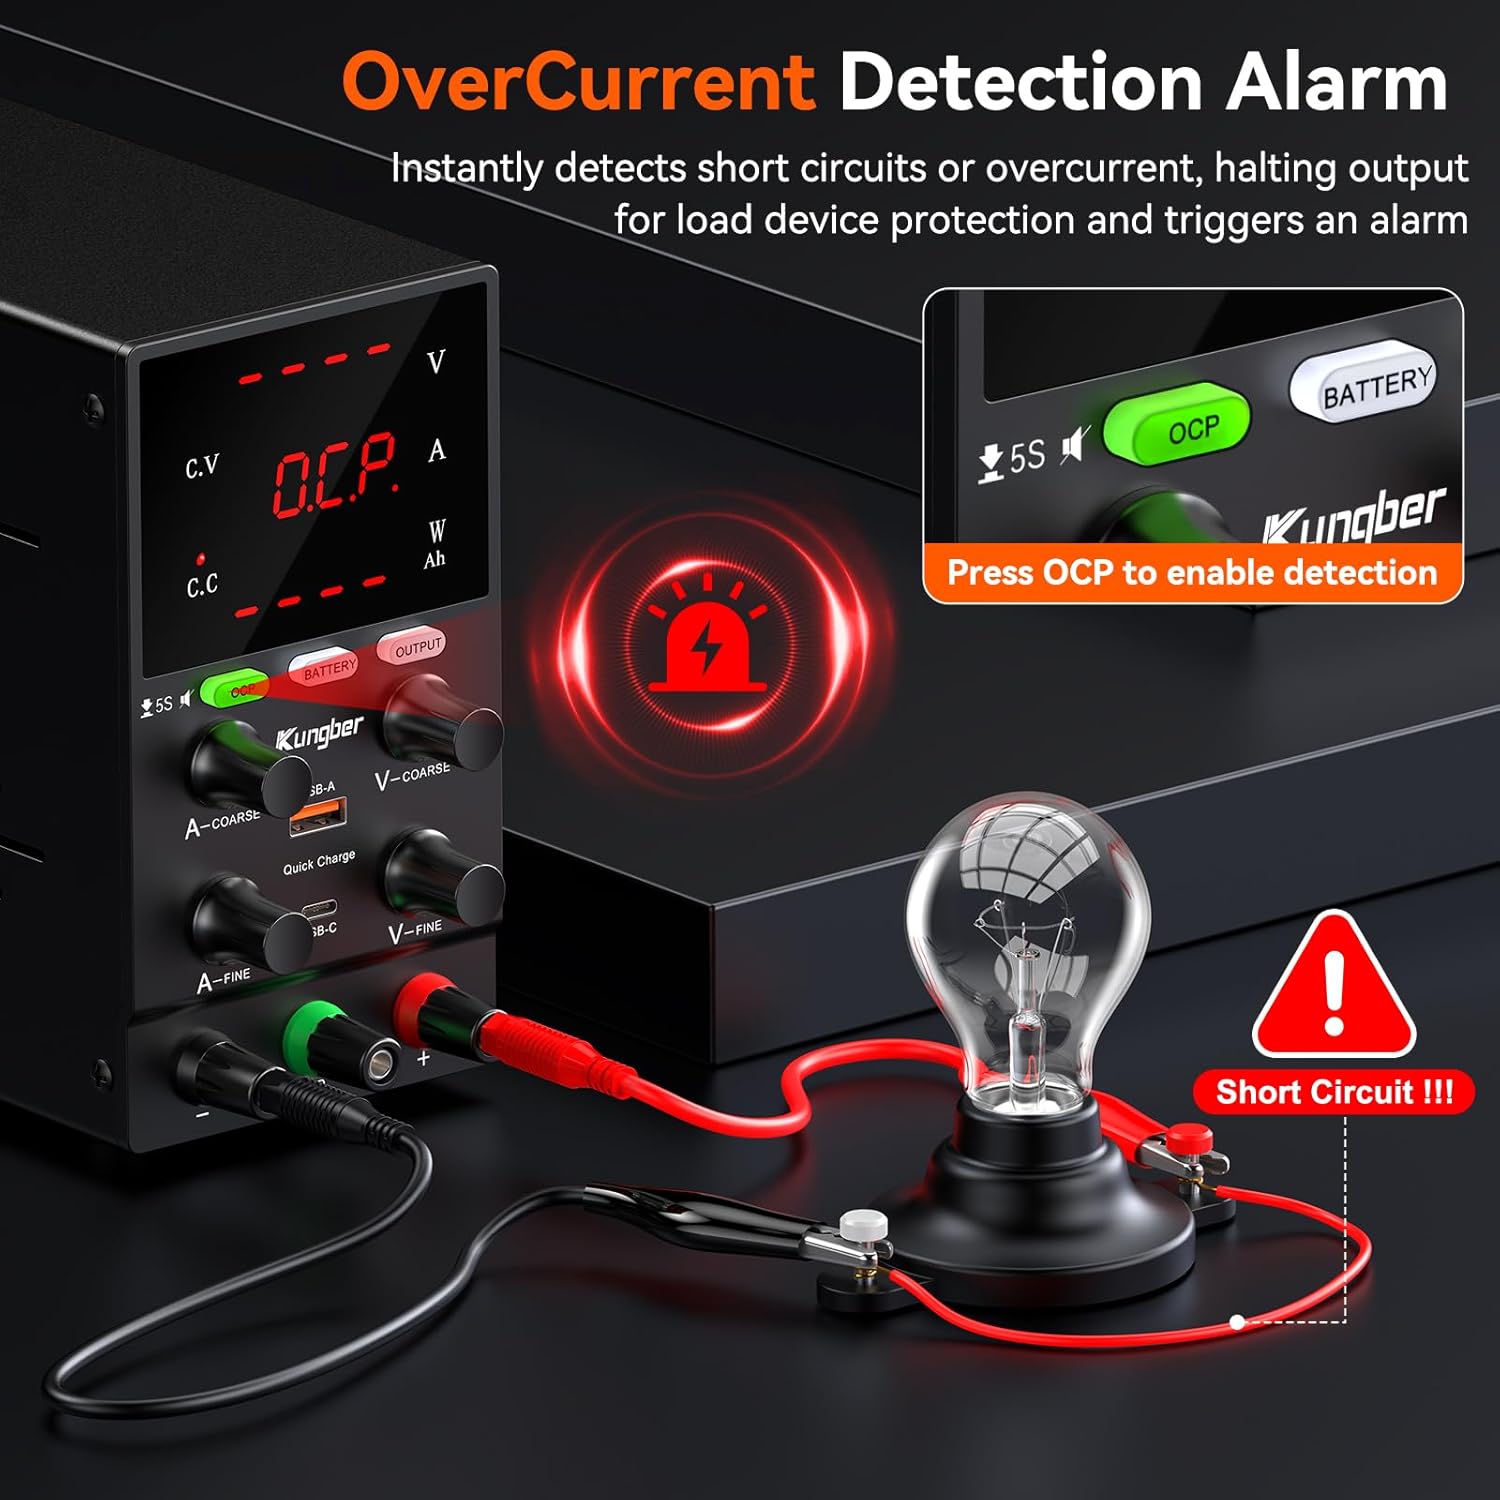
This image demonstrates the Overcurrent Protection (OCP) feature. When OCP is enabled by pressing the OCP button, the power supply instantly detects short circuits or overcurrent conditions, halting output to protect the connected load device and triggering an alarm. This ensures safety during operation.
- Press the OCP button to activate the Overcurrent Protection function. The 'OCP' indicator will light up.
- When OCP is active and an overcurrent condition is detected, the output will automatically shut down, and an alarm may sound to protect the connected device.
- To reset after an OCP event, resolve the overcurrent condition and then press the OCP button again or cycle the power.
6.6 Battery Charging Mode
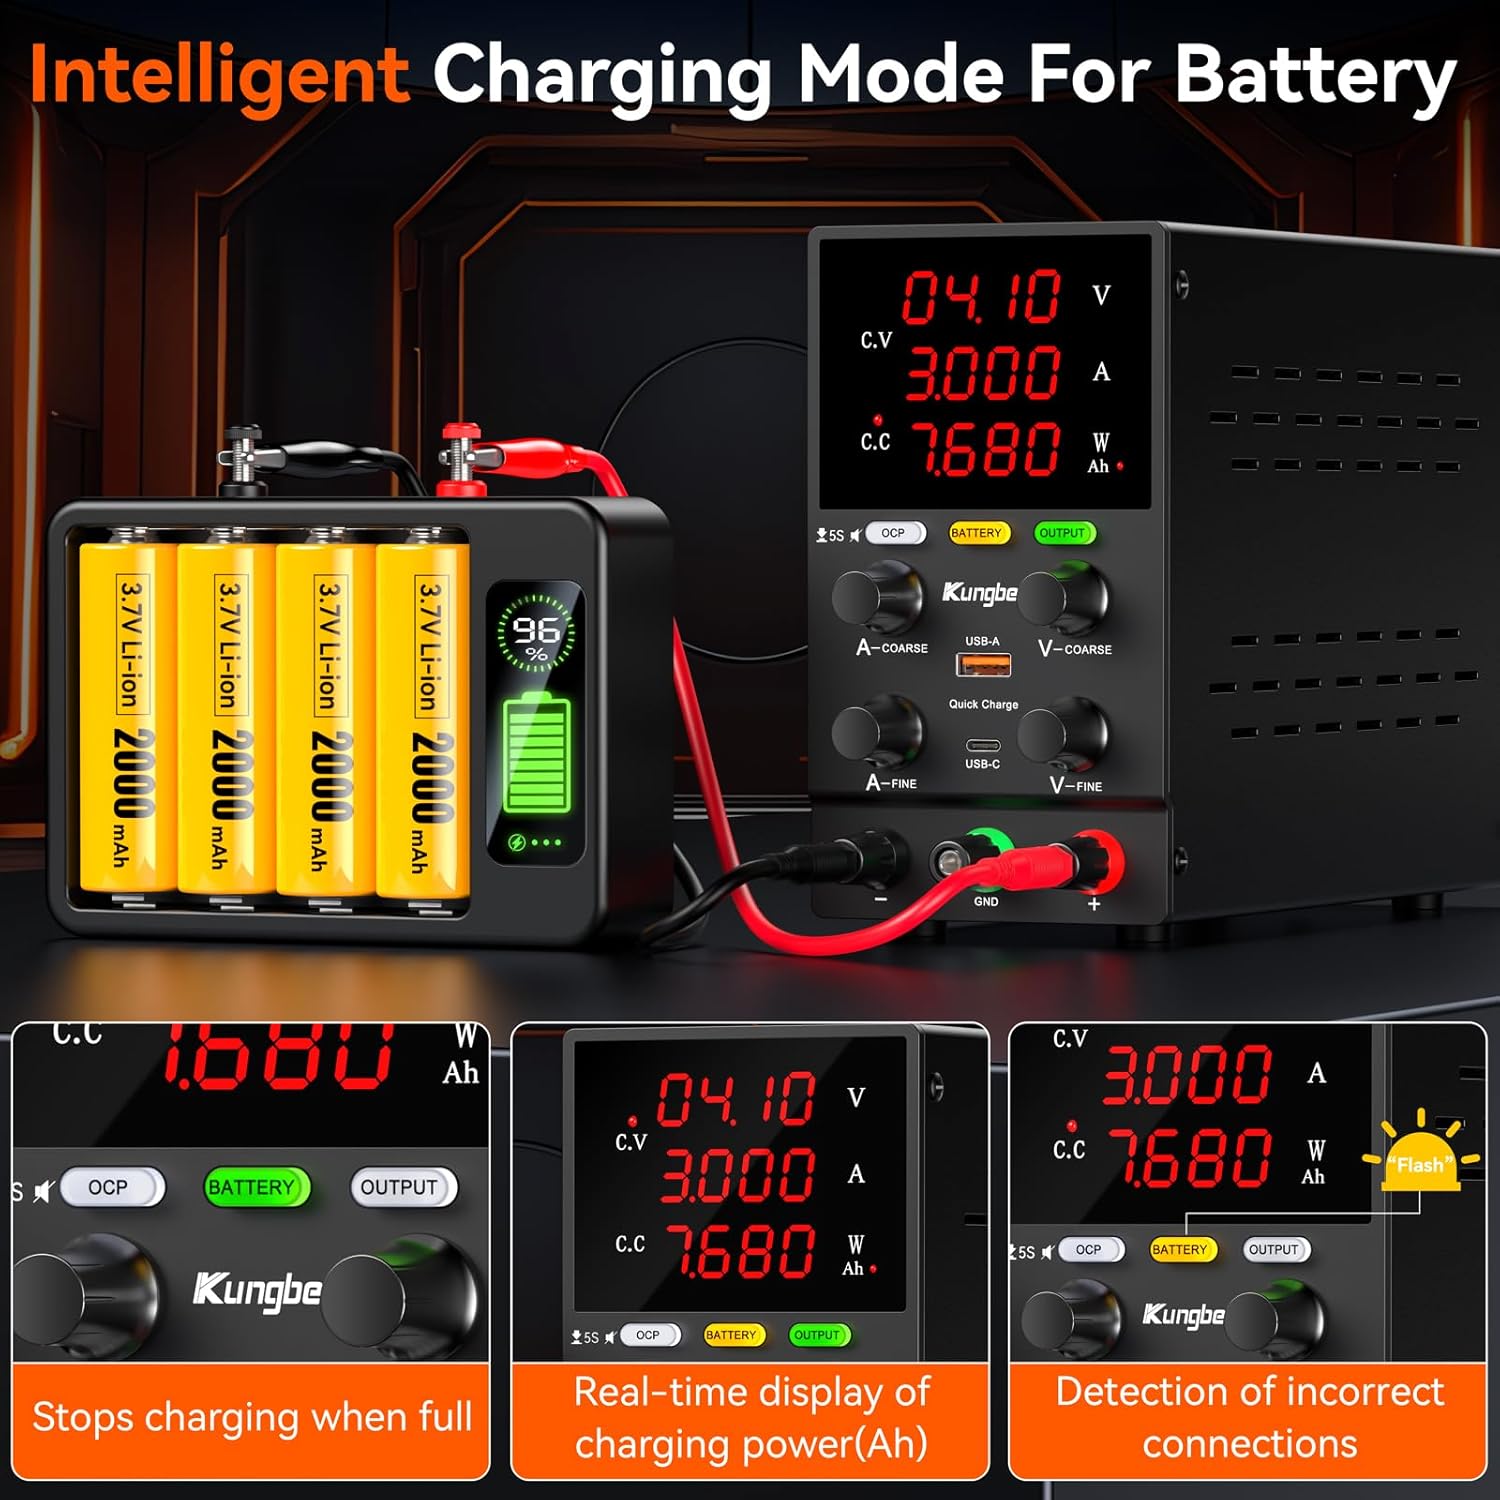
This image illustrates the intelligent battery charging mode. The power supply can detect incorrect connections, display real-time charging power in Ampere-hours (Ah), and automatically stop charging when the battery is full, ensuring safe and efficient battery management.
- Press the BATTERY button to enter battery charging mode. The 'BATTERY' indicator will light up.
- In this mode, the power supply can intelligently manage battery charging, including displaying real-time Ah (Ampere-hour) readings and automatically stopping charging when the battery is full.
- Ensure correct polarity when connecting batteries to the output terminals.
6.7 USB Fast Charging Ports

This image highlights the convenience of the integrated USB-A and USB-C fast charging ports. These ports provide a 5V/2A output, allowing users to quickly charge mobile phones or power other USB-compatible devices directly from the power supply, even while it's being used for other tasks.
- The integrated USB-A and USB-C ports provide a 5V/2A output for charging mobile devices or powering small USB-compatible electronics.
- These ports operate independently of the main DC output.
7. Maintenance
Proper maintenance ensures the longevity and reliable operation of your power supply:
- Cleaning: Disconnect the power supply from the main power outlet before cleaning. Use a soft, dry cloth to wipe the exterior. Do not use abrasive cleaners or solvents.
- Ventilation: Regularly check that the cooling fan and ventilation openings are free from dust and debris. Blocked vents can lead to overheating.
- Storage: When not in use for extended periods, store the power supply in a cool, dry place, away from direct sunlight and extreme temperatures.
- No User Serviceable Parts: Do not attempt to open or repair the unit yourself. This will void the warranty and may pose a safety hazard.
8. Troubleshooting
If you encounter issues with your power supply, refer to the following common problems and solutions:
| Problem | Possible Cause | Solution |
|---|---|---|
| No display/No power | Power cable not connected; Power switch off; Blown fuse. | Ensure power cable is securely connected. Turn power switch ON. Check and replace fuse if necessary (refer to qualified technician). |
| No output voltage/current | OUTPUT button is OFF; OCP activated; Short circuit in load. | Press OUTPUT button to enable. Check if OCP indicator is on, resolve load issue, then reset OCP. Check load for short circuits. |
| Output voltage/current unstable | Poor connection; Overload; Internal fault. | Check all cable connections. Reduce load. If problem persists, contact support. |
| Unit overheats | Blocked ventilation; Excessive load. | Ensure vents are clear. Reduce load or operating time. |
9. Specifications
| Parameter | Value |
|---|---|
| Brand | Kungber |
| Model Number | SPS3010B |
| Input Voltage | 230 Volts |
| Output Voltage | 0-30 Volts |
| Output Current | 0-10 Amperes |
| Max Power | 300 Watts (calculated from 30V * 10A) |
| Display | 4-digit LED |
| Resolution | 0.01V, 0.01A |
| USB Ports | 1 x USB-A, 1 x USB-C (5V/2A) |
| Color | Black |
| Item Weight | 2.3 Pounds (approx. 1.04 kg) |
| Dimensions (L x W x H) | 19.3 x 8.5 x 15.5 centimeters |
10. Warranty and Support
Kungber provides lifetime technical support for this product. If you encounter any issues or have questions regarding the operation, maintenance, or troubleshooting of your SPS3010B power supply, please contact Kungber customer service. Refer to the product packaging or the official Kungber website for contact information.