Introduction
This manual provides comprehensive instructions for the setup, operation, maintenance, and troubleshooting of your TP-Link AC750 Wi-Fi Range Extender (Model RE230). This device is designed to boost your existing Wi-Fi coverage, eliminate dead zones, and extend internet connectivity to more devices in your home or office.
What's in the Box
- 1 x TP-Link RE230/AC750 Wi-Fi Range Extender
- 1 x Quick Installation Guide
Product Features
- Extended Wi-Fi Coverage: Boosts Internet Wi-Fi Coverage up to 1200 Square feet and connects up to 20 devices.
- Dual Band Support: Compatible with Wi-Fi Router, Gateway, Access Point (2.4GHz - 300Mbps; 5GHz - 433Mbps).
- Fast Ethernet Port: Provides wired speed and reliability by connecting devices like smart TVs, game consoles, or Blu-ray players. Can also function as a wireless adapter.
- Easy Setup: Set up and manage your Wi-Fi in minutes using the TP-Link Tether app (Android, iOS).
- Universal Compatibility: The RE230 range extender is compatible with all Wi-Fi-enabled devices and routers or access points.
- OneMesh Compatible: Works seamlessly with TP-Link OneMesh routers to create a unified mesh network.
- Intelligent Signal Indicator: Helps find the optimal location for the best Wi-Fi connection.

Figure 1: Illustration of the RE230 extending Wi-Fi coverage throughout a home, eliminating dead zones.
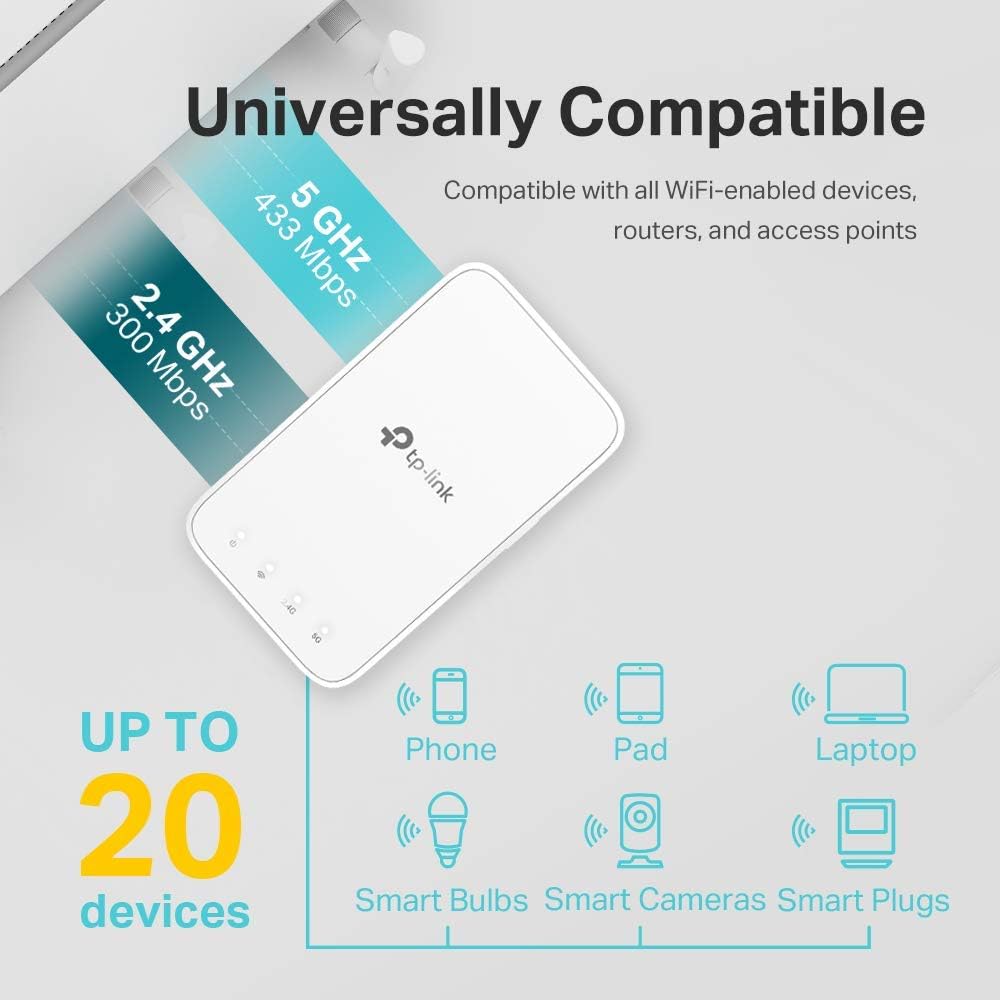
Figure 2: The RE230's universal compatibility with various Wi-Fi devices and its dual-band capabilities.
Setup Guide
Method 1: Using the TP-Link Tether App (Recommended)
The Tether app provides an intuitive way to set up and manage your extender. Ensure your smartphone is connected to your router's Wi-Fi network before starting.
- Plug In the Extender: Plug the RE230 into a power outlet next to your router. Wait until the Power LED turns solid on.
- Download Tether App: Get the up-to-date TP-Link Tether app on your smartphone from the App Store (iOS) or Google Play (Android).
- Launch App & Log In: Launch the Tether app and log in with your TP-Link ID. If you don't have an account, create one first.
- Add Extender: Tap the '+' icon on the top right corner and select 'Range Extender'.
- Follow On-Screen Instructions: The app will guide you through the process of connecting the extender to your existing Wi-Fi network. This typically involves selecting your 2.4GHz and 5GHz host networks and entering their passwords.
- Customize Network Names (Optional): You can keep the default extended network names (e.g., `YourNetworkName_EXT`) or customize them as you like.
- Confirm Settings & Reboot: Confirm your settings. The extender will reboot to apply the changes.
- Relocate the Extender: Once setup is complete, unplug the extender and relocate it to an optimal position between your router and the Wi-Fi dead zone. Ensure the Signal LED indicates a good connection (white light).

Figure 3: The RE230 plugged into a power outlet.
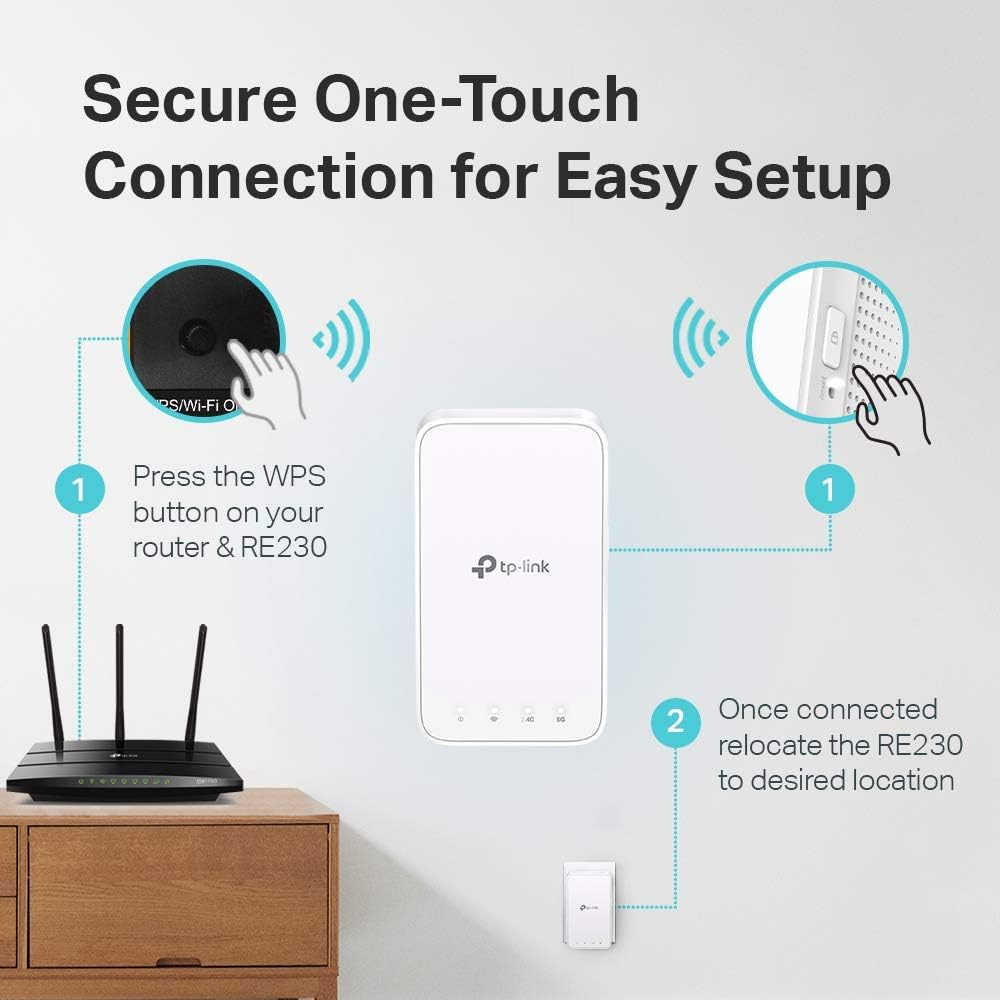
Figure 4: Secure one-touch connection for easy setup using the WPS button.
Video: Official guide on how to set up the TP-Link RE230 Range Extender via the Tether App.
Method 2: Using a Web Browser
Alternatively, you can set up the extender using a web browser.
- Plug In the Extender: Plug the RE230 into a power outlet next to your router. Wait until the Power LED turns solid on.
- Connect to Extender's Wi-Fi: Connect your computer or mobile device to the extender's Wi-Fi network (e.g., `TP-Link_Extender`).
- Access Web Management Page: Open a web browser and type `http://tplinkrepeater.net` or `http://192.168.0.254` in the address bar.
- Create Login Password: Create a new login password for the management page.
- Follow Setup Wizard: Follow the on-screen instructions to select your host Wi-Fi network(s) and enter the passwords.
- Relocate the Extender: After setup, unplug and relocate the extender to an optimal position.
Operating Instructions
Understanding LED Indicators
| LED Name | Status | Indication |
|---|---|---|
| Power | Solid On | The extender is powered on. |
| Power | Off | The extender is powered off. |
| Signal | Solid White | Good connection to the host router. |
| Signal | Solid Red | Weak connection to the host router (too far). Relocate the extender closer to the router. |
| Signal | Off | No connection to the host router. |
| 2.4GHz | Solid On | The 2.4GHz Wi-Fi band is active. |
| 5GHz | Solid On | The 5GHz Wi-Fi band is active. |

Figure 5: The Fast Ethernet port allows wired connections for devices like HDTVs, game consoles, laptops, and printers.
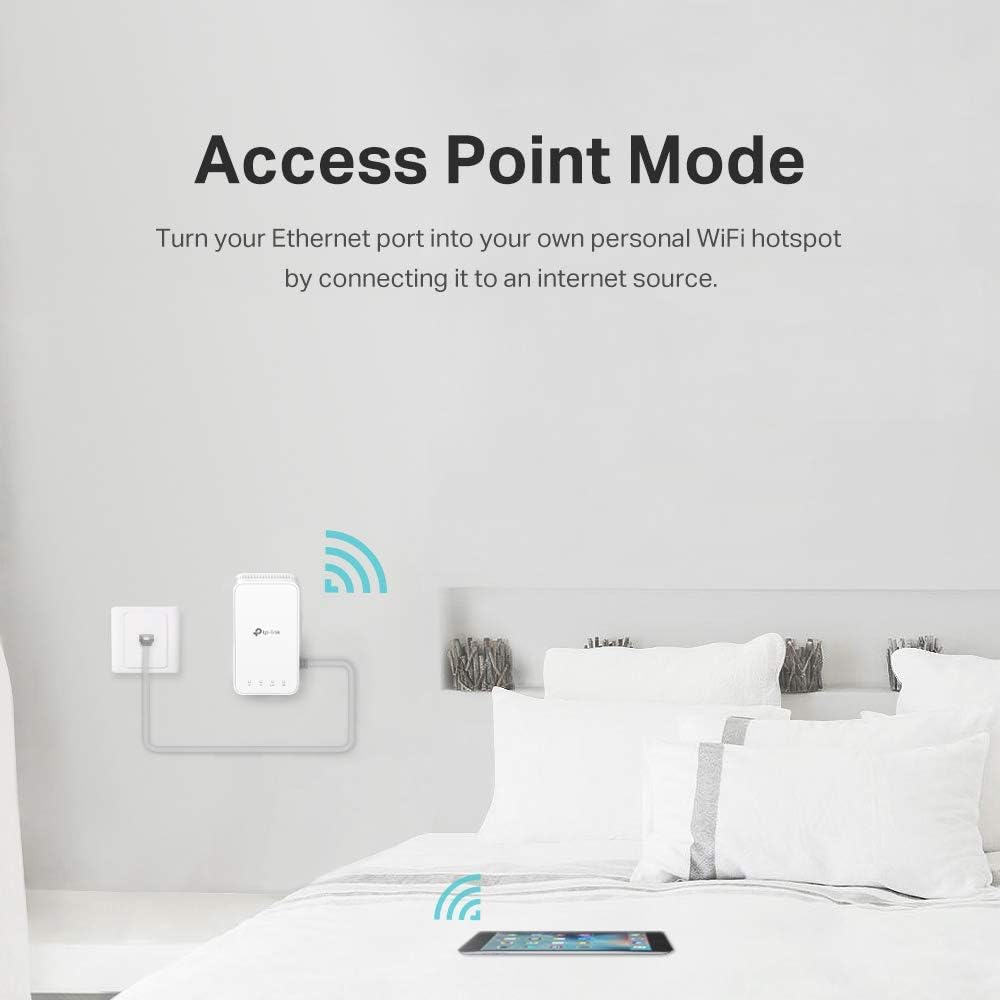
Figure 6: The RE230 can operate in Access Point Mode, turning a wired internet connection into a personal Wi-Fi hotspot.
Maintenance
- Optimal Placement: For best performance, place the extender in an open, unobstructed area, about halfway between your router and the Wi-Fi dead zone. Keep it away from large appliances that may cause interference.
- Firmware Updates: Regularly check for and install firmware updates via the Tether app or the web management page to ensure optimal performance and security.
- Cleaning: Use a soft, dry cloth to clean the device. Do not use liquid cleaners or aerosols.
- Power Cycle: If you experience persistent issues, try power cycling the extender by unplugging it from the power outlet for 10 seconds and then plugging it back in.
Troubleshooting
| Problem | Solution |
|---|---|
| Extender not powering on. | Ensure the extender is securely plugged into a working power outlet. Try a different outlet. |
| Cannot connect to the extender's Wi-Fi. | Ensure the extender is powered on. If you've already set it up, connect to the extended network name. If not, connect to the default `TP-Link_Extender` network. |
| Poor signal strength (Red Signal LED). | Relocate the extender closer to your main router. Ensure there are no major obstructions (thick walls, large metal objects) between the extender and the router. |
| Extended network has no internet access. | Verify that your main router has internet access. Reconfigure the extender to ensure it's correctly connected to your main router's Wi-Fi. Check the Signal LED for a strong connection. |
| Forgot extender's management password. | Perform a factory reset on the extender. Use a pin to press and hold the Reset button (usually a small hole) for about 5-10 seconds until the LEDs flash. Then, set up the extender again. |
Specifications
| Feature | Detail |
|---|---|
| Wireless Type | 802.11a, 802.11ac, 802.11b, 802.11g, 802.11n |
| Data Transfer Rate | 750 Megabits Per Second (AC750: 300Mbps on 2.4GHz, 433Mbps on 5GHz) |
| Frequency Band Class | Dual-Band |
| Dimensions (LxWxH) | 4.9 x 2.7 x 2 inches |
| Item Weight | 8.4 ounces |
| Color | White |
| Voltage | 100-240 Volts |
| Special Features | High-Speed Mode, Adaptive Path Selection, Smart Signal Indicator, OneMesh, Smart Roaming |
Warranty and Support
TP-Link offers a 2-year warranty for this product. For technical support, warranty claims, or additional information, please visit the official TP-Link support website or contact their customer service. Refer to the Quick Installation Guide included in your product packaging for specific contact details and regional support information.
You can also find additional resources, FAQs, and updated user guides on the TP-Link Support Website.


