Introduction
The Sky-Watcher AZ-GTe P130N is a sophisticated astronomical telescope designed for both novice and experienced stargazers. It features an automatic Go-To and tracking system, allowing users to easily locate and observe celestial objects without manual searching. Control is seamlessly integrated via a dedicated smartphone application, providing an intuitive user experience. This reflective telescope boasts a 130mm aperture, ensuring bright and clear observations with minimal chromatic aberration.

Figure 1: The Sky-Watcher AZ-GTe P130N Astronomical Telescope fully assembled, showcasing its optical tube, AZ-GTe mount, and sturdy tripod.
Safety Information
- Never look directly at the sun through the telescope or its finder scope, even for an instant, without a professionally made solar filter. Permanent and irreversible eye damage may result.
- Do not leave the telescope unsupervised, especially when children are present.
- Handle optical components with care to avoid scratches or damage.
- Ensure the tripod is stable on a level surface to prevent tipping.
- Keep electronic components dry and away from extreme temperatures.
Package Contents
Please verify that all items listed below are included in your package:
- AZ-GTe P130N Optical Tube (130mm Reflector)
- AZ-GTe Go-To Mount
- Adjustable Tripod
- Eyepiece 25mm (26x magnification)
- Eyepiece 10mm (65x magnification)
- Accessory Tray
- User Manual (this document)
Setup
1. Assembling the Tripod and Mount
- Carefully remove all components from the packaging.
- Extend the tripod legs to a stable height. Ensure the tripod is placed on a firm, level surface.
- Attach the accessory tray to the tripod's center brace. This provides additional stability and a convenient place for eyepieces.
- Mount the AZ-GTe Go-To mount onto the tripod head. Secure it firmly using the provided screws or knobs.

Figure 2: The AZ-GTe mount securely attached to the tripod, ready for the optical tube.
2. Attaching the Optical Tube
The AZ-GTe P130N optical tube uses a dovetail mounting system for easy attachment.
- Locate the dovetail clamp on the AZ-GTe mount.
- Slide the dovetail bar of the optical tube into the clamp.
- Tighten the clamp screws securely to ensure the optical tube is firmly attached and balanced.

Figure 3: The AZ-GTe P130N optical tube, showing its reflective design and the dovetail bar for mounting.
3. Installing Eyepieces
Your telescope comes with two eyepieces: 25mm and 10mm.
- Loosen the thumbscrews on the focuser.
- Insert the desired eyepiece (e.g., the 25mm for wider views) into the focuser.
- Tighten the thumbscrews to secure the eyepiece.
- To change magnification, simply swap eyepieces. The 10mm eyepiece provides higher magnification.

Figure 4: The included 10mm and 25mm eyepieces, offering different magnifications for various observing needs.
4. Powering On
Ensure batteries are correctly installed in the mount (if battery-powered) or connect the appropriate power supply. Turn on the power switch on the AZ-GTe mount.
Operating
1. Smartphone App Download and Connection
The AZ-GTe P130N is controlled via a dedicated smartphone application.
- Download the "SynScan Pro" app from your smartphone's app store (available for Android and iPhone).
- Ensure your smartphone's Wi-Fi is enabled.
- Connect to the Wi-Fi network broadcast by the AZ-GTe mount (usually named "SynScan_xxxx").
- Open the SynScan Pro app. The app should automatically detect and connect to the mount.

Figure 5: The SynScan Pro app interface on a smartphone, displaying a list of celestial objects for selection and control buttons.
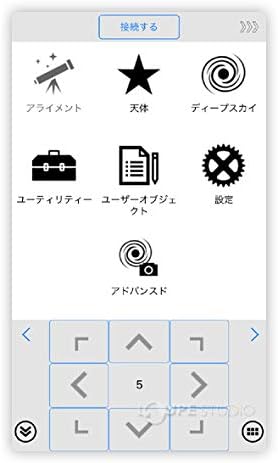
Figure 6: The main menu of the SynScan Pro app, featuring icons for alignment, celestial bodies, deep sky objects, utilities, user objects, settings, and advanced options.
2. Alignment Procedure (Go-To System)
For accurate Go-To and tracking, the mount needs to be aligned with the night sky.
- In the SynScan Pro app, select the "Alignment" option.
- Follow the on-screen instructions to perform a 1-star, 2-star, or 3-star alignment. This typically involves pointing the telescope at one or more bright stars and centering them in the eyepiece.
- Once alignment is complete, the telescope is ready for automatic Go-To operations.
3. Selecting Celestial Objects
The app provides a database of celestial objects.
- Navigate through the app's menus (e.g., "Celestial Bodies," "Deep Sky") to find your desired object (e.g., Moon, Jupiter, Orion Nebula).
- Select the object, and the mount will automatically slew (move) the telescope to its position.
- The automatic tracking feature will then keep the object centered in your eyepiece as it moves across the sky.
4. Adjusting Focus
Once an object is in view, use the focuser knobs on the optical tube to achieve a sharp image.
- Turn the focuser knobs slowly until the image appears crisp and clear.
- Focus may need slight adjustment when changing eyepieces or if ambient temperature changes significantly.
Maintenance
1. Cleaning the Optics
- Dust on the mirror or lenses should be removed with a soft camel hair brush or a can of compressed air (use short bursts, hold upright).
- For smudges or fingerprints, use a specialized optical cleaning fluid and a clean, soft microfiber cloth. Apply fluid to the cloth, not directly to the lens.
- Avoid touching optical surfaces with bare hands.
2. Storage
- When not in use, store the telescope in a dry, dust-free environment.
- Replace all lens caps and dust covers to protect the optics.
- If storing for extended periods, remove batteries from the mount to prevent leakage.
Troubleshooting
| Problem | Possible Cause | Solution |
|---|---|---|
| No power to mount | Batteries drained or incorrectly installed; power cable disconnected. | Check battery orientation and charge level; ensure power cable is securely connected. |
| App cannot connect to mount | Wi-Fi not enabled; incorrect Wi-Fi network selected; mount not powered on. | Ensure Wi-Fi is on and connected to the mount's network; power cycle the mount. |
| Go-To accuracy is poor | Inaccurate alignment; telescope not balanced; mount not level. | Re-perform alignment carefully; ensure telescope is balanced on the mount; level the tripod. |
| Fuzzy or unclear image | Out of focus; atmospheric conditions; dirty optics. | Adjust focuser; wait for better seeing conditions; clean optics as per maintenance section. |
Specifications
Key technical specifications for the Sky-Watcher AZ-GTe P130N Telescope:
| Feature | Detail |
|---|---|
| Optical Tube Type | Reflective Telescope |
| Effective Aperture | 130 mm |
| Focal Length | 650 mm |
| Eyepieces Included | 25mm (26x), 10mm (65x) |
| Light Gathering Power | 345x |
| Limiting Magnitude | 12.4 |
| Mount Type | AZ-GTe Go-To Alt-Azimuth Mount |
| Control Interface | Smartphone App (SynScan Pro) |
| Compatible Devices | Android, iPhone |
| Product Dimensions | 70 x 30 x 40 cm |
| Product Weight | Approx. 11 kg (Total) |
| Model Number | SW1410030002 |

Figure 7: Visual representation of the telescope highlighting its 130mm effective aperture and 650mm focal length.
Warranty and Support
This Sky-Watcher product is covered by a manufacturer's warranty. Please refer to the warranty card included with your purchase for specific terms and conditions, including warranty period and coverage details.
For technical support, service, or inquiries regarding your telescope, please contact Sky-Watcher customer service or visit their official website. Contact information can typically be found on the product packaging or the manufacturer's website.
Keep your purchase receipt as proof of purchase for warranty claims.


