Introduction
Thank you for choosing the RPNB Deluxe Digital Keypad Safe Box, model RP42ESA. This manual provides essential information for the proper setup, operation, and maintenance of your new safe. Please read these instructions carefully before use to ensure optimal security and functionality.

Image: The RPNB Deluxe Digital Keypad Safe Box with its door open, revealing a spacious interior with a removable shelf, suitable for storing various valuables like a camera, bottles, and books.
Important Safety Information
- Always keep emergency keys in a secure location outside the safe. Do not store them inside the safe.
- Ensure the safe is securely mounted to a wall or floor to prevent unauthorized removal.
- Do not store loaded firearms in any safe or lock box unless local regulations permit and specific firearm storage guidelines are followed.
- Check TSA regulations and airline policies before traveling with any portable safe.
- This safe is not water resistant. Avoid exposure to water or high humidity.
Package Contents
- RPNB Deluxe Digital Keypad Safe Box (Model RP42ESA)
- Emergency Backup Keys (2)
- Mounting Hardware (4 expansion bolts)
- Instruction Manual
- Removable Shelf
Setup
1. Battery Installation
- Open the safe using the emergency backup key (refer to 'Initial Safe Opening' below).
- Locate the battery compartment on the inside of the safe door.
- Remove the battery cover.
- Insert 4 new AA alkaline batteries, ensuring correct polarity. You will hear a short beep when batteries are inserted correctly.
- Replace the battery cover.

Image: A hand is shown inserting AA batteries into the designated battery compartment located on the interior of the safe door.
2. Initial Safe Opening (Emergency Key)
- Locate the backup key cover on the digital keypad.
- Gently remove the cover to reveal the keyhole.
- Insert one of the emergency keys and turn it counter-clockwise.
- While holding the key turned, rotate the knob clockwise to open the safe door.
- Remove the key and replace the key cover.

Image: A visual guide illustrating how to open the safe using either the emergency key or by entering the digital password, followed by turning the knob.
3. Programming Your Digital Code
- With the safe door open, locate the red 'PROGRAM' button on the inside of the door, near the hinge.
- Press and release the 'PROGRAM' button. The green light on the keypad will illuminate, and you will hear a single beep.
- Enter your new 3 to 8 digit code on the digital keypad.
- Press the '✓' (confirming) button. The green light will flash, and you will hear a beep, indicating successful programming.
- Test your new code with the door open before closing it. If an error occurs, the new code will not work, and you will need to repeat the programming steps.
4. Silent Mode Activation
- To activate silent mode (turn off keypad sounds), press the '✓' (confirming) button, then press the '0' button. The green light will flash once.
- To deactivate silent mode (turn on keypad sounds), press the '✓' (confirming) button, then press the '0' button again. The green light will flash once.

Image: The digital keypad features three indicator lights: Red for warning, Green for correct operation, and Yellow for low power, providing clear status feedback.
5. Mounting the Safe
The safe features pre-drilled mounting holes on the back and bottom for secure installation. Use the included expansion bolts to mount the safe to a wall, shelf, or floor.
- Choose a suitable location for mounting.
- Mark the drilling points through the pre-drilled holes inside the safe.
- Drill pilot holes in the marked locations.
- Align the safe with the drilled holes and insert the expansion bolts.
- Tighten the bolts securely to fasten the safe in place.

Image: A close-up view of the expansion bolts provided with the safe, used for secure mounting to a surface.
Video: This video demonstrates the process of installing batteries, using the emergency key, and programming the digital code for the RPNB Electronic Security Home Safe (RP42ESA).
Operating Your Safe
1. Opening with Digital Code
- Enter your programmed 3 to 8 digit code on the digital keypad.
- Press the '✓' (confirming) button. The green light will illuminate.
- Within 5 seconds, rotate the knob clockwise to open the safe door.
2. Opening with Emergency Key
Follow the steps outlined in 'Initial Safe Opening (Emergency Key)' in the Setup section.
3. Closing and Locking
- Close the safe door firmly.
- Rotate the knob counter-clockwise to engage the locking bolts.
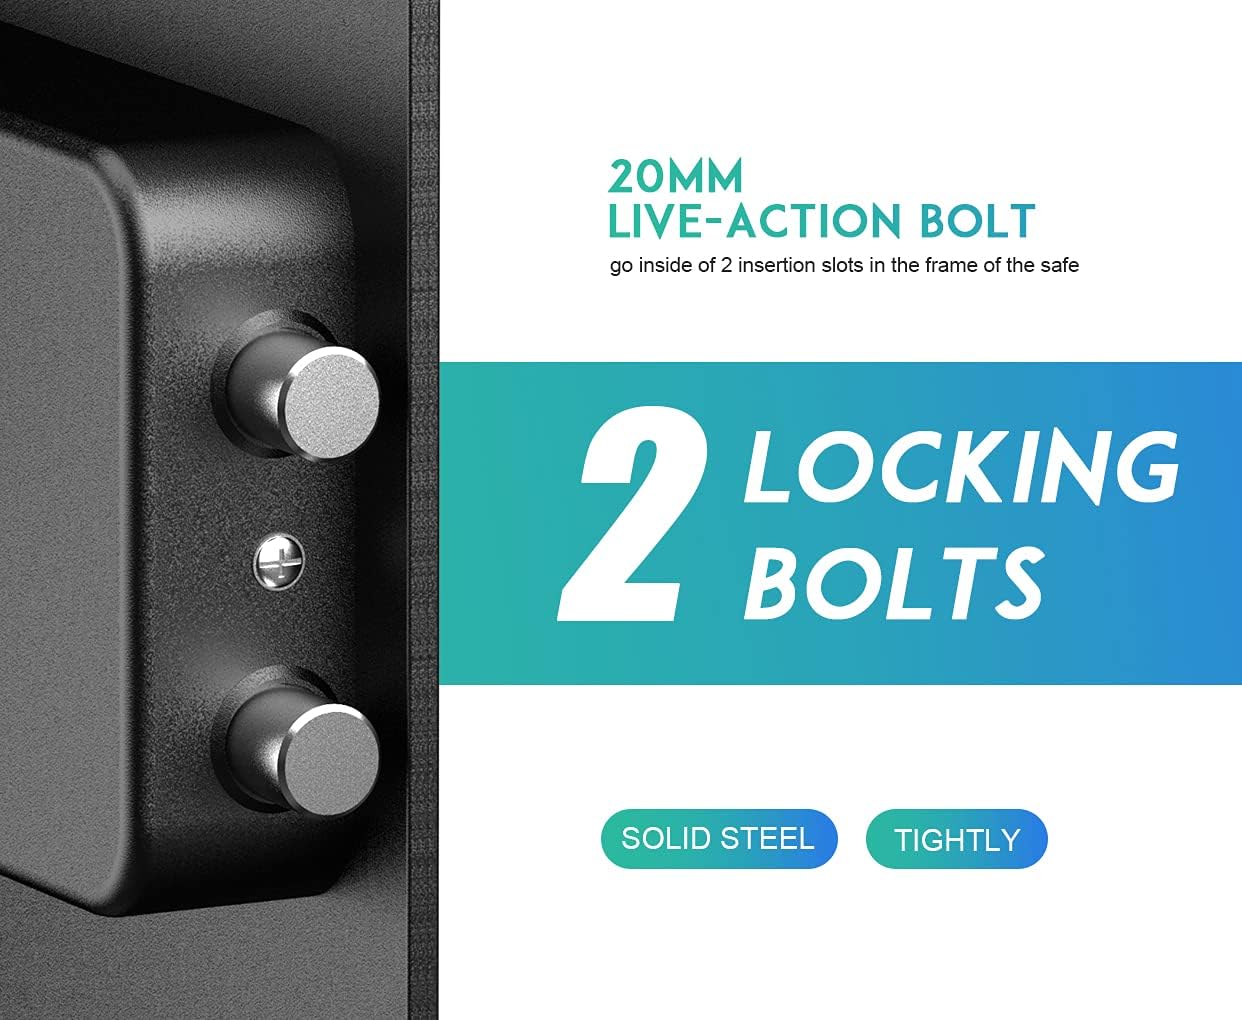
Image: A close-up view highlights the two 20mm live-action solid steel locking bolts that secure the safe door tightly.
Maintenance
Battery Replacement
When the yellow indicator light on the keypad flashes, it indicates low battery power. Replace all 4 AA alkaline batteries promptly to ensure continuous operation. If batteries completely drain, use the emergency key to open the safe.
Cleaning
Wipe the exterior of the safe with a soft, damp cloth. Avoid using abrasive cleaners or solvents that could damage the finish.
Troubleshooting
| Issue | Possible Cause | Solution |
|---|---|---|
| Safe does not open with digital code. | Incorrect code entered, low batteries, or batteries incorrectly installed. | Re-enter code carefully. Replace batteries. Check battery polarity. Use emergency key. |
| Keypad lights are not working. | Dead batteries. | Replace all 4 AA alkaline batteries. |
| Safe door is difficult to open/close. | Obstruction or misalignment. | Check for any obstructions. Ensure the safe is on a level surface. |
| Cannot program new code. | Incorrect programming sequence. | Repeat programming steps carefully, ensuring the 'PROGRAM' button is pressed first. |
Specifications
| Feature | Detail |
|---|---|
| Brand | RPNB |
| Model Number | RP42ESA |
| Exterior Dimensions (H x W x D) | 16.51" x 13.76" x 12.97" |
| Interior Dimensions (H x W x D) | 16.42" x 13.66" x 10.63" |
| Capacity | 1.5 Cubic Feet |
| Material | Alloy Steel |
| Lock Type | Electronic Combination Lock, Key |
| Power Source | 4 x AA Batteries (not included) |
| Mounting Type | Wall Mount; Floor Mount |
| Special Features | Anti-Theft, Removable Shelf |
| Item Weight | 27.7 pounds (12.6 Kilograms) |

Image: A diagram illustrating the exterior dimensions of the RPNB Deluxe Digital Keypad Safe Box.
Warranty and Customer Support
RPNB is committed to providing high-quality products and excellent customer service. For any questions, difficulties, or warranty inquiries regarding your safe, please contact RPNB customer support directly. Refer to the contact information provided on the RPNB official website or your purchase documentation.


