
1. Introduction
This user manual provides comprehensive instructions for the NETVIP Dual Band WiFi Range Extender (Model: ZQ1211). This device is designed to extend the coverage of your existing Wi-Fi network, eliminating dead zones and providing a stronger, more reliable wireless signal throughout your home or office. It supports both 2.4GHz and 5GHz frequency bands for versatile connectivity.

Image: The NETVIP Dual Band WiFi Range Extender, a white rectangular device with four external antennas, plugged into a wall socket. Indicator lights are visible on the front panel.
2. Product Features
- Dual Band Connectivity: Supports both 2.4GHz (up to 300Mbps) and 5GHz (up to 867Mbps) Wi-Fi bands for a combined speed of 1200Mbps.
- Extended Coverage: Designed to eliminate Wi-Fi dead zones and extend wireless signal to hard-to-reach areas.
- WPS Function: Easy one-touch setup for quick connection to your router.
- Ethernet Ports: Includes LAN and WAN/LAN ports for wired connections to devices like smart TVs, gaming consoles, or PCs.
- Multiple Device Compatibility: Can connect up to 10 wireless devices simultaneously with stable performance.
- Signal Strength LED: Helps in finding the optimal location for installation by indicating signal strength.

Image: A graphic illustrating the benefits of dual-band Wi-Fi. The 5GHz band (867Mbps) is shown for interference-free HD video and gaming, while the 2.4GHz band (300Mbps) is for basic internet applications and more supported devices.

Image: A cutaway diagram of a multi-story house showing a router on the ground floor and the Wi-Fi extender on the second floor, illustrating how the extender helps eliminate Wi-Fi dead zones by extending coverage.
3. Product Overview
Familiarize yourself with the components of your NETVIP WiFi Range Extender:
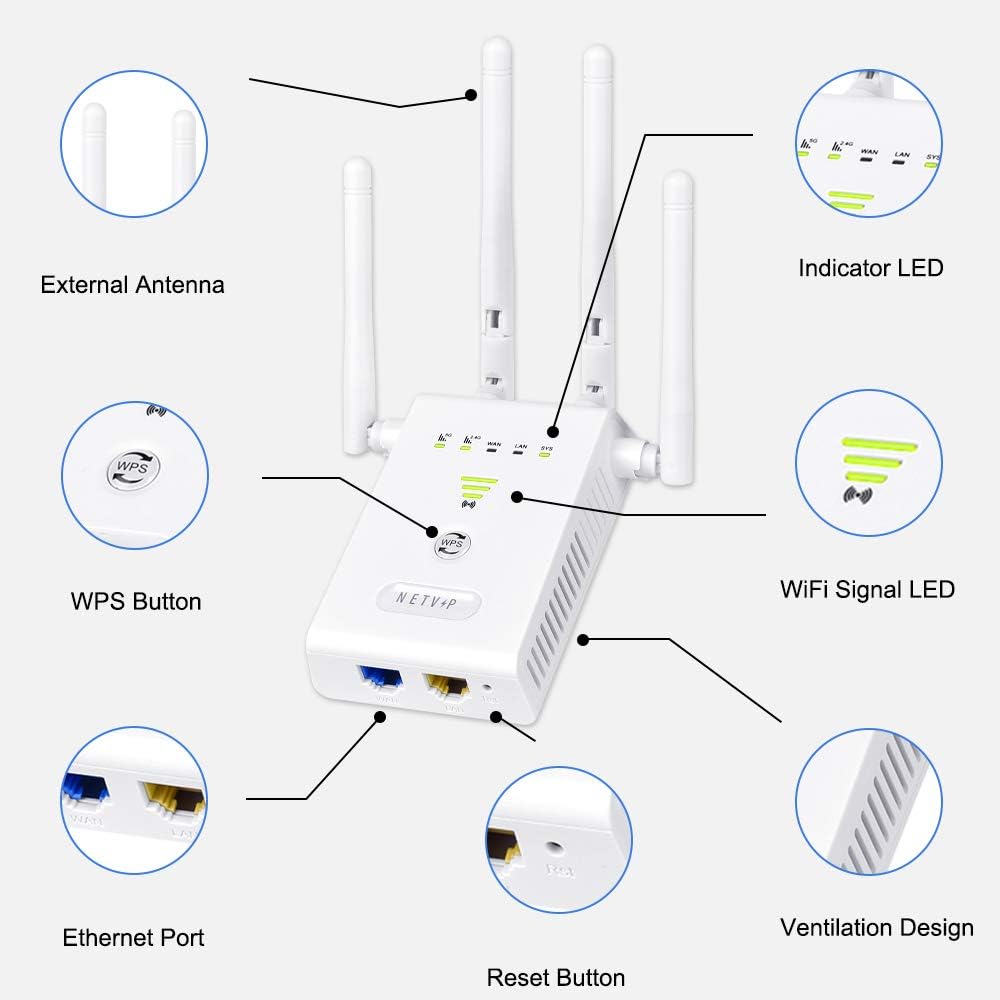
Image: A detailed diagram of the Wi-Fi extender with labels pointing to its key components: External Antennas, Indicator LEDs (2.4G, 5G, WAN, LAN, SYS), WiFi Signal LED, WPS Button, Ethernet Ports (LAN/WAN), and Reset Button, and Ventilation Design.
- External Antennas: Four adjustable antennas for optimal signal reception and transmission.
- Indicator LEDs: Lights indicating status for 2.4G, 5G, WAN, LAN, and System (SYS).
- WiFi Signal LED: Indicates the strength of the Wi-Fi signal received by the extender.
- WPS Button: For quick and easy setup with WPS-enabled routers.
- Ethernet Ports (LAN/WAN): For connecting wired devices or for setting up in AP/Router mode.
- Reset Button: Used to restore the device to factory default settings.
- Ventilation Design: Ensures proper heat dissipation for stable operation.
4. Setup Instructions
4.1. WPS One-Touch Connection
The easiest way to set up your extender is using the WPS (Wi-Fi Protected Setup) function. Ensure your router supports WPS.
- Plug the NETVIP extender into a power outlet near your main router.
- Wait for the Power LED to turn solid.
- Press the WPS button on your host router.
- Within 2 minutes, press the WPS button on the WiFi Repeater.
- Wait for 1-2 minutes for the connection to establish. The Wi-Fi Signal LED on the extender should turn solid, indicating a successful connection.

Image: A visual guide demonstrating the three steps for WPS setup: 1. Press WPS on host router, 2. Press WPS on WiFi Repeater, 3. Wait for 1-2 minutes for successful setup.
4.2. Manual Setup (Via Web Browser)
If your router does not support WPS or if you prefer manual configuration, follow these steps:
- Plug the NETVIP extender into a power outlet near your main router.
- Connect your computer or mobile device to the extender's Wi-Fi network (e.g., "NETVIP_Extender" or similar, usually without a password initially).
- Open a web browser and enter the default IP address (e.g., 192.168.10.1) or the default domain name (check the manual or device label for specifics, common ones are wifi.repeater or ap.setup).
- Log in using the default username and password (usually "admin" for both, check the device label or included quick start guide).
- Follow the on-screen wizard to select your desired operating mode (Repeater, AP, or Router).
- If in Repeater mode, select your existing Wi-Fi network and enter its password. You can choose to keep the same SSID or create a new one for the extended network.
- Save the settings and wait for the extender to restart.
- Once restarted, the Wi-Fi Signal LED should indicate a strong connection. You can now unplug the extender and move it to an optimal location.
5. Operating Modes
The NETVIP WiFi Range Extender supports multiple operating modes to suit various networking needs:
- Repeater Mode: Extends the range of your existing wireless network. This is the most common mode for eliminating Wi-Fi dead zones.
- AP (Access Point) Mode: Converts a wired network connection into a wireless one. Ideal for areas with only wired internet access, allowing wireless devices to connect.
- Router Mode: Functions as a primary router, creating a new private network. This mode is typically used when you have a modem but no router.

Image: A diagram illustrating the use of the LAN/WAN port to connect wired devices such as a printer, laptop, desktop computer, or game console to the extender, creating a wired connection for these devices.
6. Optimal Placement
For best performance, place the extender in a location where it can receive a strong signal from your main router and also effectively transmit to the areas needing coverage. The Signal Strength LED can assist you:

Image: A close-up of the extender's front panel showing the Signal Strength LED. It indicates that three bars mean Strong Signal, two bars mean Medium Signal, and one bar means Weak Signal. Aim for a strong or medium signal.
- Place the extender roughly halfway between your router and the Wi-Fi dead zone.
- Avoid placing it near large metal objects, concrete walls, or other devices that emit electromagnetic interference (e.g., microwaves, cordless phones).
- Ensure the Signal Strength LED indicates a strong or medium signal from your router. If it's weak, move the extender closer to the router.
7. Maintenance
- Regular Restart: Periodically restarting the extender (unplugging and plugging back in) can help maintain optimal performance.
- Firmware Updates: Check the manufacturer's website (www.netvip.com) for any available firmware updates. Updates can improve performance and security.
- Cleaning: Use a soft, dry cloth to clean the device. Do not use liquid cleaners or aerosols.
- Environment: Keep the device in a cool, dry place, away from direct sunlight and excessive heat or moisture.
8. Troubleshooting
If you encounter issues with your NETVIP WiFi Range Extender, try the following solutions:
| Problem | Solution |
|---|---|
| Cannot connect to the extender's Wi-Fi network. | Ensure the extender is powered on. Try restarting the extender. Verify you are selecting the correct network name (SSID). |
| No internet access after connecting to the extender. | Check the connection between the extender and your main router (Signal Strength LED). Ensure the extender is configured correctly (e.g., entered the correct password for your main Wi-Fi network). Restart both the extender and your main router. |
| Slow internet speed through the extender. | Relocate the extender to a position where it receives a stronger signal from your main router (check Signal Strength LED). Reduce interference from other electronic devices. Ensure your main internet connection is stable. |
| WPS setup failed. | Ensure your router supports WPS and that you pressed both WPS buttons within the required timeframe. Try the manual setup method via web browser. |
| Forgot login password for web management page. | Press and hold the Reset button on the extender for 5-10 seconds until the LEDs flash. This will restore the extender to factory default settings, and you can then log in with the default credentials. |
9. Specifications
| Feature | Detail |
|---|---|
| Model Number | ZQ1211 |
| Brand | NETVIP |
| Data Transfer Rate | 1200 Megabits Per Second (Mbps) |
| Frequency Band Class | Dual-Band (2.4GHz & 5GHz) |
| Connector Type | RJ45 (Ethernet) |
| Compatible Devices | Router |
| Product Dimensions | 4.72 x 4.13 x 1.97 inches |
| Item Weight | 7.2 ounces |

Image: A bar chart illustrating the data transfer rates for the 2.4 GHz (300 Mbps) and 5 GHz (867 Mbps) bands, emphasizing the dual wireless band support.
10. Warranty and Support
For warranty information and technical support, please refer to the documentation included with your product or visit the official NETVIP website. Keep your purchase receipt for warranty claims.
For further assistance, you may also contact NETVIP customer service through their official channels.
