1. Product Overview
The FLEXISPOT Under Desk Cable Management Tray is designed to organize and conceal cables, power strips, and adapters beneath your desk. This metal raceway helps create a clutter-free and safer workspace by keeping wires tidy and off the floor. Its open design promotes airflow and allows for easy access to cables.

Image 1.1: The FLEXISPOT Under Desk Cable Management Tray installed, showing organized cables and a power strip.
2. Package Contents
Before beginning installation, please verify that all components are present:
- Cable Management Tray (1 PC)
- Connecting Bracket (2 PCS)
- M4x6mm Screws (2 PCS)
- St4.8x12mm Screws (4 PCS)
- 2.5x2.5mm Allen Key (1 PC)

Image 2.1: Detailed view of all included components and hardware for the cable management tray.
Attention: The safe thickness of the table for installation is at least 15mm (0.6 inches) to prevent damage to the table from drilling.
3. Setup and Installation
Follow these steps to properly install your FLEXISPOT Under Desk Cable Management Tray:
- Step 1: Attach the Connecting Brackets to the Cable Management Tray.
Use the M4x6mm screws and the provided 2.5x2.5mm Allen key to secure the two connecting brackets to the cable management tray. Ensure they are firmly attached. - Step 2: Attach the Cable Management Tray to the Tabletop.
Position the assembled tray under your desk in the desired location. Use the St4.8x12mm screws to attach the connecting brackets to the underside of the tabletop. It is recommended to pre-drill pilot holes to prevent wood splitting and ensure a secure fit. Consider the desktop material and thickness before drilling.
For a visual guide, please refer to the official installation video:
Video 3.1: Official installation guide for the FLEXISPOT CMP502 Cable Management Tray. This video demonstrates the step-by-step process of assembling the tray and mounting it to a desk, including the use of screws and tools.
4. Operating and Usage
Once installed, the cable management tray provides an efficient solution for organizing your workspace.
- Clutter-Free Workstation: Place power strips, excess cable lengths, and adapters within the tray to keep them off the floor and out of sight. This significantly reduces visual clutter and creates a more organized environment.
- Airflow Open Design: The tray features an open ventilation design that prevents dust accumulation and allows for proper airflow around electronic components, helping to keep them cool. This design also simplifies adding or removing cables as needed.
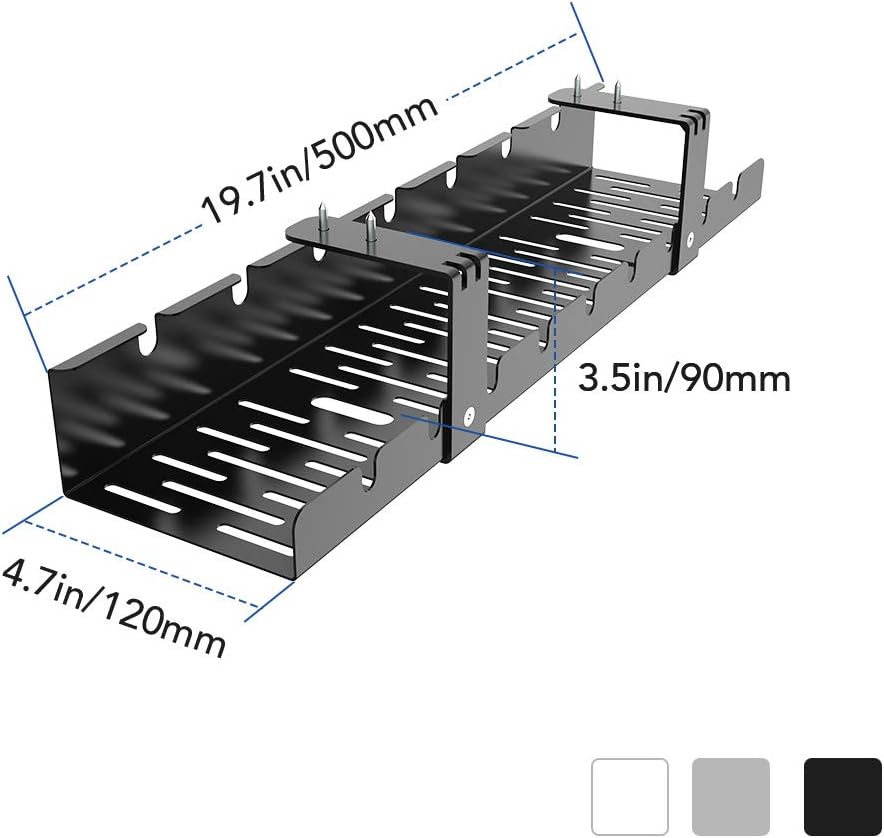
Image 4.1: The open design of the tray facilitates airflow, preventing heat buildup and dust accumulation.
- Improved Safety and Productivity: By organizing cables, you reduce the risk of electrical fires, tripping hazards, and accidental disconnections. A tidy workspace can also minimize distractions and enhance productivity.
- Pet Protection: Keep cables out of reach of pets to protect them from potential harm and prevent damage to your wires.

Image 4.2: A visual comparison demonstrating the significant reduction in cable clutter after installing the management tray.

Image 4.3: The cable management tray helps protect pets by keeping wires inaccessible.
5. Maintenance
The FLEXISPOT Cable Management Tray requires minimal maintenance:
- Regularly inspect the tray and its mounting screws to ensure they remain secure.
- Wipe the tray with a dry or slightly damp cloth to remove dust and debris. Avoid using harsh chemicals or abrasive cleaners.
- Periodically check cables within the tray for any signs of wear or damage.
6. Troubleshooting
If you encounter any issues with your cable management tray, consider the following:
- Tray feels loose after installation: Ensure all screws are tightened securely. If the desk material is soft, consider using appropriate anchors for better stability.
- Power bricks or adapters do not fit: The tray has specific dimensions (19.7x4.7 inches). Taller power bricks may not fit vertically. Try repositioning them horizontally or using smaller adapters if possible.
- Cables are still visible or messy: Utilize cable ties or Velcro straps within the tray to bundle cables together. Route cables through the designated slots for a cleaner appearance.
7. Specifications
| Feature | Detail |
|---|---|
| Brand | FLEXISPOT |
| Model Number | EB9D |
| Shape | Rectangular |
| Color | Black |
| Finish Type | Black |
| Size | 19.7 x 4.7 inches (500mm x 120mm) |
| Product Dimensions | 20.16 x 5.24 x 2.8 inches |
| Item Weight | 75.9 pounds (34.5 Kilograms) |
| Assembly Required | Yes |
| UPC | 810000748020 |
| Manufacturer | FLEXISPOT |
| Date First Available | July 17, 2020 |
Image 7.1: Key dimensions of the cable management tray.
8. Warranty and Support
For warranty information or technical support, please refer to the official FLEXISPOT website or contact their customer service directly. Details regarding product protection plans may also be available through your retailer.


