Introduction
Thank you for choosing the BWE Black Shower Faucet Set. This manual provides detailed instructions for the installation, operation, maintenance, and troubleshooting of your new shower system. Please read this manual thoroughly before installation and keep it for future reference to ensure safe and efficient use of the product.

Figure 1: Complete BWE Black Shower Faucet Set components.
Product Overview and Components
The BWE Black Shower Faucet Set is designed to provide a luxurious and functional showering experience. It features a matte black finish for durability and a modern aesthetic. Key components include:
- 12-inch Square Rain Shower Head: Made from 304 stainless steel, designed for a wide, natural rainfall experience.
- Handheld Shower Head: Constructed from brass for durability and ease of use.
- 15.75-inch Shower Arm: Solid brass construction for secure mounting of the rain shower head.
- Shower Hose: Durable PVC material for flexibility and longevity.
- Shower Holder: Brass construction to securely hold the handheld shower head.
- Water Control Valve: Brass pressure balance valve with 2-function switch for seamless operation.
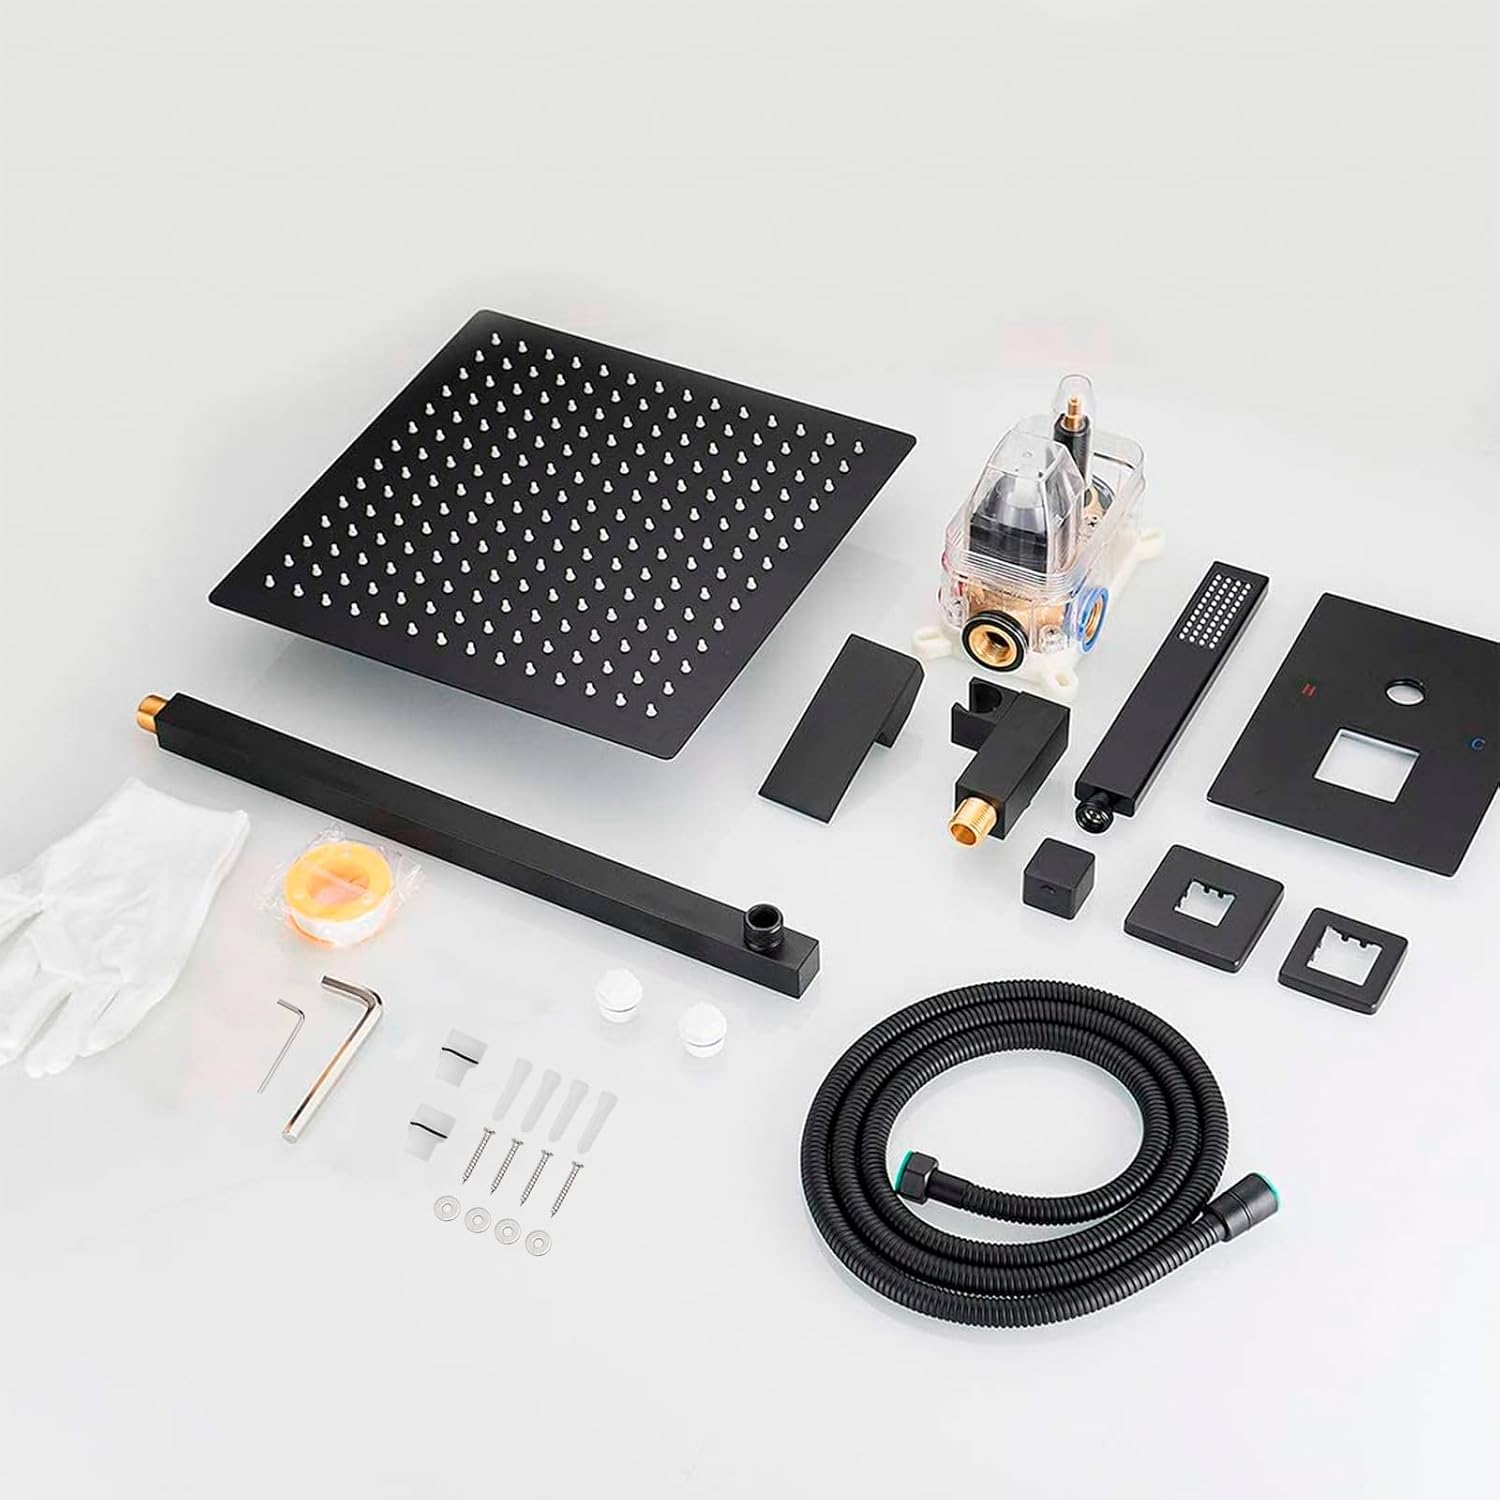
Figure 2: All included components for the BWE Black Shower Faucet Set.
Specifications
| Feature | Detail |
|---|---|
| Brand | BWE |
| Color | Matte Black |
| Material | Brass (Valve, Handheld, Holder, Arm), 304 Stainless Steel (Rain Head), PVC (Hose) |
| Finish Type | Matte Black |
| Number of Handles | 1 |
| Rain Shower Head Size | 12 inches (Square) |
| Shower Arm Length | 15.75 inches |
| Shower Hose Length | 59 inches |
| Connection Threads | Standard 1/2 NPT tapered threads |
| Water Flow Rate | Up to 2.5 GPM (Gallons Per Minute) |
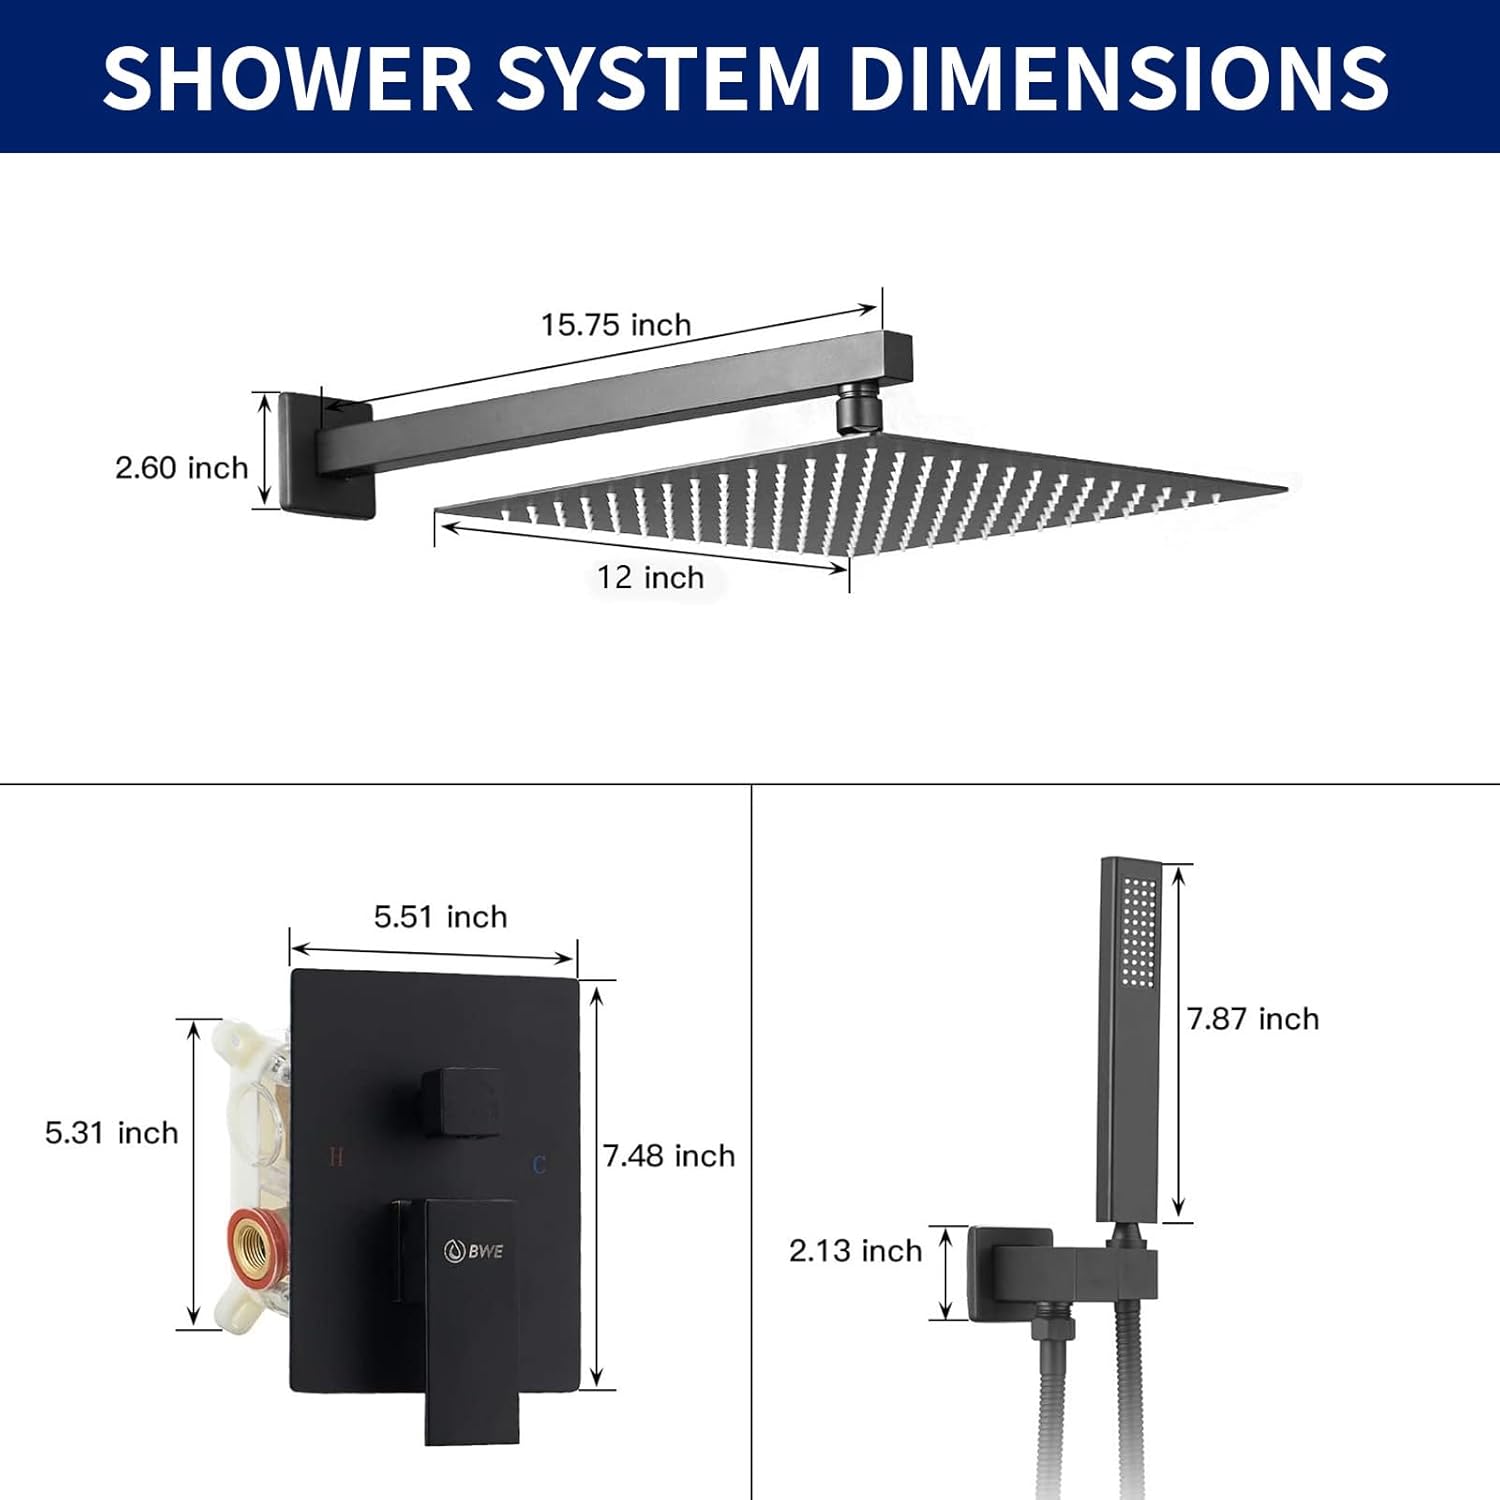
Figure 3: Detailed dimensions of the shower system components.
Setup and Installation
Professional installation is recommended. Ensure all local plumbing codes are followed. Before beginning, turn off the main water supply.
Tools and Materials Required (Not Included):
- Adjustable wrench
- Pipe sealant tape (Teflon tape)
- Phillips head screwdriver
- Level
- Drill (if required for mounting)
- Safety glasses
Installation Steps:
- Prepare the Wall: Ensure the wall cavity is ready for the embedded valve. The valve requires an embedded depth of approximately 3.15 inches (80mm).
- Install the Pressure Balance Valve:
- Connect the hot and cold water lines to the designated inlets on the brass valve body (Hot Water Connector and Cold Water Connector, both 1/2 NPT).
- Connect the fixed shower head connector (1/2 NPT) and handheld shower head connector (1/2 NPT) to their respective outlets on the valve.
- Securely mount the valve body within the wall, ensuring it is level and at the correct depth for the trim plate.

Figure 4: Pressure Balance Valve internal connections and dimensions.
- Install the Shower Arm:
- Apply pipe sealant tape to the threads of the shower arm.
- Thread the shower arm into the wall connection, ensuring it is securely tightened and properly oriented.
- Attach the Rain Shower Head:
- Thread the 12-inch square rain shower head onto the end of the shower arm. Hand-tighten first, then use a wrench to secure, being careful not to overtighten.
- Install the Handheld Shower Holder:
- Mount the brass shower holder to the wall at a comfortable height, connecting it to the dedicated outlet from the valve.
- Connect the Shower Hose and Handheld Shower Head:
- Connect one end of the PVC shower hose to the shower holder outlet.
- Connect the other end of the hose to the handheld shower head.
- Install the Trim Plate and Handle:
- Install the decorative trim plate over the valve body, securing it with the provided screws.
- Attach the control handle to the valve stem, ensuring it operates smoothly.
- Test for Leaks:
- Slowly turn on the main water supply.
- Check all connections for leaks. If leaks are present, turn off water, tighten connections, and re-test.
Operating Instructions
Your BWE shower system features a single handle for controlling both water temperature and flow, and a diverter for switching between the rain shower head and handheld shower.

Figure 5: Shower Mixer Valve Control operation.
- Turning On/Off Water Flow:
- Lift the main handle to turn on the water flow.
- Push the main handle down to turn off the water flow.
- Adjusting Water Temperature:
- Rotate the main handle to adjust the temperature. Rotate towards "H" (Hot) for warmer water and towards "C" (Cold) for cooler water.
- The pressure balance valve maintains consistent water temperature, protecting against sudden changes in hot or cold water pressure.
- Switching Shower Functions:
- The small knob on the valve plate controls the shower output.
- Rotate the knob to select between the rain shower head and the handheld shower head.
Key Features:
- Air Pressure Technology: Injects air into the water stream for a softer, more natural rainfall experience and efficient water usage (up to 2.5 GPM).
- 360° Rotation: Both the rain shower head and handheld shower head offer 360° rotation for adjustable spray angles.
- Easy-Cleaning Silicone Nozzles: The nozzles on both shower heads are made of silicone, allowing for easy cleaning of mineral buildup by simply wiping them.

Figure 6: Overview of the 2-function shower system features.

Figure 7: Air Injection Technology explanation.

Figure 8: High Pressure Handheld Shower Head features.
Maintenance
Regular cleaning and maintenance will ensure the longevity and optimal performance of your BWE shower system.
- Cleaning the Finish: Use a soft, damp cloth and mild soap to clean the matte black finish. Avoid abrasive cleaners, harsh chemicals, or scouring pads, as these can damage the finish.
- Cleaning Nozzles: The silicone nozzles on both shower heads are designed for easy cleaning. Periodically rub the nozzles with your finger or a soft brush to dislodge any mineral buildup.
- Preventing Water Spots: Wipe down the shower system after each use to prevent water spots and mineral deposits, especially in hard water areas.
- Cartridge Maintenance: If you notice a decrease in water flow or inconsistent temperature, the pressure balance cartridge may need cleaning or replacement. Consult a professional plumber for this service.
Troubleshooting
This section addresses common issues you might encounter with your shower system.
| Problem | Possible Cause | Solution |
|---|---|---|
| Low Water Flow | Clogged shower head nozzles; debris in valve cartridge; low water pressure in home. | Clean shower head nozzles. Check for debris in the valve cartridge (professional assistance may be needed). Consult a plumber to check home water pressure. |
| Inconsistent Water Temperature | Pressure balance cartridge issue; hot/cold water supply imbalance. | Ensure hot and cold water supplies are fully open. The pressure balance cartridge may need cleaning or replacement. Consult a professional. |
| Leaks from Connections | Loose connections; insufficient pipe sealant tape; damaged O-rings/gaskets. | Turn off water supply. Tighten connections. Reapply pipe sealant tape if necessary. Inspect and replace any damaged O-rings or gaskets. |
| Diverter Not Switching Functions | Debris in diverter mechanism; worn diverter cartridge. | Flush the system. If the issue persists, the diverter cartridge may need inspection or replacement by a professional. |
Warranty and Support
BWE products are manufactured to high-quality standards. For specific warranty information, please refer to the documentation included with your purchase or visit the official BWE website.
For customer support, technical assistance, or to inquire about replacement parts, please contact BWE customer service. You can often find contact information on the product packaging or through the brand's official online store.
Return Policy: This product is eligible for a 30-day refund/replacement return policy from the date of purchase. Please retain your proof of purchase for any warranty or return claims.
BWE Store: For more products and information, visit the Official BWE Store on Amazon.


