1. Product Overview
The Brennenstuhl Mobile Rechargeable LED Floodlight Rufus 3020 MA is a robust and versatile lighting solution designed for various applications, including workshops, construction sites, and automotive detailing. It features a high color rendering index (CRI 96) for accurate color assessment, multiple brightness levels, and a durable construction.

Figure 1: Brennenstuhl Rufus 3020 MA LED Floodlight. This image shows the front view of the floodlight with its central LED and protective casing.
Key features include an integrated Li-Ion battery, a power bank function for charging external devices, and a multi-level fold-out frame for flexible positioning. Its IP65 protection rating ensures resistance against dust and water jets, making it suitable for both indoor and outdoor use.
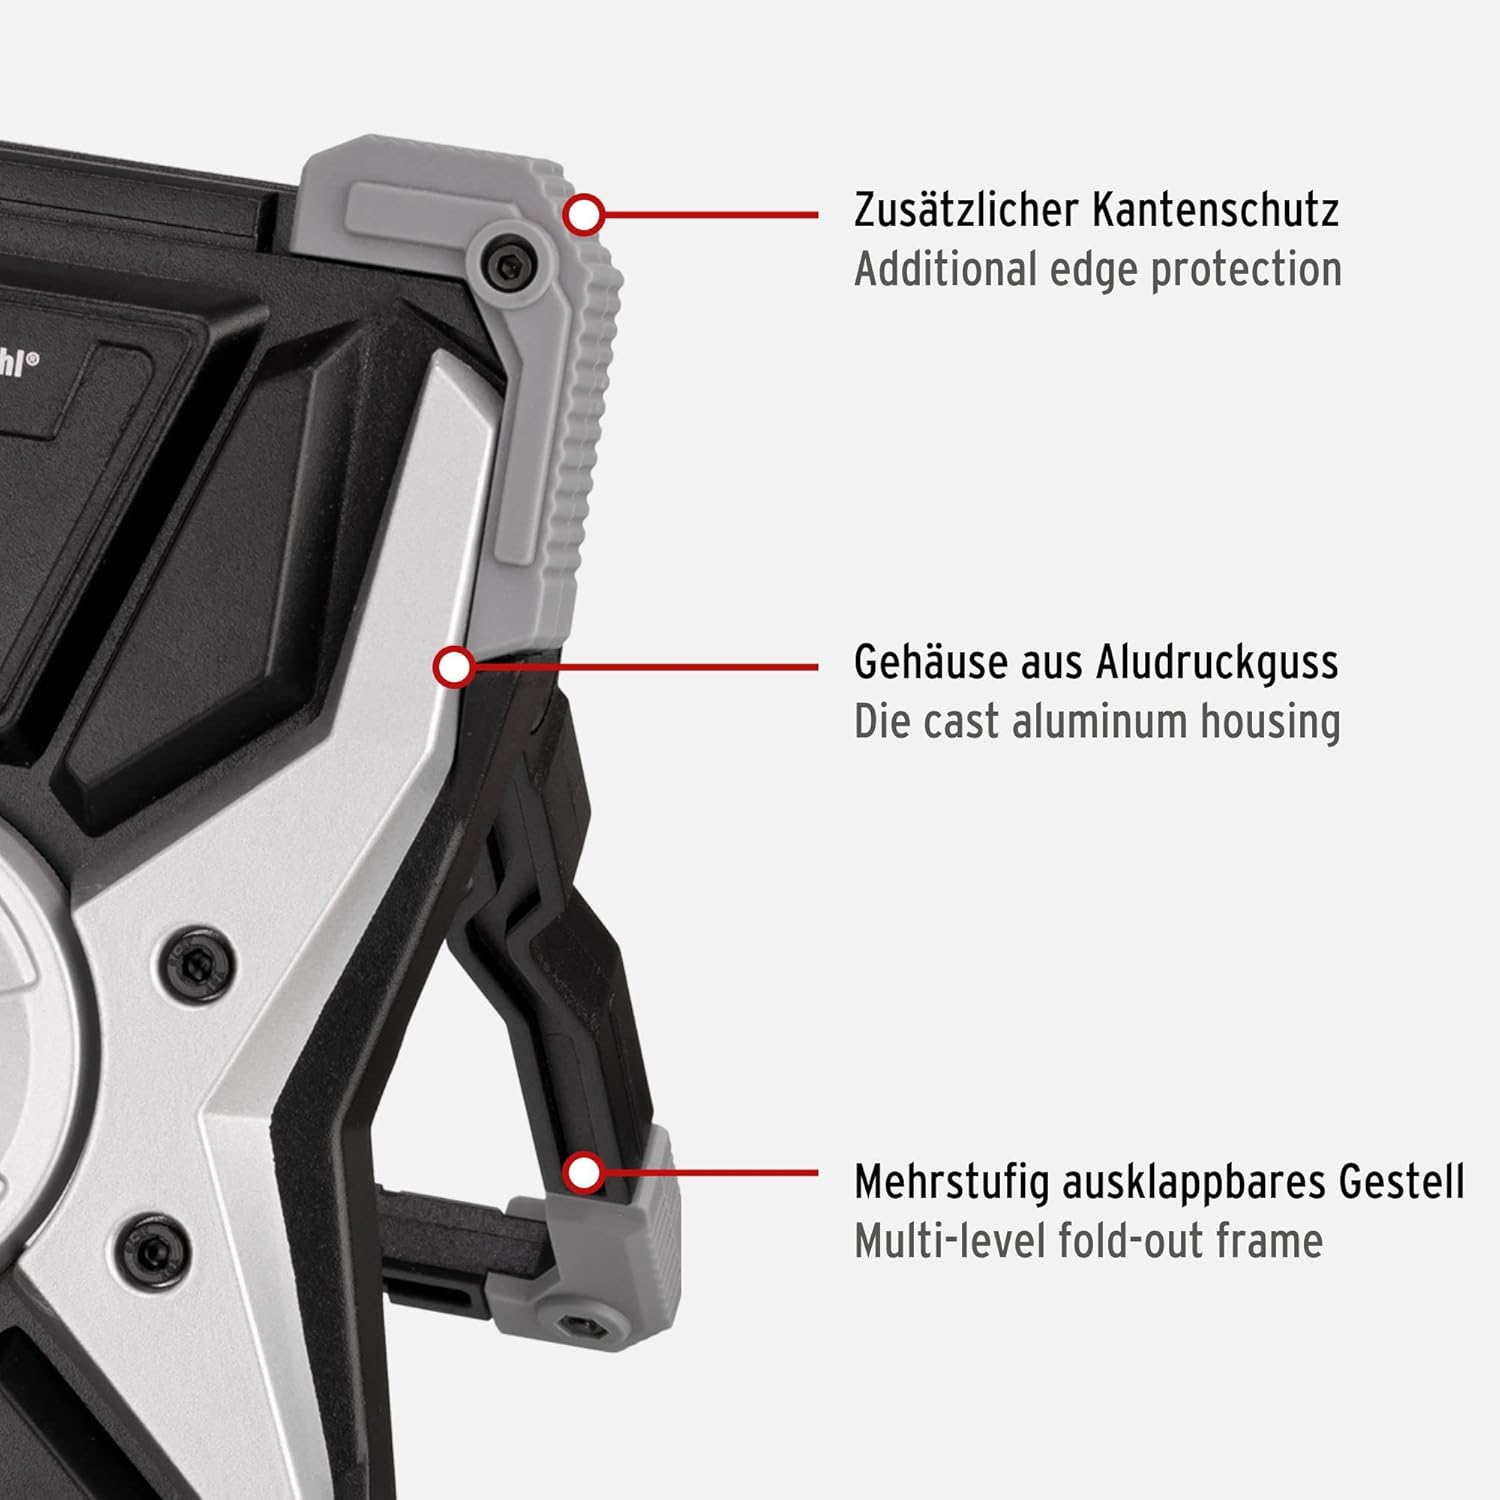
Figure 2: Key structural features of the floodlight. This image highlights the additional edge protection, die-cast aluminum housing, and the multi-level fold-out frame for stability and durability.
2. Setup and Initial Use
2.1 Unpacking and Inspection
Carefully remove the floodlight and all accessories from the packaging. Inspect the device for any signs of damage. If any damage is found, do not use the device and contact customer support.
2.2 Initial Charging
Before first use, fully charge the floodlight's integrated Li-Ion battery. Connect the included Type A/C charging cable to the charging port (Type C) on the device and to a suitable USB power adapter (not included). The charge indicator will provide feedback on the charging status.
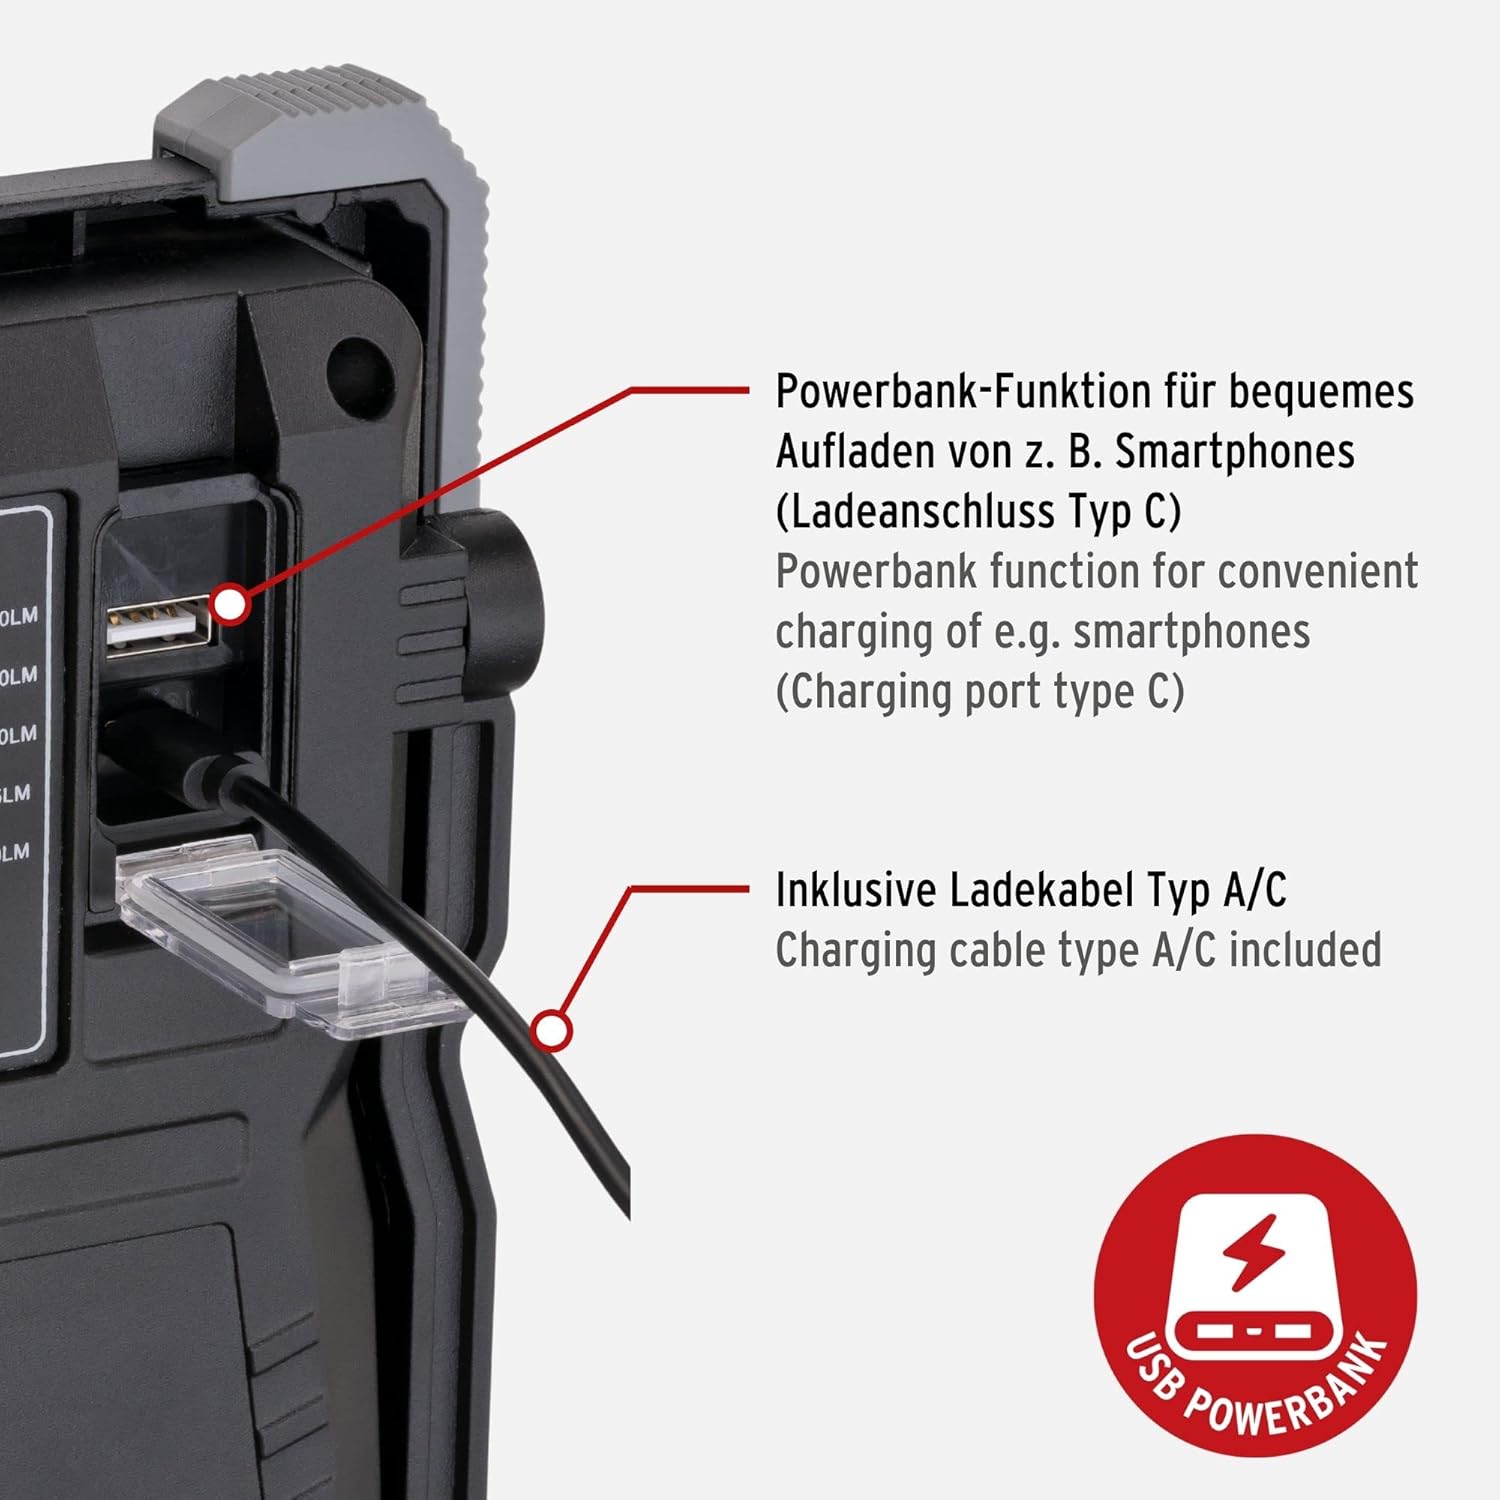
Figure 3: Charging port and power bank function. This image illustrates the Type C charging port for the floodlight and the USB-A output for the power bank function, along with the included charging cable.
A full charge typically takes approximately 5 hours.
2.3 Positioning the Floodlight
Utilize the multi-level fold-out frame to position the floodlight at the desired angle and height. Ensure the floodlight is placed on a stable, level surface to prevent tipping.
3. Operating Instructions
3.1 Power On/Off and Brightness Adjustment
Press the On/Off switch to turn the floodlight on. Subsequent presses of the switch will cycle through the 5 available brightness levels: 10%, 25%, 50%, 75%, and 100%. The floodlight features a memory function, recalling the last used brightness setting.

Figure 4: Control panel details. This image shows the On/Off switch, the charge indicator lights, and the labels for the five brightness levels with corresponding lumen and Kelvin values.
3.2 Color Temperature Adjustment
The Rufus 3020 MA allows for adjustment of the color temperature to suit different tasks and environments. Cycle through the available color temperatures (2700K, 3500K, 4500K, 5500K, 6500K) by pressing the dedicated color temperature button (refer to Figure 4 for button location). This feature is particularly useful for tasks requiring precise color assessment, such as painting or detailing.

Figure 5: Understanding CRI and Color Temperature. This graphic explains the Colour Rendering Index (CRI) and how adjusting the color temperature changes the light from cold white to warm white, crucial for accurate color perception.
3.3 Power Bank Function
The floodlight can be used as a power bank to charge compatible USB devices, such as smartphones or tablets. Connect your device to the USB-A output port on the floodlight using an appropriate charging cable (refer to Figure 3).

Figure 6: Floodlight in use, providing illumination for detailed inspection of a car tire.

Figure 7: A professional using the floodlight for car detailing, demonstrating its utility for precise work and color assessment on vehicle surfaces.
4. Maintenance
4.1 Cleaning
Ensure the floodlight is turned off and disconnected from any power source before cleaning. Wipe the exterior surfaces with a soft, damp cloth. Do not use abrasive cleaners or solvents, as these can damage the housing. The IP65 rating allows for cleaning with a gentle water spray, but avoid submerging the device.
4.2 Battery Care
To prolong battery life, avoid fully discharging the battery frequently. Recharge the floodlight regularly, especially if it will be stored for an extended period. Store the device in a cool, dry place.
4.3 Storage
When not in use, store the floodlight in a clean, dry environment, away from direct sunlight and extreme temperatures. The included carrying bag can be used for protection during storage and transport.
5. Troubleshooting
- Floodlight does not turn on:
- Check if the battery is charged. Connect the floodlight to a charger and observe the charge indicator.
- Ensure the On/Off switch is pressed firmly.
- Battery not charging:
- Verify that the charging cable is securely connected to both the floodlight and the power adapter.
- Ensure the power adapter is functioning correctly and connected to a live power outlet.
- Try using a different USB-C charging cable or power adapter.
- Power bank function not working:
- Ensure the floodlight has sufficient battery charge.
- Check the connection between your device and the floodlight's USB-A output port.
- Try a different charging cable for your external device.
If the issue persists after attempting these troubleshooting steps, please contact Brennenstuhl customer support.
6. Technical Specifications
| Feature | Specification |
|---|---|
| Model Number | 1173110300 |
| Power Consumption | 30 W |
| Luminous Flux | 2700 lm (max) |
| Color Rendering Index (CRI) | 96 (CRI15) |
| Color Temperature | 2700K / 3500K / 4500K / 5500K / 6500K |
| Battery Type | Integrated Li-Ion 7.4 V / 5 Ah |
| Charging Time | Approx. 5 hours |
| Light Duration (100% / 75% / 50% / 25% / 10%) | 3h / 4h / 6h / 12h / 25h |
| Protection Rating | IP65 (Dust and water jet protected) |
| Impact Strength | IK08 |
| Protection Class | III |
| Material | Die-cast Aluminum housing, high-quality plastic edge protection |
| Dimensions | Approx. 5 x 14 x 21 cm |
| Weight | Approx. 1.11 kg |

Figure 8: Integrated battery and selectable light color. This image highlights the integrated Li-Ion battery specifications and the range of selectable light colors (Kelvin values) available.

Figure 9: Detailed explanation of CRI15. This graphic compares the general color rendering index (Ra) with CRI15, emphasizing that CRI15 considers secondary reference colors for more accurate color matching, ideal for precise work.
7. Warranty and Support
Brennenstuhl products are manufactured to high-quality standards and come with a manufacturer's warranty. For specific warranty terms and conditions, please refer to the warranty card included with your product or visit the official Brennenstuhl website.
For technical support, troubleshooting assistance beyond this manual, or spare parts inquiries, please contact Brennenstuhl customer service. Contact details can typically be found on the product packaging or the official Brennenstuhl website.


