1. Introduction and Safety Information
This manual provides essential instructions for the safe and effective operation, maintenance, and care of your Tuffcare Rhino Lift Electric Patient Lift. Please read this manual thoroughly before initial use and retain it for future reference. Proper use ensures the safety of both the user and the caregiver.
Important Safety Warnings:
- Always ensure the patient's weight does not exceed the lift's maximum capacity of 380 lbs.
- Never operate the lift without proper training and understanding of all functions.
- Always engage the wheel brakes before transferring a patient.
- Ensure slings are correctly attached and secured before lifting.
- Do not use the lift on uneven or unstable surfaces.
- Regularly inspect the lift and slings for wear or damage. Do not use if damaged.
- Keep hands and clothing clear of moving parts.
- In case of emergency, use the emergency stop button immediately.
2. Product Overview and Components
The Tuffcare Rhino Lift is an electric sit-to-stand patient lift designed to assist in transferring individuals with limited mobility. It features a robust frame, electric lifting mechanism, and a low-profile base for accessibility.

Figure 2.1: Key components of the Tuffcare Rhino Lift. This image displays the ergonomic hand grips, detachable battery pack, emergency stop button, control pendant, knee support, adjustable legs, foot plate, foot pedal, and rear locking casters.
Key Components:
- Ergonomic Hand Grips: For caregiver control and maneuverability.
- Detachable Battery Pack: Provides power for electric lifting.
- Emergency Stop Button: Immediately cuts power to the lift in emergencies.
- Control Pendant: Wired remote for controlling lift arm movement (up/down).
- Knee Support: Padded support for patient comfort and stability during transfer.
- Adjustable Legs: Base legs can be widened for stability and access around furniture.
- Foot Plate: Non-slip platform for the patient's feet.
- Foot Pedal: Used to adjust the width of the base legs.
- Rear Locking Casters: Wheels with brakes to secure the lift in place.
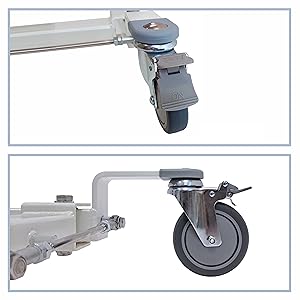
Figure 2.2: Detail of the locking caster wheel, essential for securing the lift during transfers.
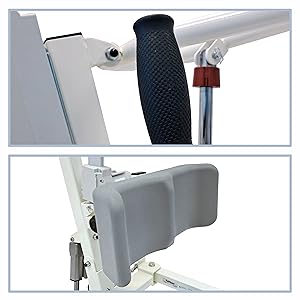
Figure 2.3: Close-up view of the ergonomic handle for caregiver comfort and the padded knee support for patient stability.
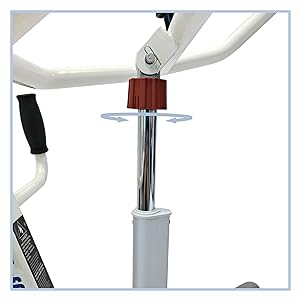
Figure 2.4: The adjustable mechanism allows for customization of the lift's height to suit various patient and caregiver needs.
3. Setup and Initial Preparation
3.1 Assembly
The Tuffcare Rhino Lift arrives mostly pre-assembled. Only a few components require attachment. Refer to the included assembly guide for detailed steps. Ensure all bolts and connections are securely fastened before first use.
3.2 Battery Installation and Charging
The lift is powered by a detachable 24-volt 9 amp battery pack. Before initial use, fully charge the battery. The battery pack can be removed for charging.
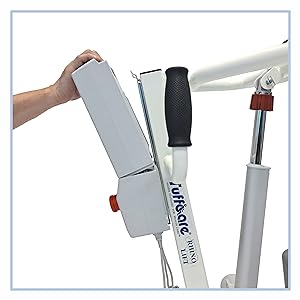
Figure 3.1: The battery pack can be easily detached for charging or replacement.
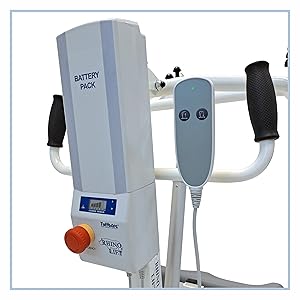
Figure 3.2: The battery pack powers the lift, and its charge level should be monitored. The control pendant is connected here.
- Connect the charger to the battery pack and a power outlet.
- Allow sufficient time for a full charge, typically indicated by a light on the charger.
- Ensure the battery is securely re-installed before operating the lift.
4. Operating Instructions
4.1 Preparing the Patient and Slings
The Tuffcare Rhino Lift is compatible with various standing and transport slings. Ensure you select the correct sling size and type for the patient's needs and weight.

Figure 4.1: Standing Sling Reference Guide. This chart provides suggested weight ranges and waist circumferences for different sling sizes (Small, Medium, Large, X-Large) and models (P140, P141, P142, P143, P147).
- Position the sling around the patient according to the sling manufacturer's instructions.
- Ensure the patient is comfortable and secure in the sling.
- Attach the sling loops to the multi-hook up points on the lift arm. Verify all connections are secure.
4.2 Patient Transfer Procedure
- Position the Lift: Roll the lift close to the patient. Use the foot pedal to adjust the base width as needed to fit around chairs or beds. Engage the rear locking casters to prevent movement.
- Patient Positioning: Assist the patient to place their feet on the non-slip footplate and their knees against the knee support. Encourage the patient to grasp the ergonomic hand grips for stability.
- Attach Slings: Securely attach the chosen sling to the lift arm's hooks. Double-check all attachment points.
- Initiate Lift: Using the control pendant, slowly press the 'UP' button to raise the patient. Monitor the patient's comfort and stability throughout the lift.
- Transfer: Once the patient is in a standing or partially standing position, disengage the caster brakes and carefully maneuver the lift to the desired location. Re-engage brakes upon arrival.
- Lower Patient: Using the control pendant, slowly press the 'DOWN' button to lower the patient onto the new surface (e.g., chair, toilet). Ensure the patient is fully seated before detaching the sling.
- Remove Slings: Once the patient is safely transferred and stable, detach the sling from the lift arm.

Figure 4.2: A patient utilizing the Tuffcare Rhino Lift with a standing sling, demonstrating the lifting process.

Figure 4.3: A caregiver guiding a patient during a transfer from a bed using the Tuffcare Rhino Lift.
5. Maintenance
5.1 Cleaning
- Wipe down the lift frame with a damp cloth and mild, non-abrasive cleaner.
- Do not use harsh chemicals or immerse electrical components in water.
- Clean slings according to their specific care instructions, typically machine washable.
5.2 Battery Care
- Keep the battery fully charged when not in use to prolong its lifespan.
- Avoid completely draining the battery before recharging.
- Store the lift and battery in a dry, temperate environment.
5.3 Inspections
- Regularly check all fasteners for tightness.
- Inspect the lift arm, frame, and casters for any signs of damage or wear.
- Examine the control pendant cable for fraying or damage.
- Ensure the emergency stop button functions correctly.
6. Troubleshooting
Common Issues and Solutions:
- Lift does not operate:
- Check if the emergency stop button is engaged. Twist to disengage.
- Verify the battery pack is properly installed and charged.
- Ensure all electrical connections are secure.
- Lift operates slowly or weakly:
- The battery may be low. Recharge the battery fully.
- Ensure the patient's weight is within the specified capacity.
- Unusual noises during operation:
- Stop operation immediately. Inspect for loose parts or obstructions.
- Contact customer support if the noise persists or indicates a malfunction.
If you encounter issues not listed here or if troubleshooting steps do not resolve the problem, please contact Tuffcare customer support.
7. Specifications
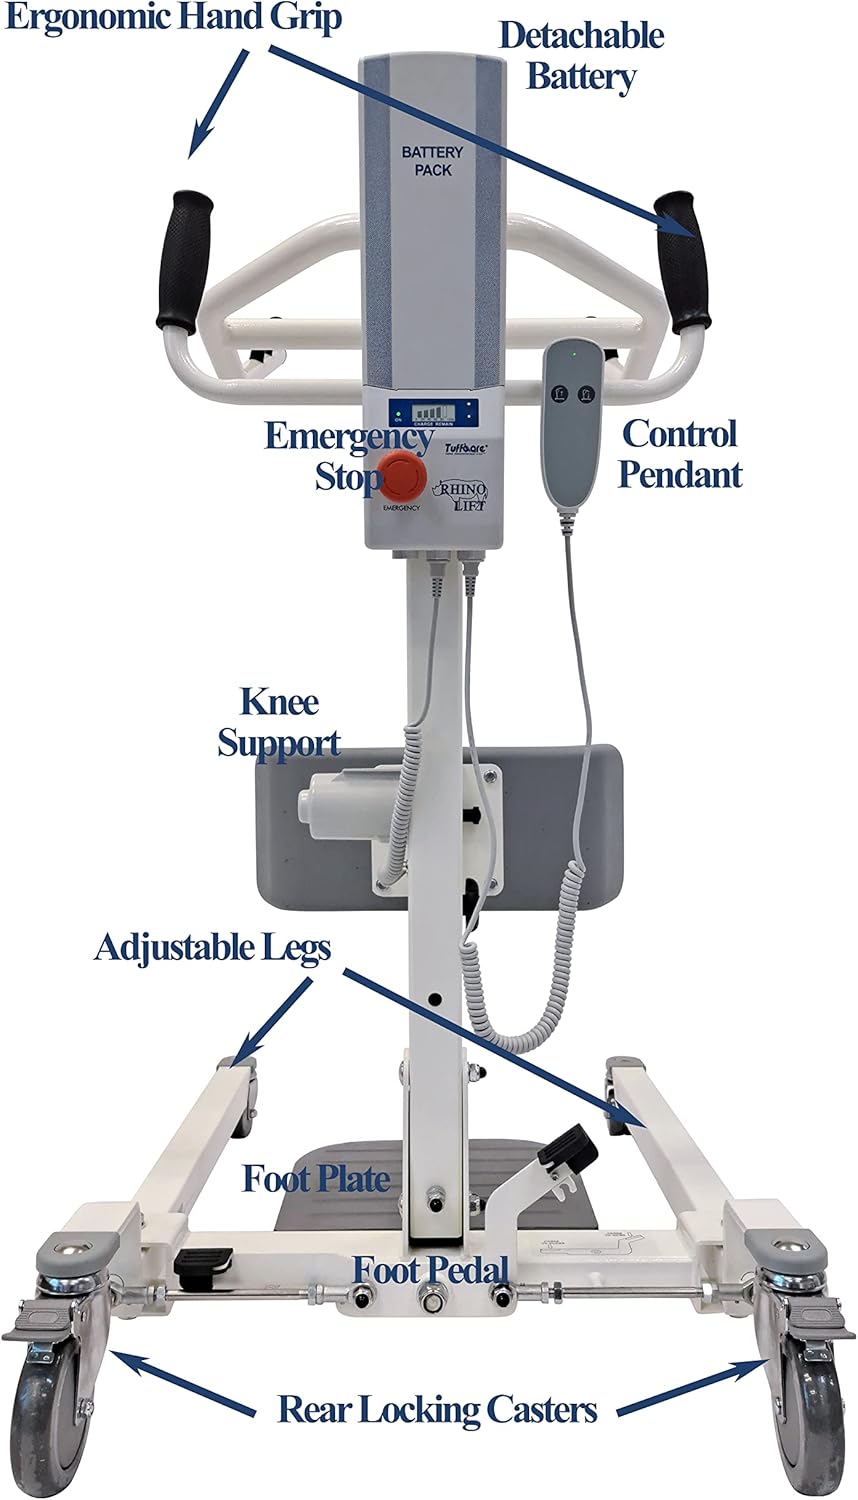
Figure 7.1: Dimensional overview of the Tuffcare Rhino Lift, indicating various height and width measurements.
| Feature | Specification |
|---|---|
| Item Weight | 111 Pounds |
| Weight Capacity | 380 lbs |
| Lift Arm Height Range | 30" to 53" |
| Low Base Opening | 4 1/2" to 32" wide |
| Batteries | 2 x 12V (included) |
| Manufacturer | Tuffcare |
8. Warranty and Support
The Tuffcare Rhino Lift includes a one-year electronic component coverage and extended frame support. For warranty claims, technical assistance, or any product-related inquiries, please contact Tuffcare customer service.
Contact information can typically be found on the Tuffcare official website or through your purchase documentation.
9. Legal Disclaimer
Statements regarding dietary supplements have not been evaluated by the FDA and are not intended to diagnose, treat, cure, or prevent any disease or health condition.