1. Introduction
This manual provides essential instructions for the safe and effective operation, setup, maintenance, and troubleshooting of your Solar HT1224AGM Heavy Truck Jump Starter. This unit is designed for professional use to jump-start 12V and 24V heavy-duty trucks and equipment equipped with AGM batteries. Please read this manual thoroughly before using the product.
2. Important Safety Information
WARNING: Failure to follow these safety instructions may result in electric shock, fire, serious injury, or death.
- Always wear eye protection and protective clothing when working with batteries.
- Ensure adequate ventilation when charging or operating the jump starter. Batteries can produce explosive gases.
- Do not smoke or allow sparks or flames near the jump starter or vehicle battery.
- Avoid touching battery terminals or clamps together. This can cause sparks and short circuits.
- Keep the jump starter away from children and unauthorized personnel.
- Do not expose the unit to rain or wet conditions.
- If battery acid comes into contact with skin or eyes, flush immediately with water and seek medical attention.
- Always ensure the jump starter is in the OFF position before connecting or disconnecting clamps.
3. Product Features and Components
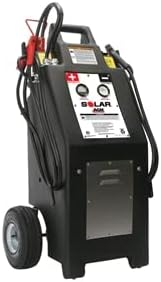
Figure 1: Solar HT1224AGM Heavy Truck Jump Starter. This image displays the main unit with its integrated wheels for portability, heavy-duty cables with clamps, and the control panel featuring gauges and switches.
The Solar HT1224AGM is a robust jump starter designed for heavy-duty applications. Key components include:
- Main Unit: Houses the AGM batteries and control circuitry.
- Heavy-Duty Cables and Clamps: For secure connection to vehicle batteries.
- Control Panel: Features voltage selection switch (12V/24V), battery status indicators, and charging port.
- Integrated Wheels and Handle: For easy transport and maneuverability.
- Charging Port: For recharging the internal batteries of the jump starter.
4. Initial Setup and Charging
Before first use, or after extended storage, fully charge the jump starter's internal batteries.
- Unpack: Remove the jump starter and all accessories from the packaging.
- Inspect: Check the unit for any visible damage. Do not use if damaged.
- Initial Charge: Connect the jump starter to a standard AC outlet using the provided charging cable. Allow the unit to charge until the "Fully Charged" indicator illuminates (typically 12-24 hours for a full charge from depleted state).
- Regular Charging: For optimal performance and battery life, it is recommended to recharge the unit after each use and every 30 days when not in use.
5. Operating Instructions
5.1 Jump Starting a Vehicle
Always ensure the vehicle's ignition is OFF and the jump starter is in the OFF position before connecting.
- Determine Voltage: Identify if the vehicle requires 12V or 24V. Set the jump starter's voltage selector switch to the appropriate setting (12V or 24V).
- Connect Positive Clamp: Attach the RED (+) positive clamp to the positive (+) terminal of the vehicle's discharged battery. Ensure a firm, clean connection.
- Connect Negative Clamp: Attach the BLACK (-) negative clamp to a clean, unpainted metal part of the vehicle's chassis or engine block, away from the battery and fuel lines. Do NOT connect directly to the negative battery terminal.
- Activate Jump Starter: Turn the jump starter to the ON position.
- Start Vehicle: Attempt to start the vehicle. If it does not start within 5-10 seconds, wait at least 3 minutes before trying again to allow the jump starter to cool.
- Disconnect Negative Clamp: Once the vehicle starts, turn the jump starter to the OFF position. Disconnect the BLACK (-) negative clamp first.
- Disconnect Positive Clamp: Then disconnect the RED (+) positive clamp.
- Recharge: Recharge the jump starter as soon as possible after use.
5.2 Using the 12V DC Power Outlet (if applicable)
The unit may feature a 12V DC power outlet for powering accessories. Refer to the unit's specific labeling for maximum current draw. Do not exceed the rated amperage.
6. Maintenance
- Recharge After Use: Always recharge the jump starter immediately after each use to prolong battery life.
- Periodic Charging: If not used frequently, recharge the unit every 30 days to maintain internal battery health.
- Cleaning: Clean the exterior of the unit with a soft, dry cloth. Do not use harsh chemicals or abrasives. Keep battery clamps clean and free of corrosion.
- Storage: Store the jump starter in a cool, dry place, away from direct sunlight and extreme temperatures. Ensure it is fully charged before storing.
- Battery Replacement: Internal AGM batteries are sealed and maintenance-free. If replacement is needed, contact authorized service personnel.
7. Troubleshooting
| Problem | Possible Cause | Solution |
|---|---|---|
| Jump starter does not turn on. | Internal battery is discharged. | Charge the jump starter fully. |
| Vehicle does not start. | Incorrect voltage selection; poor clamp connection; vehicle battery severely discharged; vehicle issue not related to battery. | Verify voltage setting (12V/24V); ensure clamps are clean and securely connected; allow more time for charging before attempting to start; consult a mechanic if the issue persists. |
| Unit not charging. | Charging cable faulty; AC outlet not working; internal battery fault. | Check charging cable and AC outlet; contact customer support if problem persists. |
8. Specifications
- Model: HT1224AGM
- Brand: Solar
- Voltage Output: 12V / 24V DC
- Internal Battery Type: AGM (Absorbed Glass Mat)
- Charging Amperage: 10 Amps (Input)
- Manufacturer Part Number: HT1224AGM
- UPC: 010271025077
- First Available: July 12, 2019
9. Warranty and Support
For warranty information, technical support, or service inquiries, please refer to the warranty card included with your product or contact Solar customer service directly. Keep your purchase receipt as proof of purchase.
Proposition 65 Warning: This product may contain chemicals known to the State of California to cause cancer and birth defects or other reproductive harm.


