1. Introduction
This manual provides essential information for the safe and efficient installation, operation, and maintenance of your Thincol 24V DC Brushless Solar High Temperature Water Pump. Please read this manual thoroughly before using the product and retain it for future reference.
The Thincol 24V DC Brushless Solar High Temperature Water Pump is designed for various water circulation and boosting applications, including solar water heaters, electric water heaters, and general water circulation systems. Its brushless design ensures long life and quiet operation.
2. Product Features
- 24V High Temperature Resistant: Designed for high-temperature water circulation, suitable for applications up to 100°C.
- Brushless DC Motor: Utilizes electronic commutation for extended lifespan, low noise operation (<35dB), and high efficiency.
- Amphibious Design: Can be used both submerged in cold water or in non-diving installations.
- Energy Efficient: Operates at DC 24V 18W, providing a maximum flow of 11 L/min and a maximum head of 6 meters.
- Versatile Applications: Ideal for hot and cold water pressurization, refrigeration systems, solar heat collection, water heater circulation, floor heating, and fountains.
3. Technical Specifications
| Specification | Value |
|---|---|
| Rated Voltage | 24V DC |
| Power | 18 W |
| Rated Current | 0.85A (maximum) |
| Inlet/Outlet Dimensions | 1/2" male thread / 20mm |
| Flow Rate | 11 L/min (maximum) |
| Maximum Lifting Height | 6 Meters |
| Max Fluid Temperature | 100°C |
| Wire Length | 80 cm |
| Noise Level | <35dB (low noise) |
| Life Expectancy | > 40000 hours |
| Material | Ceramic (for wear-resistant shaft) |
| Product Dimensions | 4.33"L x 4.33"W x 2.76"H (approx.) |
| Item Weight | 9.9 ounces (approx.) |
The pump features a magnetically isolated design where the stator and rotor parts are completely separated, enhancing durability and performance.
4. Safety Guidelines
- Ensure the power supply matches the pump's rated voltage (24V DC).
- Do not operate the pump dry (without water) as this can cause damage.
- Always disconnect power before performing any installation, maintenance, or troubleshooting.
- Install the pump in a location where it is protected from physical damage and extreme environmental conditions, unless designed for such exposure.
- Ensure all connections are secure and watertight to prevent leaks and electrical hazards.
- Keep children and pets away from the pump during operation.
5. Installation
Proper installation is crucial for the pump's performance and longevity. Refer to the diagrams below for guidance.
5.1 General Installation Considerations
- The pump is designed for both submersible and non-submersible (in-line) applications.
- Ensure the pump is installed in a manner that allows for easy access for maintenance.
- Use appropriate fittings and sealants to prevent leaks at the inlet and outlet connections.
5.2 Installation Angle and Orientation
Incorrect installation orientation can affect pump performance and lifespan. The pump body should ideally be installed vertically or horizontally with the main body facing down or to the sides, as shown in the correct examples below.

5.3 Submersible and Non-Diving Installation Methods
The pump supports both submerged and non-submerged setups, offering flexibility for various applications.

For submersible applications, ensure the pump is fully immersed in water to prevent dry running and aid in cooling. For non-diving (in-line) installations, ensure the pump is positioned below the water source or properly primed to avoid airlocks.
6. Operation
The Thincol water pump is designed for continuous operation in various water circulation and boosting systems. Once installed correctly and connected to a 24V DC power source, the pump will begin to circulate water.
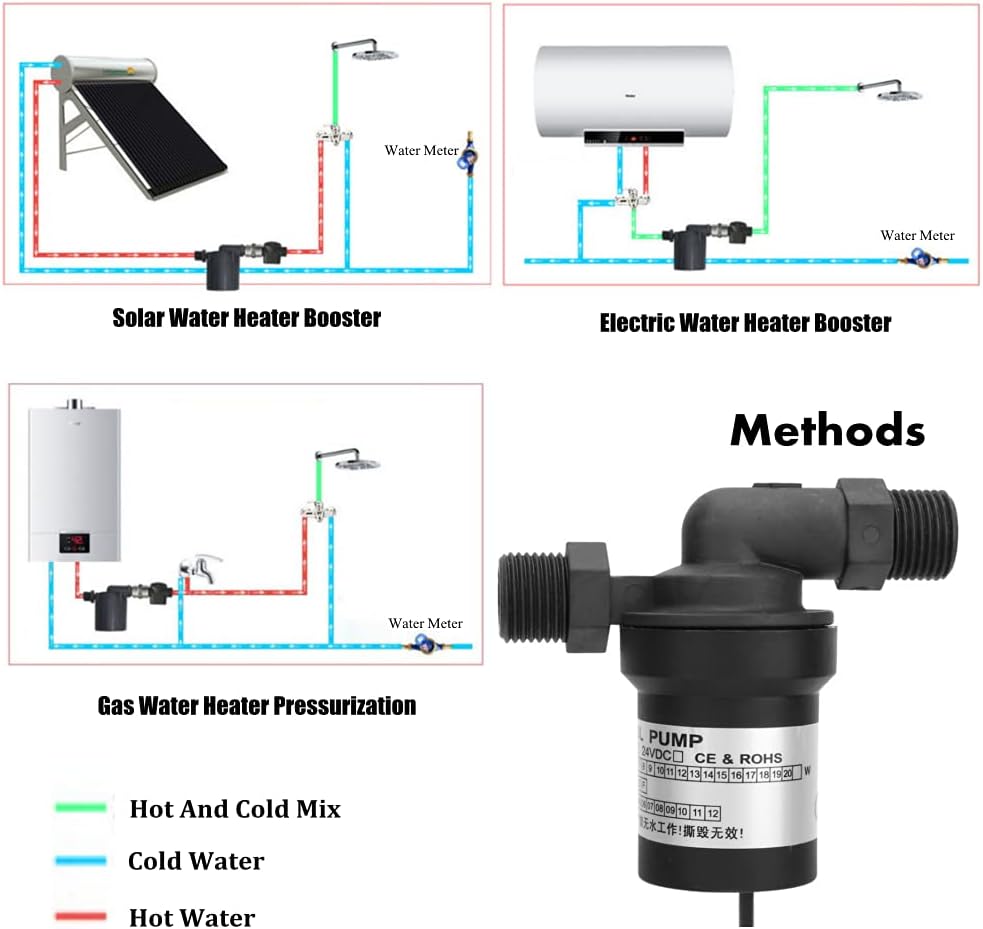
6.1 Typical Applications
This pump is suitable for a wide range of uses, including:
- Solar water heater boosting
- Electric water heater boosting
- Gas water heater pressurization
- General hot and cold water pressurization
- Refrigeration systems
- Water circulation systems
- Solar heat collection cycles
- Solar temperature difference cycles
- Water heater water pipe cycles
- Solar floor heating and general floor heating systems
- Fountains and other decorative water features

6.2 Power Connection
Connect the 24V DC power adapter (not included) to the pump's power input cable. Ensure the polarity is correct. The pump is designed for low power consumption and quiet operation.

7. Maintenance
The Thincol brushless pump is designed for minimal maintenance due to its durable ceramic shaft and brushless motor. However, periodic checks can help ensure optimal performance and extend its lifespan.
- Regular Inspection: Periodically check the pump and connections for any signs of leaks, damage, or wear.
- Cleanliness: If used in environments where debris or sediment might be present, periodically clean the pump's inlet to prevent blockages. Disconnect power before cleaning.
- Avoid Dry Running: Never operate the pump without water. Dry running can cause overheating and permanent damage to the motor and seals.
- Temperature Monitoring: While designed for high temperatures, ensure the operating temperature does not exceed 100°C.
8. Troubleshooting
If you encounter issues with your pump, refer to the following common problems and solutions:
- Pump Not Starting:
- Check if the 24V DC power supply is connected correctly and providing power.
- Ensure the power adapter is functioning.
- Verify that there are no blockages in the pump's inlet or outlet.
- Low Flow Rate or Pressure:
- Check for blockages in the pipes or pump inlet/outlet.
- Ensure the water level is sufficient for submersible applications or that the pump is properly primed for non-submersible use.
- Inspect for air leaks in the suction line if applicable.
- Unusual Noise:
- Air in the system can cause noise; ensure the pump is properly primed.
- Check for debris inside the pump. Disconnect power and carefully inspect.
- Ensure the pump is securely mounted and not vibrating against other surfaces.
- Pump Overheating:
- The pump may be running dry; ensure it has a continuous water supply.
- Check for excessive back pressure or blockages in the discharge line.
- Ensure ambient temperature is within operating limits.
If problems persist after attempting these solutions, contact customer support.
9. Warranty and Support
Specific warranty details are not provided in the product information. For warranty claims or technical support, please contact your retailer or the manufacturer, Thincol, directly. Please have your model number (Thincolesvx5zngqu) and purchase information available when contacting support.