
WeatherTech SP0111
WeatherTech Custom Scratch Protection Kit Instruction Manual
Model: SP0111
For Volvo XC90 (2016-2025) and XC90 Recharge (2021-2025)
1. Product Overview
The WeatherTech Custom Scratch Protection Kit is designed to shield vulnerable areas of your vehicle from damaging scuffs, scratches, dings, and chips. This custom-fit, practically invisible film provides durable protection for your vehicle's door sills, door handle cups, door edges, and trunk ledges. It resists wear and discoloration, and features self-healing technology for long-lasting scratch resistance. The film adheres directly to your vehicle's painted surface without causing damage to the paint or finish.
This kit is specifically designed for select 2016-2025 Volvo XC90 and 2021-2025 Volvo XC90 Recharge models. Please confirm fitment to your specific year, make, and model prior to purchase.

Proudly Made in USA.
2. Components and Required Items
2.1 Included with Your Kit
- Protection Film Sheet (pre-cut for specific areas)
- Squeegee (for application)
- Written Instructions (this manual)

The kit includes the pre-cut protection film and a squeegee for smooth application.
2.2 Required Items for Installation (Not Included)
- Microfiber Towel
- 70% Isopropyl Alcohol
- Baby Shampoo (tear-free formula recommended)
- Two Spray Bottles (clean, empty)
- Scissors (for separating film pieces)

Gather these common household items before beginning installation.
3. Preparation
Proper preparation of the application surface is crucial for optimal adhesion and longevity of the scratch protection film. Ensure the vehicle is clean and dry before starting.
3.1 Clean Application Areas
- Thoroughly clean the areas where the scratch protection will be applied (door handle cups, door edges, door sills, trunk ledge) using your alcohol slip solution (see 3.2).
- The surface must be free of all contaminants such as dirt, debris, grease, or oil.
- Dry the cleaned areas completely with a clean microfiber towel.
3.2 Prepare Solutions
You will need two spray bottles for the installation process:
- Alcohol Slip Solution: Mix 1 part 70% Isopropyl Alcohol to 3 parts water in one spray bottle. This solution is used for cleaning the surface.
- Soap Slip Solution: In a separate spray bottle, mix 1 part baby shampoo to 3 parts water. This solution will be used to lubricate the film and the application surface during installation, allowing for repositioning.


Ensure your cleaning and slip solutions are prepared before starting the application.
4. Installation
Please Note: If you are not comfortable installing the WeatherTech Scratch Protection, please consider professional installation.
Begin by unrolling the scratch protection kit and carefully cutting along the dash markings to separate each piece of film from the kit.
4.1 Door Handle Cup Installation
- Spray the soap slip solution generously on your fingers, the protection film (as you remove it from the backing), and the door handle cup area.
- Apply the template, centering it in the door handle cup area.
- Starting from the center, use your fingers to slowly work the bubbles out towards the edges with firm, gentle pressure until all air bubbles are eliminated.

Carefully apply the film to the door handle cup, ensuring proper alignment.
4.2 Door Edge Installation
- Locate the desired starting point for the film on the door edge. Body lines can serve as an excellent guide.
- Peel back 3 to 4 inches of the film from the backing.
- Apply half of the film width onto the front edge, firmly pressing it down.
- Continue the application until the end of the film is reached. Depending on your chosen starting point, trimming excess material may be required.
- Press the remaining film width onto the inside of the door, working from top to bottom.
- Use the provided squeegee or your hand to set any remaining film into place.

Apply the film along the door edge for comprehensive protection.
4.3 Door Sill Installation
- Locate the desired spot for your film application on the door sill.
- Spray the soap slip solution generously on your fingers, the protection film (as you remove it from the backing), and the door sill area.
- Using the top edge as a guide, apply the film to the door sill.
- Starting from the top and working down, use your fingers to apply slow, gentle strokes to force the solution and air bubbles down and out.
- Use the provided squeegee as needed to finish the application.

The red areas in this diagram illustrate the coverage provided by the clear protection film, including the door sills.
4.4 Trunk Ledge Installation
- Locate the desired spot for your film application on the trunk ledge.
- Spray the soap slip solution generously on your fingers, the protection film (as you remove it from the backing), and the trunk ledge area.
- Using the top edge as a guide and centering the film as best as you can, apply the template to the trunk ledge.
- Starting from the top and working down, use the provided squeegee to apply slow, gentle strokes to force the solution and air bubbles down and out.
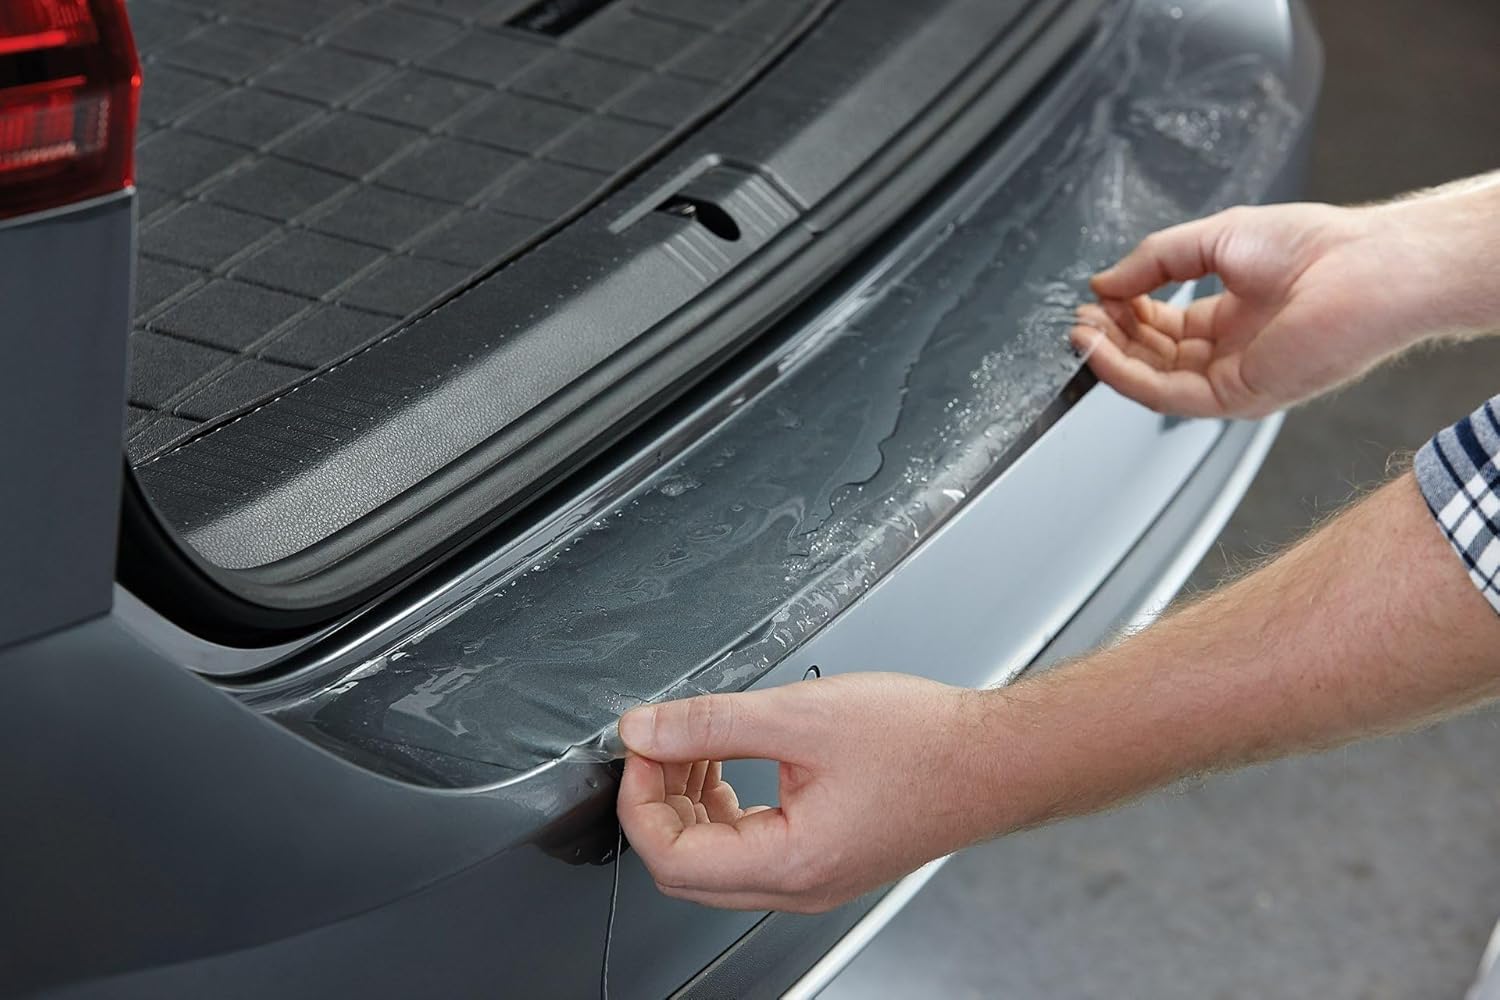
Apply the film to the trunk ledge to protect against scratches from loading and unloading.
4.5 Curing Time
The protection film will adhere after just 20 minutes, but it will be fully cured after 24 hours. Avoid washing the vehicle or exposing the newly installed film to excessive moisture during the initial 24-hour curing period.
4.6 Installation Video Guide
Watch the official WeatherTech Scratch Protection Installation Video for a visual guide on applying the film to your vehicle's door handle cups, edges, sills, and trunk ledge.
5. Maintenance
Once fully cured, the WeatherTech Scratch Protection film requires minimal maintenance. Clean the protected areas as you would the rest of your vehicle's exterior, using standard car wash soap and water. Avoid using abrasive cleaners or harsh chemicals on the film, as this may damage its self-healing properties and clarity.
6. Troubleshooting
6.1 Common Issues and Solutions
- Bubbles or Air Pockets: Small bubbles may appear immediately after installation. These often disappear on their own as the film cures and the water/soap solution evaporates. For larger or persistent bubbles, gently push them towards the nearest edge with your finger or the squeegee.
- Lifting Edges: If an edge begins to lift, re-spray the area with soap slip solution and gently press the film back down, working from the center outwards. Ensure the surface is clean before re-applying.
- Film Not Adhering: This is usually due to insufficient cleaning of the surface or not enough soap slip solution during application. Re-clean the area thoroughly with alcohol slip solution and re-apply with ample soap slip solution.
7. Specifications
| Feature | Detail |
|---|---|
| Product Name | WeatherTech Custom Scratch Protection Kit |
| Model Number | SP0111 |
| Material | High-performance Polyurethane Film |
| Coverage Areas | Door Handle Cups, Door Edges, Door Sills, Trunk Ledge |
| Vehicle Compatibility | 2016-2025 Volvo XC90, 2021-2025 Volvo XC90 Recharge |
| Color | Clear (Red in illustrations is for visibility only) |
| Origin | Made in USA |
8. Warranty and Support
WeatherTech is committed to providing high-quality American-made products. For specific warranty information or to contact customer support, please visit the official WeatherTech website or refer to the documentation included with your purchase.
You can also visit the WeatherTech Store on Amazon for more products and information.
Learn more about WeatherTech Scratch Protection and its benefits in this overview video.
Ask a question about this manual
Ask about setup, troubleshooting, compatibility, parts, safety, or missing instructions. Manuals+ will review the question and use this page’s manual context to help answer it.