Electrolux EEM48321L
Electrolux EEM48321L Fully Integrated Dishwasher User Manual
Model: EEM48321L
1. Important Safety Information
Read all instructions before using the appliance. Keep this manual for future reference. Always follow basic safety precautions to reduce the risk of fire, electric shock, or injury to persons.
1.1 General Safety
- This appliance is intended for household use only.
- Do not allow children to play with the appliance.
- Ensure the appliance is properly grounded.
- Do not operate the dishwasher if it is damaged. Contact authorized service for repairs.
1.2 Electrical Safety
- Connect the appliance to a properly rated, protected, and sized power supply circuit.
- Do not use extension cords or adapter plugs with this appliance.
- Disconnect the appliance from the power supply before performing any maintenance or cleaning.
1.3 Water Safety
- Ensure water supply connections are secure to prevent leaks.
- The AquaStop function provides protection against water leaks.
2. Product Overview
The Electrolux EEM48321L is a fully integrated dishwasher designed for efficient and quiet dishwashing. It features advanced technologies for optimal cleaning and energy efficiency.
2.1 Key Features
- Timer and Delay Start: Allows scheduling wash cycles for convenience.
- AquaStop Function: Provides leak protection to prevent water damage.
- AquaSensor Function: Detects the level of soiling and adjusts water consumption accordingly.
- Protective Glass: Designed to care for delicate glassware.
- Converter Technology: Enhances performance and energy efficiency.
- Salt Indicator: Notifies when to refill dishwasher salt.
2.2 Appliance Components

Figure 2.1: Front View of the Dishwasher. This image shows the fully integrated design of the Electrolux EEM48321L dishwasher, with its control panel visible at the top edge when the door is slightly ajar.

Figure 2.2: Interior View. The interior of the dishwasher, showing the stainless steel tub and the central spray arm. The lower filter area is also visible.
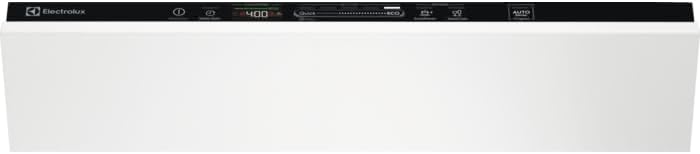
Figure 2.3: Control Panel. This image displays the top-mounted control panel with various program selection buttons, indicators, and a digital display for cycle time.
3. Setup and Installation
Proper installation is crucial for the safe and efficient operation of your dishwasher. It is recommended that installation be performed by a qualified technician.
3.1 Unpacking
- Carefully remove all packaging materials.
- Inspect the dishwasher for any shipping damage. Report any damage immediately to your retailer.
- Retain packaging materials for potential future transport or service.
3.2 Positioning and Leveling
- Place the dishwasher in the desired cabinet opening.
- Adjust the leveling feet to ensure the appliance is stable and level.
3.3 Water and Electrical Connections

Figure 3.1: Rear Connections. This image shows the back of the dishwasher with the water inlet hose (typically blue or white with a red connector) and the drain hose, along with the electrical cable.
- Connect the water inlet hose to a cold water supply with a shut-off valve. Ensure the connection is tight.
- Connect the drain hose to a suitable drain pipe or sink trap. Ensure there are no kinks.
- Plug the power cord into a grounded electrical outlet.
3.4 Initial Use
- Before the first wash, fill the salt dispenser with dishwasher salt (refer to section 5.2).
- Add rinse aid to the dispenser (refer to section 5.3).
- Run a short wash cycle without dishes to flush out any manufacturing residues.
4. Operating Instructions
Follow these steps for effective and efficient dishwashing.
4.1 Loading the Dishwasher

Figure 4.1: Loaded Racks. This image shows the dishwasher interior with dishes properly arranged in the upper and lower racks, ensuring optimal water circulation.

Figure 4.2: Glassware Placement. Close-up of the upper rack demonstrating how glasses are securely placed, utilizing the protective glass feature for stability during the wash cycle.
- Scrape off large food particles from dishes before loading.
- Place larger items in the lower rack and smaller, more delicate items (like glasses) in the upper rack.
- Ensure dishes do not block the spray arms.
- Place cutlery in the cutlery basket with handles down for forks and spoons, and handles up for knives.
4.2 Adding Detergent and Rinse Aid
- Open the detergent dispenser and add the recommended amount of dishwasher detergent. Close the dispenser cover securely.
- Open the rinse aid dispenser and fill it with rinse aid until the indicator shows full. Adjust the rinse aid dosage if necessary.
4.3 Selecting and Starting a Program
- Close the dishwasher door.
- Press the Power button to turn on the appliance.
- Use the program selection buttons on the control panel to choose the desired wash program (e.g., Eco, Intensive, Quick).
- If desired, select the Delay Start function and set the delay time.
- Press the Start button to begin the wash cycle.
5. Maintenance and Care
Regular maintenance ensures optimal performance and extends the lifespan of your dishwasher.
5.1 Cleaning the Filters

Figure 5.1: Filter Location. This image shows the filter assembly located at the bottom of the dishwasher tub, which collects food particles.
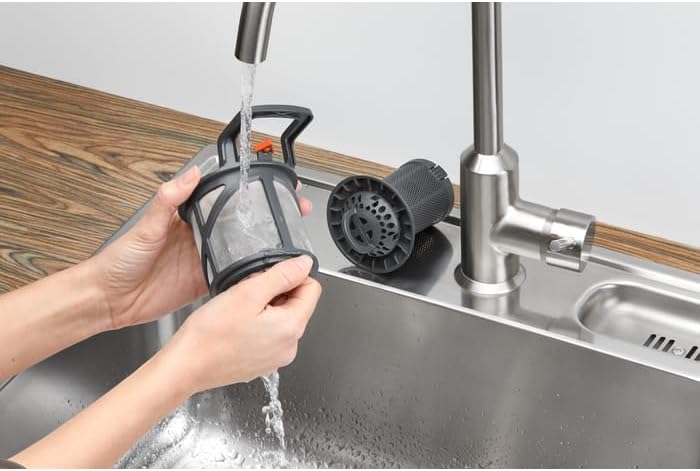
Figure 5.2: Cleaning the Filter. A person is shown cleaning the disassembled dishwasher filter components under running tap water to remove trapped food debris.
- The filter system should be cleaned regularly to prevent blockages and ensure effective washing.
- Twist and remove the cylindrical filter from the bottom of the dishwasher.
- Separate the coarse and fine filters.
- Rinse all filter components under running water to remove food particles. Use a soft brush if necessary.
- Reassemble the filters and place them back into the dishwasher, ensuring they are securely locked in place.
5.2 Cleaning the Spray Arms
- Periodically check the spray arm nozzles for blockages.
- If necessary, remove the spray arms and clear any clogged holes with a thin object like a toothpick.
- Rinse them under running water and reattach them securely.
5.3 Exterior and Interior Cleaning
- Wipe the exterior surfaces with a soft, damp cloth. Do not use abrasive cleaners.
- Clean the door seal regularly to remove food residues.
- For interior cleaning, run a dishwasher cleaning cycle with a specialized dishwasher cleaner.
5.4 Salt Refill
- When the salt indicator light illuminates, refill the salt dispenser with dishwasher salt.
- Use a funnel to add salt to prevent spillage.
- Close the cap tightly after refilling.
6. Troubleshooting
Before contacting service, consult this section for common issues and their solutions.
| Problem | Possible Cause | Solution |
|---|---|---|
| Dishwasher does not start | Power supply issue, door not closed, program not selected | Check power connection, ensure door is latched, select a program and press Start. |
| Poor cleaning results | Incorrect loading, clogged spray arms, insufficient detergent, dirty filters | Reload dishes correctly, clean spray arms, add more detergent, clean filters. |
| Water not draining | Clogged drain hose or filter, drain pump issue | Clean filters, check drain hose for kinks or blockages. |
| Dishwasher leaks | Improperly sealed door, loose hose connections, excessive suds | Check door seal, tighten hose connections, use appropriate detergent. |
| Salt indicator light on | Dishwasher salt level is low | Refill the salt dispenser with dishwasher salt. |
7. Specifications
Technical data for the Electrolux EEM48321L dishwasher.
| Specification | Value |
|---|---|
| Model Name | EEM48321L |
| Brand | Electrolux |
| Installation Type | Built-In |
| Capacity | 14 Place Settings (implied by 14 cutlery in title, 10.5 litres is water capacity) |
| Energy Efficiency Class | A+++ |
| Annual Energy Consumption | 237 Kilowatt Hours |
| Noise Level | 44 dB |
| Voltage | 230 Volts (AC) |
| Wattage | 1950 watts |
| Product Dimensions (W x D x H) | 60 x 55 x 82 cm (standard integrated dishwasher dimensions, 24 x 69 x 2.5 cm from product data seems incorrect for a dishwasher) |
| Material | Stainless Steel |
| Special Features | Timer, Delay Start, AquaStop, AquaSensor, Protective Glass, Converter Technology, Salt Indicator |
Note: Product dimensions provided in the source data (24 x 69 x 2.5 cm) appear to be incorrect for a full-size integrated dishwasher. Standard dimensions for such appliances are typically around 60cm width, 55cm depth, and 82cm height. Please refer to the official Electrolux product documentation for precise measurements.
8. Warranty and Support
Your Electrolux EEM48321L dishwasher comes with a manufacturer's warranty. Please refer to the warranty card included with your appliance for specific terms and conditions.
8.1 Warranty Information
- The warranty covers manufacturing defects and faulty materials.
- Proof of purchase is required for all warranty claims.
- The warranty does not cover damage caused by improper installation, misuse, or normal wear and tear.
8.2 Customer Support
For technical assistance, spare parts, or to schedule a service appointment, please contact Electrolux customer service. Contact details can typically be found on the Electrolux official website or in the documentation provided with your appliance.
You can also visit the official Electrolux store for more information: Electrolux Store
Related Documents - EEM48321L
 |
Electrolux Fully Integrated Dishwasher Dimension Guide - Model EET43200LX Provides essential installation dimensions for the Electrolux Fully Integrated Dishwasher, model EET43200LX. Includes specifications for both semi-integrated and fully integrated cabinet setups, covering appliance and opening sizes, and utility clearances. |
 |
Electrolux Dishwasher Range: Smart, Quiet, and Efficient Kitchen Appliances Explore the Electrolux Dishwasher Range, featuring innovative technologies like ComfortLift, AirDry, and SprayZone for a seamless and efficient kitchen experience. Discover models designed for modern living, offering superior cleaning and quiet operation. |
 |
Electrolux Fully Integrated Dishwasher Dimension Guide - EBF3360VWB Provides dimension details for the Electrolux Fully Integrated Dishwasher, model EBF3360VWB, including product and cut-out dimensions for installation. |
 |
Electrolux EEM48300L Fully Integrated Dishwasher Dimension Guide Detailed dimension guide for the Electrolux EEM48300L fully integrated dishwasher, including installation measurements and product specifications for cabinetry and appliance fit. |
 |
Electrolux AEG Dishwasher Service Manual: Easytronic Plus with Flow-Type Heaters Comprehensive service manual for Electrolux and AEG fully-integrated, integrated, substructure, and upright dishwashers featuring Easytronic Plus control and flow-type heaters. Includes specifications, cycle functions, fault displays, and test routines for models like ASF 2688-w and ASF 2645-w. |
 |
Electrolux EBF3360VWB Fully Integrated Dishwasher Dimension Guide Detailed dimension guide for the Electrolux EBF3360VWB Fully Integrated Dishwasher, part of the ULTIMATECARE series. Includes product and cut-out dimensions (width, height, depth) and installation space requirements for this 60cm, 13-place setting appliance. |