
Introduction
The JJC BTR C1 Bluetooth Wireless Remote Control is designed for compatible cameras, allowing for wireless operation of various camera functions. This remote control provides convenience for capturing photos and videos from a distance, reducing camera shake and enabling self-portraits or group shots.
It supports functions such as instant shutter release, 2-second delay release, video recording, autofocus, and zoom control, with an operating distance of approximately 10 meters (32.8 feet).

Image: The JJC BTR C1 remote control shown alongside a compatible camera, illustrating its wireless operating range of 10 meters (32.8 feet) and key functions like instant shutter, video control, zoom, and delay shutter.
Parts and Functions
Familiarize yourself with the components of your JJC BTR C1 remote control:

Image: A detailed diagram showing the front and back of the JJC BTR C1 remote control, highlighting the indicator lamp, shutter release button, AF button, zoom buttons (W and T), function switching button, and the CR2032 battery compartment.
- Indicator Lamp: Lights up to indicate status (e.g., pairing, shutter release).
- Shutter Release Button: Press to take a photo.
- AF Button (Auto Focus Start Button): Initiates autofocus.
- Zoom Button (W/T):
- W Button: Wide-Angle Zoom.
- T Button: Telephoto Zoom.
- Function Switching Button: Toggles between Immediate Release (S), 2-Second Delay Release (2S), and Video Recording (REC) modes.
- Battery Compartment: Located on the back, holds one CR2032 battery.
Setup
Battery Installation
The JJC BTR C1 remote control is powered by one CR2032 lithium battery (included).
- Locate the battery compartment cover on the back of the remote control.
- Use a coin or similar tool to turn the cover counter-clockwise to the "OPEN" position and remove it.
- Insert the CR2032 battery with the positive (+) side facing upwards.
- Replace the cover and turn it clockwise to the "CLOSE" position to secure it.
Pairing the Remote Control with Your Camera
The pairing process may vary slightly depending on your camera model. Refer to your camera's instruction manual for specific details. Below are general steps for pairing:
Method 1: General Pairing Steps (Example 1)
- Step 1: On your camera, select the Wireless settings or Wi-Fi/Bluetooth connection option.
- Step 2: Choose to connect to a Wireless Remote.
- Step 3: Select "Add a device to connect to" from the camera's menu.
- Step 4: When the camera displays "Pairing in progress" or similar, press and hold the W button and T button on the remote control simultaneously for at least 3 seconds.
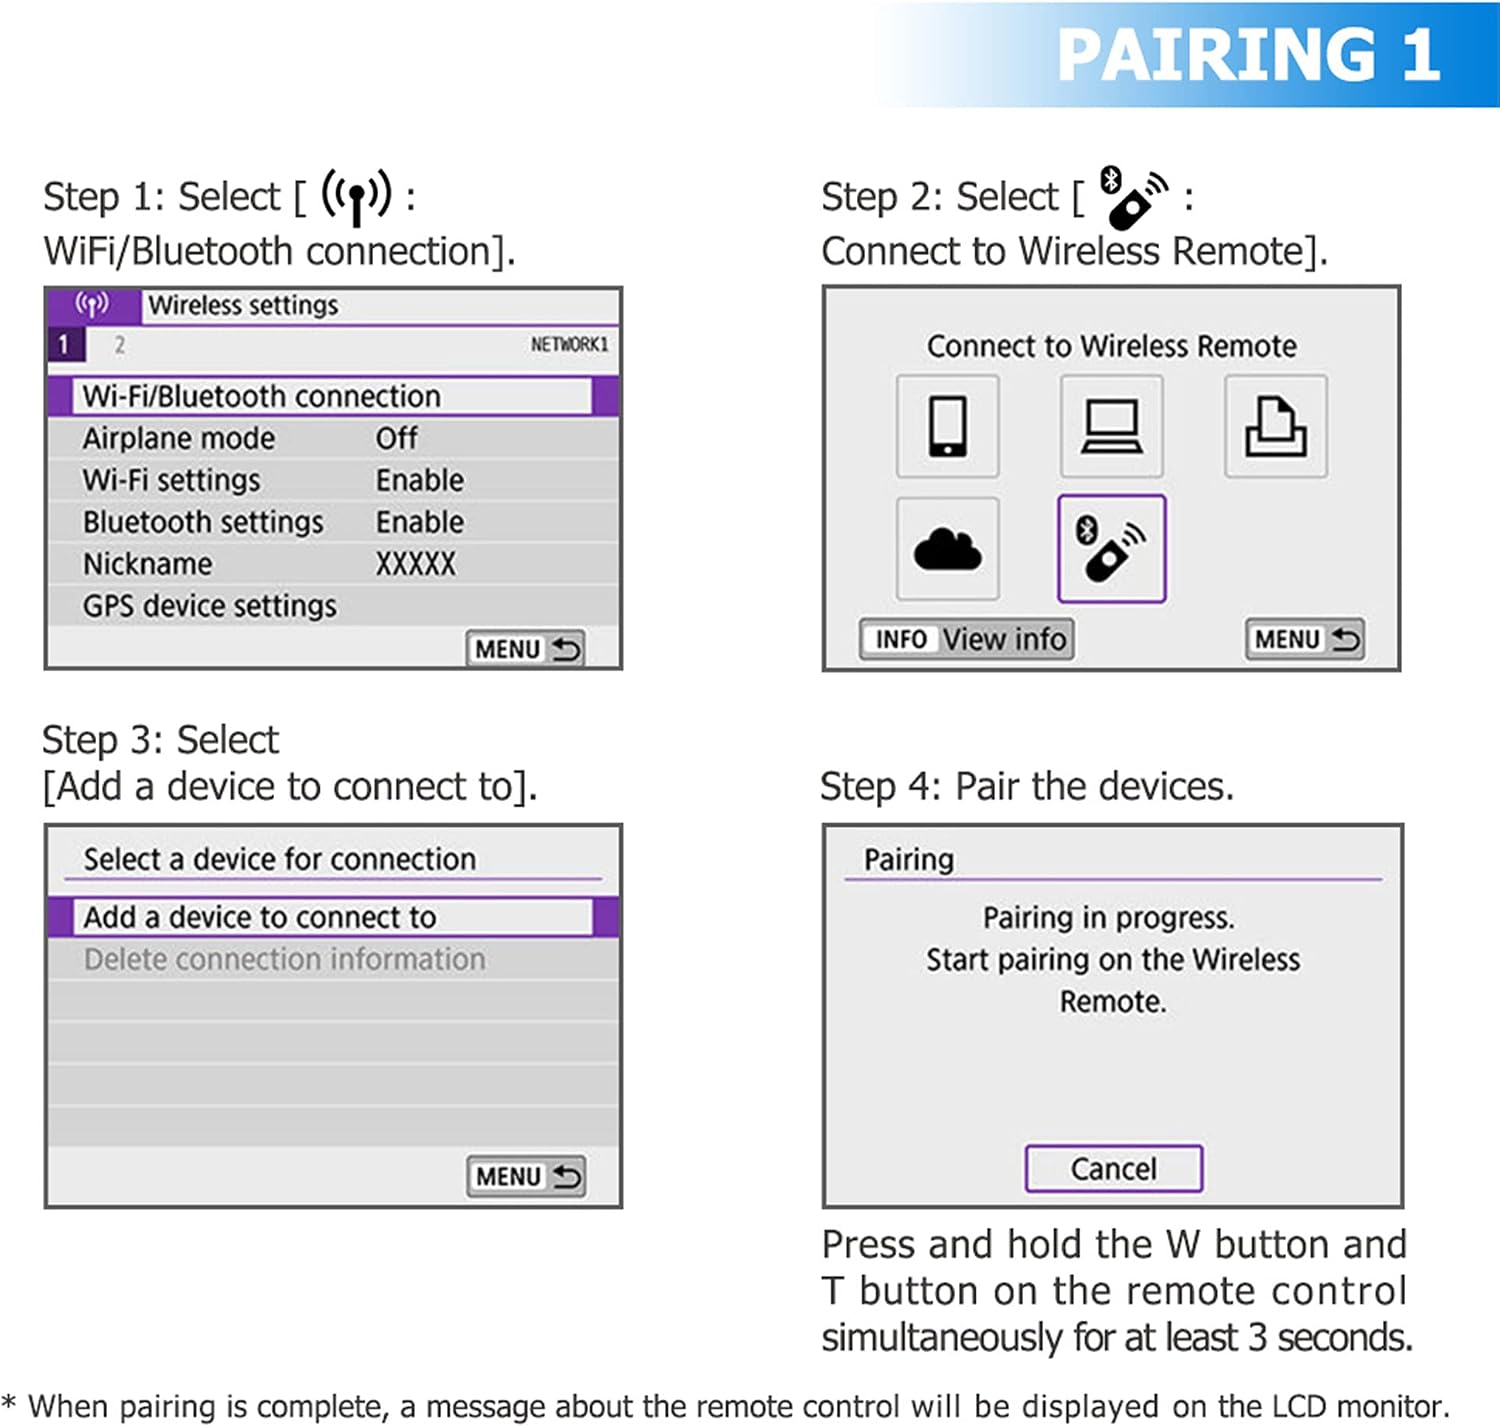
Image: A visual guide demonstrating the camera menu navigation for pairing the remote, including selecting wireless settings, connecting to a wireless remote, and initiating the pairing process.
Method 2: General Pairing Steps (Example 2)
- Step 1: On your camera, navigate to Wireless communication settings.
- Step 2: Select "Bluetooth function".
- Step 3: Ensure "Bluetooth function" is enabled.
- Step 4: Select "Remote Controller" or a similar option for remote control pairing.
- Step 5: Select "Pairing" from the Bluetooth function menu.
- Step 6: When the camera's screen displays the [Pairing] screen, press and hold the W button and T button on the remote control simultaneously for at least 3 seconds.

Image: An alternative visual guide showing camera menu steps for pairing, focusing on wireless communication settings, Bluetooth function activation, and selecting the remote controller for pairing.
Note: When pairing is complete, a message about the remote control will typically be displayed on the camera's LCD monitor.
Operating Instructions
Once paired, the JJC BTR C1 remote control can be used to operate your camera wirelessly.
Selecting a Function Mode
Use the Function Switching Button to cycle through the available modes:
- S (Immediate Release): For instant photo capture.
- 2S (2-Second Delay Release): Provides a 2-second delay before capturing a photo, useful for reducing camera shake or allowing time to get into position.
- REC (Video Recording): For starting and stopping video recording.
Using the Remote Control
- Taking Photos: Select 'S' or '2S' mode using the Function Switching Button, then press the Shutter Release Button.
- Recording Videos: Select 'REC' mode using the Function Switching Button, then press the Shutter Release Button to start recording. Press it again to stop recording.
- Autofocus: Press the AF Button to initiate autofocus before taking a photo or recording a video.
- Zoom Control: Use the W Button for wide-angle zoom and the T Button for telephoto zoom.

Image: A user holding the JJC BTR C1 remote control, demonstrating its use for various camera functions such as instant shooting, 2-second delay, video recording, autofocus, and zooming.
Important Usage Notes:
- Power zoom lenses can typically be zoomed directly by pressing the zoom buttons (W/T) on the remote control.
- Some lenses may require a Power Zoom Adapter (not included) to utilize the zoom function via the remote control.
- During viewfinder shooting, the lens may not be zoomable using the remote control.
Maintenance
- Cleaning: Wipe the remote control with a soft, dry cloth. Do not use harsh chemicals or abrasive cleaners.
- Storage: Store the remote control in a cool, dry place away from direct sunlight and extreme temperatures.
- Battery Replacement: If the remote control becomes unresponsive or the indicator lamp does not light up, replace the CR2032 battery. Dispose of used batteries responsibly.
- Avoid Moisture: Keep the remote control dry. Exposure to water or high humidity can damage internal components.
Troubleshooting
| Problem | Possible Cause | Solution |
|---|---|---|
| Remote control does not respond. |
|
|
| Difficult to pair or doesn't stay connected. |
|
|
| Zoom function does not work. |
|
|
Specifications
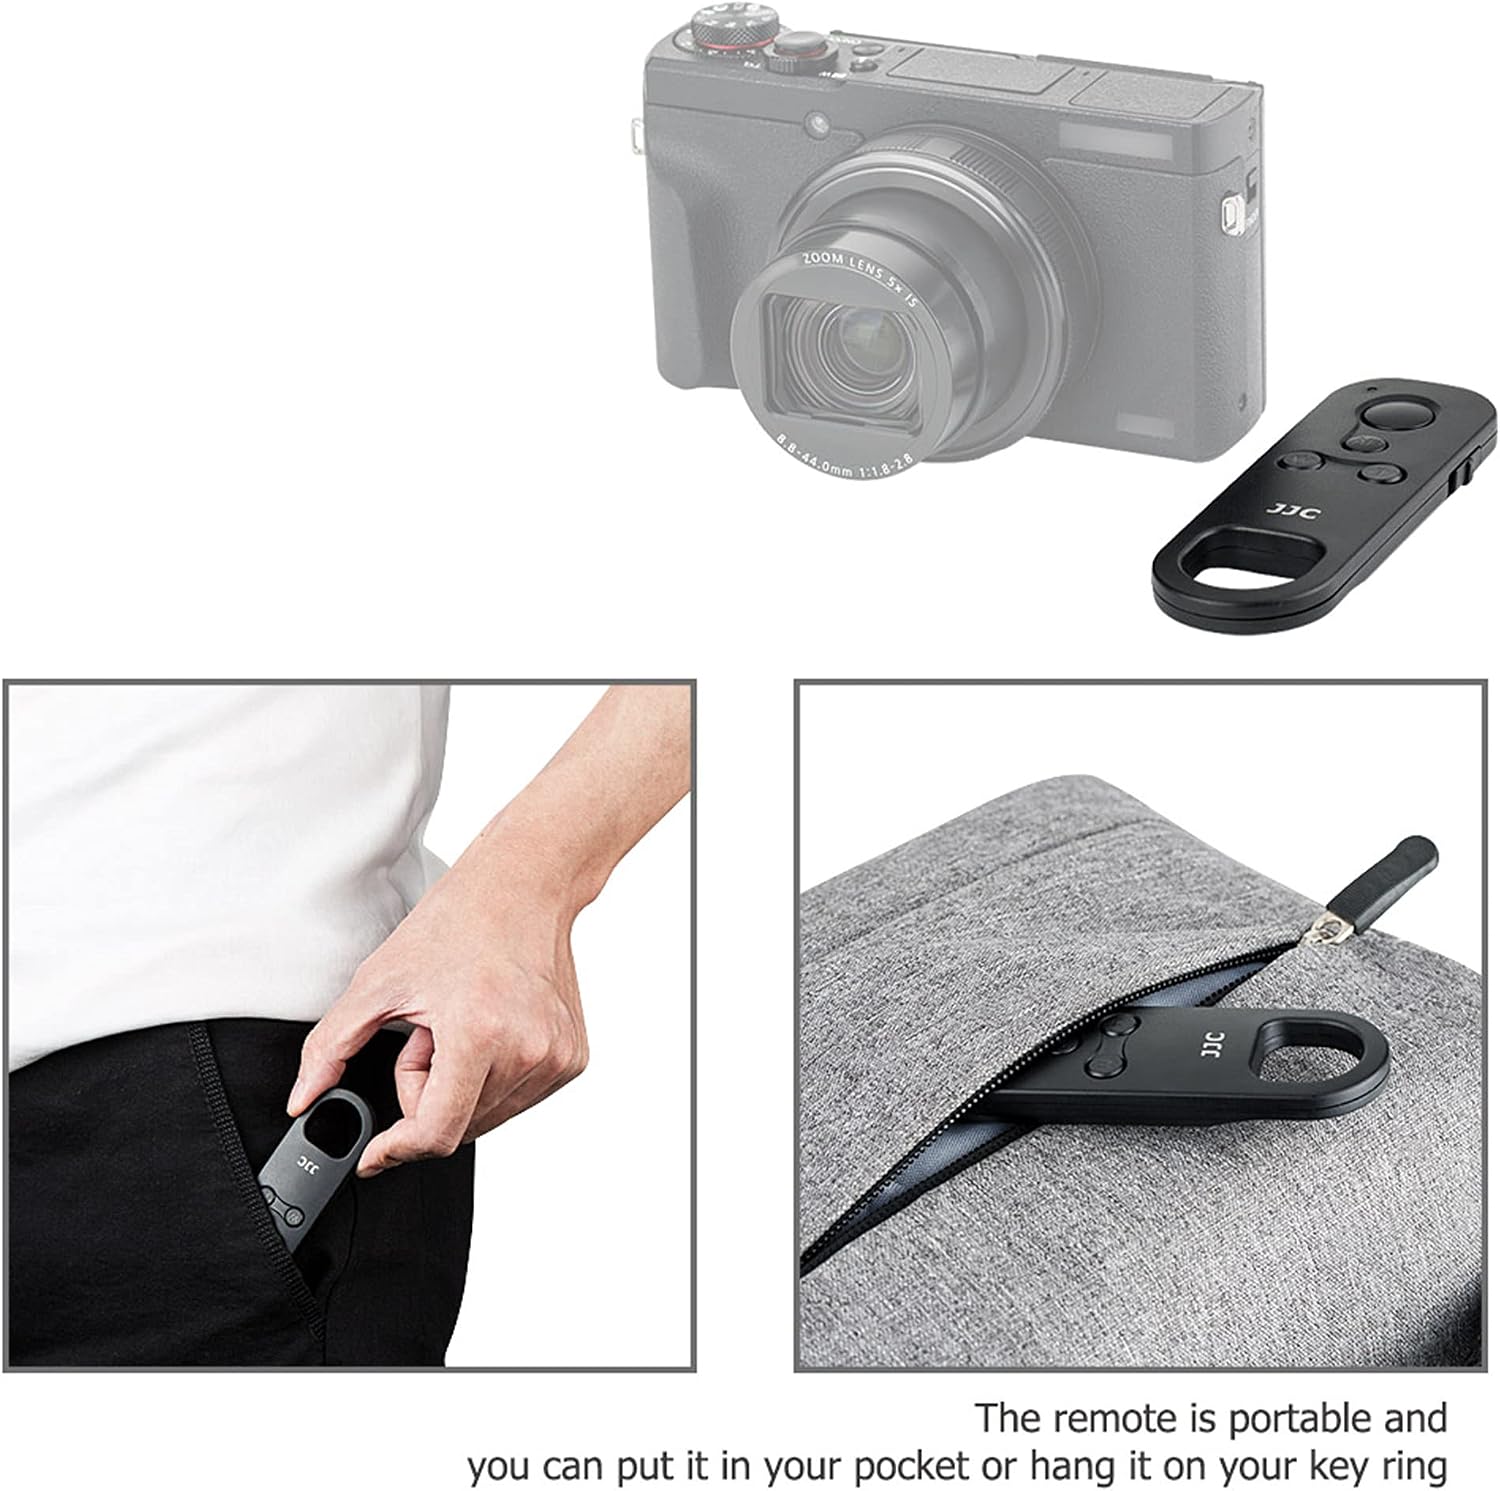
Image: A diagram showing the dimensions of the JJC BTR C1 remote control (91.5mm x 30.8mm x 12.7mm) and listing key specifications such as transmission method, operating distance, power source, and weight.
- Model: JW-BTR-C1
- Transmission Method: 2.4GHz, GFSK modulation
- Operating Distance: Approx. 10m / 32.8 feet
- Power: CR2032 battery
- Dimensions: Approx. 91.5 x 30.8 x 12.7mm (3.6 x 1.2 x 0.5 inches)
- Weight: Approx. 14g
- Number of Buttons: 5
- Compatible Devices: Camera
Portability
The JJC BTR C1 remote control is designed to be compact and lightweight, making it easy to carry.

Image: The remote control being placed into a pocket, illustrating its compact size for easy carrying.

Image: The remote control attached to a keyring and stored in a bag, demonstrating its convenient portability options.
Its small size allows it to be easily carried in a pocket or attached to a keyring for quick access.
Warranty and Support
This product comes with a 2-year manufacturer's warranty. For warranty claims or technical support, please contact your retailer or the manufacturer directly.


