Introduction
This manual provides detailed instructions for the setup, operation, and maintenance of your AcuRite Iris 5-in-1 Wireless Weather Station (Model 01536M) and the AcuRite Iris 06003 PRO+ Upgrade for 5-in-1 Weather Sensor (Model 06003M). Please read this manual thoroughly before installation and use to ensure proper functionality and longevity of your devices.
Product Overview
AcuRite Iris 5-in-1 Wireless Weather Station (Model 01536M)
The AcuRite Iris 5-in-1 Wireless Weather Station provides comprehensive environmental monitoring. It accurately measures indoor and outdoor temperature, humidity, rainfall, wind speed, and wind direction. The system includes a color display unit with a weather ticker for real-time information and connectivity to the My AcuRite app for remote monitoring via smartphone, tablet, or computer. A USB port allows for data storage, tracking, and analysis, with options to share data with communities like Weather Underground.
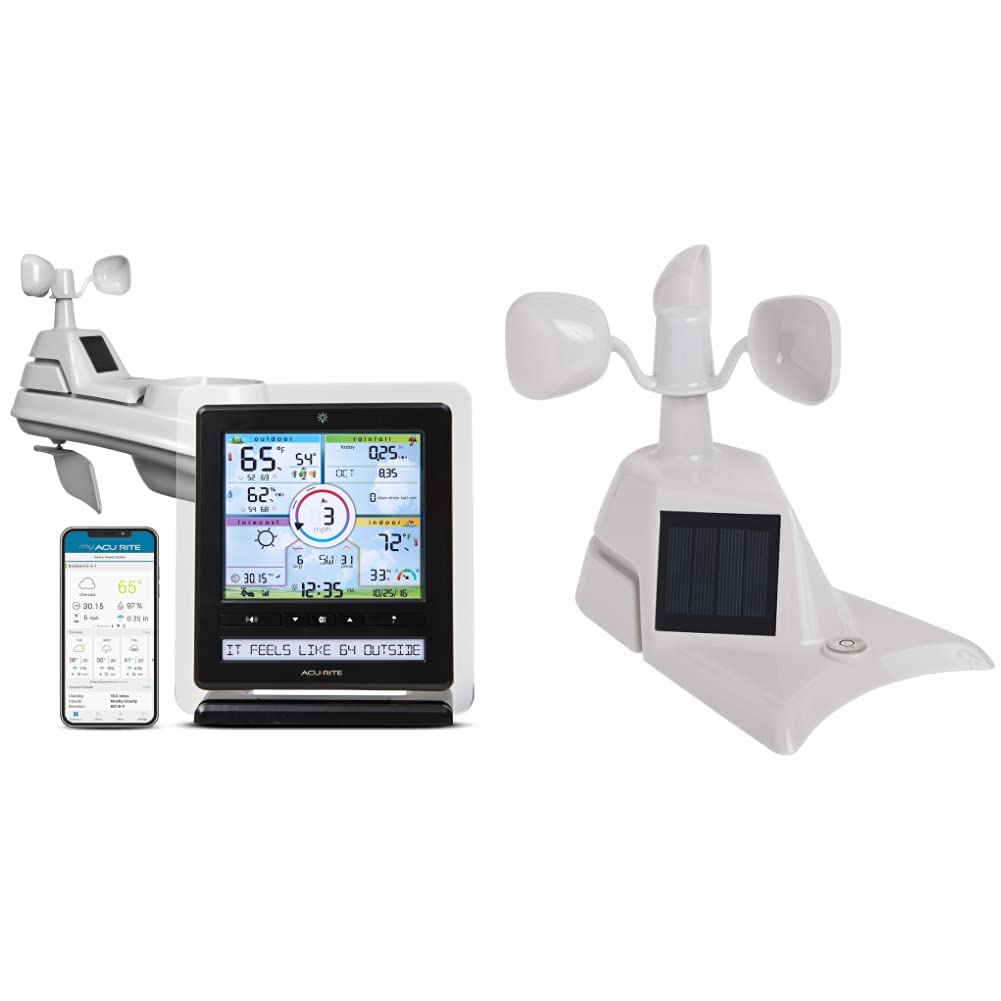
Image: The AcuRite Iris 5-in-1 Wireless Weather Station, showing the outdoor sensor, indoor color display, and the My AcuRite mobile application interface.

Image: Key features of the AcuRite Iris 5-in-1 Weather Station, including indoor/outdoor temperature and humidity, wind speed/direction/rainfall monitoring, visual readouts, and a real-time weather ticker, alongside the mobile app.

Image: The AcuRite Iris 5-in-1 Weather Station display, highlighting its ability to accurately measure indoor and outdoor temperature and humidity, monitor wind speed, direction, and rainfall, provide a visual readout of current weather conditions, and offer a real-time weather ticker.

Image: A close-up of the AcuRite Iris 5-in-1 Weather Station display, illustrating its presentation of weather, humidity, and wind information with trend indicators, barometer readings, future forecasts, and the current date and time.
AcuRite Iris 06003 PRO+ Upgrade for 5-in-1 Weather Sensor (Model 06003M)
The PRO+ Upgrade is designed to enhance the performance of your existing AcuRite 5-in-1 weather sensor. It features dual solar panels to maximize sun exposure and power a solar-powered aspirating fan. This fan improves internal airflow within the sensor, leading to more accurate ambient temperature readings throughout the day. The upgrade is a replacement assembly for the standard solar panel component of the 5-in-1 sensor.

Image: Top view of the AcuRite 06003 PRO+ Upgrade for the 5-in-1 Weather Sensor, showing the dual solar panels and wind cups.

Image: Side view of the AcuRite 06003 PRO+ Upgrade for the 5-in-1 Weather Sensor, highlighting the solar panel and overall design.

Image: Internal view of the AcuRite 06003 PRO+ Upgrade for the 5-in-1 Weather Sensor, showing the aspirating fan component designed to improve temperature accuracy.
Package Contents
AcuRite Iris 5-in-1 Wireless Weather Station (01536M)
- 5-in-1 Outdoor Sensor
- Color Display Unit
- Power Adapter for Display Unit
- Mounting Hardware for Sensor
- Instruction Manual (this document)
AcuRite Iris 06003 PRO+ Upgrade (06003M)
- PRO+ Upgrade Assembly (with dual solar panels and aspirating fan)
- Installation Guide for PRO+ Upgrade
Setup
1. Install Batteries in 5-in-1 Sensor
- Locate the battery compartment on the underside of the 5-in-1 sensor.
- Remove the battery compartment cover.
- Insert 4 AA alkaline or lithium batteries (not included) according to the polarity markings. Lithium batteries are recommended for temperatures below -4°F (-20°C).
- Replace the battery compartment cover securely.
2. Install the 5-in-1 Sensor
Proper placement of the 5-in-1 sensor is crucial for accurate readings.
- Location: Choose an open location at least 5 feet (1.5 meters) off the ground, away from heat sources (e.g., exhaust vents, engines) and reflective surfaces (e.g., large windows, concrete). Ensure clear access to wind and rain.
- Mounting: Use the included mounting hardware to secure the sensor to a post or pole. Ensure the sensor is level for accurate rain collection. The wind cups should be able to spin freely.
3. Install the PRO+ Upgrade (06003M)
This section applies if you are upgrading your existing 5-in-1 sensor with the PRO+ assembly.
- Tools Needed: Small Phillips head screwdriver.
- Remove Existing Assembly: Carefully detach the existing solar panel and fan assembly from your 5-in-1 sensor. This usually involves unscrewing a few small screws. Refer to the PRO+ Upgrade Installation Guide for specific steps.
- Install PRO+ Assembly: Align the PRO+ Upgrade assembly with the mounting points on your 5-in-1 sensor. Secure it in place using the screws. Ensure the aspirating fan is correctly positioned and can rotate freely.
4. Setup the Color Display Unit
- Power On: Plug the power adapter into the display unit and then into a standard electrical outlet.
- Initial Configuration: The display will power on. Follow the on-screen prompts to set the time, date, and measurement units (Fahrenheit/Celsius, mph/kmh, etc.).
- Sensor Connection: The display unit will automatically search for and connect to your 5-in-1 sensor. This may take a few minutes. Once connected, outdoor readings will appear on the display.
- My AcuRite App (Optional): Download the My AcuRite app from your device's app store. Follow the in-app instructions to create an account and connect your display unit for remote monitoring. You will need your display unit's Device ID, typically found on a sticker on the back or bottom of the unit.
Operation
Color Display Unit Features
The color display unit provides a wealth of information at a glance:
- Outdoor Conditions: Current temperature, humidity, wind speed, wind direction, and rainfall.
- Indoor Conditions: Current indoor temperature and humidity.
- Weather Forecast: A 12 to 24-hour weather forecast based on barometric pressure changes.
- Weather Ticker: Scrolls through real-time weather information and alerts.
- Historical Data: View daily, weekly, or monthly highs and lows for various measurements.
- Alarms: Set customizable alarms for specific weather conditions (e.g., high wind, low temperature).
My AcuRite App
The My AcuRite app extends the functionality of your weather station:
- Remote Monitoring: View your weather data from anywhere using your smartphone or tablet.
- Custom Alerts: Receive push notifications or email alerts when conditions exceed your preset ranges.
- Data History: Access detailed historical data and charts.
- Sharing: Share your weather data with friends, family, or online weather communities like Weather Underground.
USB Port Functionality
The display unit includes a USB port for connecting to a computer. This allows you to:
- Store and archive weather data.
- Analyze long-term weather trends.
- Export data for use in other applications.
Maintenance
Cleaning the 5-in-1 Sensor
Periodically clean the sensor to ensure accurate readings:
- Rain Collector: Remove any debris (leaves, insects) from the rain collector funnel.
- Wind Cups/Vane: Ensure the wind cups and wind vane rotate freely. Clean any obstructions.
- Exterior: Wipe the exterior with a damp cloth. Avoid abrasive cleaners.
Battery Replacement
Replace batteries in the 5-in-1 sensor approximately every 12-24 months, or when the low battery indicator appears on the display unit. Always replace all batteries at once with fresh ones.
Recalibration
If you suspect inaccurate readings, refer to the AcuRite support website for instructions on recalibrating specific sensors (e.g., rain gauge, temperature offset).
Troubleshooting
| Problem | Possible Solution |
|---|---|
| No outdoor data on display |
|
| Inaccurate temperature/humidity |
|
| Inaccurate rainfall |
|
| Inaccurate wind speed/direction |
|
| My AcuRite app not connecting |
|
Specifications
- Brand: AcuRite
- Models: 01536M (Weather Station), 06003M (PRO+ Upgrade)
- Power Source (5-in-1 Sensor): 4 x AA batteries (not included), Solar Powered (for internal fan/aspirator)
- Power Source (Display Unit): AC Power Adapter
- Connectivity Technology: Wireless (sensor to display), USB Port (display to PC), Wi-Fi (for My AcuRite app, if applicable)
- Temperature Accuracy: ±1°C (±2°F)
- Display Type: Color Display
- Sensor Technology (PRO+ Upgrade): Aspirating Fan, Dual Solar Panels
- Wireless Range: Up to 330 feet (100 meters)
Warranty & Support
Limited Warranty
Your AcuRite Iris 5-in-1 Wireless Weather Station and PRO+ Upgrade are covered by a one-year limited warranty from the date of purchase. This warranty covers defects in materials and workmanship. For full warranty details, please refer to the official AcuRite website or contact customer support.
Customer Support
For technical assistance, troubleshooting, or warranty claims, please visit the official AcuRite support website or contact their customer service department. Contact information can typically be found on the AcuRite website or in the original product packaging.