1. Important Safety Instructions
Please read these safety instructions carefully before using the appliance and keep them for future reference. Incorrect use may lead to injury or damage.
- Ensure the appliance is connected to a grounded power outlet with the correct voltage (220V).
- Do not immerse the appliance, cord, or plug in water or any other liquid.
- Always unplug the appliance before cleaning, refilling water, or when not in use.
- Do not operate the appliance with a damaged cord or plug, or if it has been dropped or damaged in any way.
- Keep the appliance out of reach of children and pets.
- Do not block the air inlets or outlets. Ensure adequate ventilation around the unit.
- Use the appliance only for its intended household purpose as described in this manual.
- Do not place the appliance near heat sources, direct sunlight, or in excessively humid environments.
- Always place the appliance on a stable, flat surface to prevent tipping.
2. Product Overview
The ADLER AD 7913 is a versatile evaporative cooler designed to provide cooling, ventilation, humidification, and air purification. It features a portable design with wheels for easy movement.

Figure 2.1: Front view of the ADLER AD 7913 Evaporative Cooler, showing the air outlet, control panel, and water level indicator.
Key Components:
- Control Panel: Located on the top, with buttons for power, speed, mode, and oscillation.
- Air Outlet: Front grille where cooled air is discharged.
- Water Tank: 12-litre capacity, located at the bottom, accessible for refilling.
- Water Level Indicator: Transparent window on the front to monitor water level.
- Wheels: Four castor wheels for easy portability.
- Air Filter/Cooling Pad: Located at the rear, responsible for air filtration and evaporation.
3. Setup
3.1 Unpacking
- Carefully remove the evaporative cooler from its packaging.
- Remove all packing materials, including any protective films or tapes.
- Inspect the appliance for any signs of damage. If damaged, do not use and contact customer support.
3.2 Placement
Place the evaporative cooler on a firm, level surface. Ensure there is at least 20 cm of clear space around the back and sides of the unit for proper airflow. For optimal cooling, place the unit near an open window or door to allow fresh air intake.
3.3 Filling the Water Tank
The ADLER AD 7913 has a 12-litre water tank. For cooling and humidification, the tank must be filled with water.
- Ensure the appliance is unplugged from the power outlet.
- Locate the water filling port, typically at the top or rear of the unit.
- Slowly pour clean, cold water into the tank. Do not exceed the 'MAX' fill line indicated on the water level indicator.
- For enhanced cooling, you may add ice packs (if included or purchased separately) to the water tank.
- Close the water tank cap securely.

Figure 3.1: The evaporative cooler positioned in a living space, demonstrating its portable nature.
4. Operating Instructions
4.1 Control Panel Overview
The control panel on the top of the unit allows you to manage all functions.
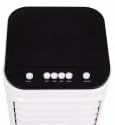
Figure 4.1: Top view of the control panel with various function buttons.
4.2 Power On/Off
- Plug the power cord into a suitable electrical outlet.
- Press the POWER button (usually marked with ⑉) to turn the unit on or off.
4.3 Fan Speed Adjustment
The unit offers 3 fan speed levels.
- Press the SPEED button repeatedly to cycle through Low, Medium, and High fan speeds.
4.4 Cooling Function (Evaporative Cooling)
To activate the cooling function, ensure the water tank is filled.
- Press the COOL button. The water pump will activate, circulating water over the cooling pad, which then cools the air through evaporation.
- Press the COOL button again to deactivate the cooling function. The unit will then operate as a fan.
4.5 Oscillation Function
The unit features 120° horizontal oscillation and 70° manual vertical oscillation to distribute air evenly.
- Press the SWING or OSC button to activate automatic horizontal oscillation.
- Press the button again to stop oscillation at the desired position.
- To adjust vertical airflow, manually tilt the front louvers up or down.
4.6 Humidification and Air Purification
When the cooling function is active, the unit also humidifies the air and helps purify it by trapping dust particles in the cooling pad.
5. Maintenance
Regular maintenance ensures optimal performance and extends the lifespan of your evaporative cooler. Always unplug the unit before performing any maintenance.
5.1 Cleaning the Exterior
- Wipe the exterior surfaces with a soft, damp cloth.
- Do not use abrasive cleaners, waxes, or solvents as they may damage the finish.
5.2 Cleaning the Water Tank
To prevent mold and mildew growth, clean the water tank regularly, especially if the unit is used frequently.
- Drain any remaining water from the tank.
- Remove the water tank (if detachable) or access the tank interior.
- Clean the tank with a mild detergent and water. Rinse thoroughly to remove any soap residue.
- Allow the tank to air dry completely before reassembling or refilling.
5.3 Filter/Cooling Pad Maintenance
The cooling pad (also acts as a filter) should be cleaned periodically to maintain efficiency.
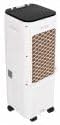
Figure 5.1: Rear view of the unit, indicating the location of the air filter/cooling pad for maintenance.
- Unplug the unit.
- Locate the filter access panel at the rear of the unit and remove it.
- Carefully slide out the cooling pad.
- Rinse the cooling pad under running water to remove dust and mineral deposits. For stubborn deposits, soak in a mild descaling solution (e.g., vinegar and water) for 30 minutes, then rinse thoroughly.
- Allow the cooling pad to air dry completely before reinserting it.
- Reinstall the cooling pad and secure the access panel.
5.4 Storage
If storing the unit for an extended period:
- Drain and clean the water tank and cooling pad thoroughly.
- Ensure all components are completely dry to prevent mold and mildew.
- Store the unit in a cool, dry place, away from direct sunlight and extreme temperatures.
6. Troubleshooting
Before contacting customer support, please refer to the following table for common issues and their solutions.
| Problem | Possible Cause | Solution |
|---|---|---|
| Unit does not turn on | No power supply Power button not pressed | Check if the power cord is securely plugged in and the outlet is working. Press the POWER button. |
| No cool air / Weak cooling | Water tank empty Cooling function not activated Cooling pad dirty/clogged Insufficient ventilation | Fill the water tank. Press the COOL button. Clean the cooling pad as per maintenance instructions. Ensure adequate space around the unit and an open window for fresh air. |
| Unpleasant odor | Stagnant water in tank Cooling pad needs cleaning | Drain and clean the water tank. Use fresh water. Clean the cooling pad. |
| Water leakage | Water tank overfilled Unit not on a level surface | Do not exceed the MAX fill line. Place the unit on a stable, flat surface. |
7. Specifications
| Feature | Specification |
|---|---|
| Model Number | AD 7913 |
| Power Consumption | 350 Watts |
| Voltage | 220V |
| Water Tank Capacity | 12 Litres |
| Fan Speeds | 3 Levels |
| Airflow | 342 m³/h |
| Horizontal Oscillation | 120° |
| Vertical Oscillation | 70° (Manual) |
| Noise Level | 44 dB |
| Product Dimensions (L x W x H) | 30 x 25 x 80 cm |
| Item Weight | 2.1 kg |
8. Warranty and Support
This product is covered by a manufacturer's warranty. Please refer to the warranty card included with your purchase for specific terms and conditions, including the warranty period and coverage details.
For technical assistance, troubleshooting beyond this manual, or to inquire about replacement parts, please contact Adler customer support. Contact information can typically be found on the product packaging, the official Adler website, or your purchase receipt.


