1. Introduction
This instruction manual provides essential information for the safe and efficient operation, setup, maintenance, and troubleshooting of your Einhell TE-OS 18/150 Li-Solo Power X-Change Cordless Multi-Sander. Please read this manual thoroughly before using the tool and keep it for future reference. This product is part of the Einhell Power X-Change family, meaning it operates with any 18V Power X-Change battery.

Figure 1: Einhell TE-OS 18/150 Li-Solo Cordless Multi-Sander with included abrasive sheets.
2. General Safety Instructions
Always observe the following safety precautions when operating power tools to prevent electric shock, fire, and serious injury.
- Work Area Safety: Keep your work area clean and well-lit. Cluttered or dark areas invite accidents. Do not operate power tools in explosive atmospheres, such as in the presence of flammable liquids, gases, or dust.
- Electrical Safety: Avoid body contact with earthed or grounded surfaces. Do not expose power tools to rain or wet conditions.
- Personal Safety: Always wear eye protection. Use hearing protection when operating for extended periods. Wear a dust mask in dusty conditions. Dress properly; avoid loose clothing or jewelry. Keep hair, clothing, and gloves away from moving parts.
- Tool Use and Care: Do not force the power tool. Use the correct power tool for your application. Disconnect the battery pack from the power tool before making any adjustments, changing accessories, or storing power tools. Store idle power tools out of the reach of children and do not allow persons unfamiliar with the power tool or these instructions to operate the power tool.
- Battery Tool Use and Care: Recharge only with the charger specified by the manufacturer. Use power tools only with specifically designated battery packs.
3. Product Components
The Einhell TE-OS 18/150 Li-Solo multi-sander includes the following components:
- Cordless Multi-Sander Unit
- Dust Collection Box (with filter)
- Adapter for External Dust Extraction
- 6 Abrasive Sheets (3x P120, 3x P240)
Note: This product is supplied without a battery or charger. These are sold separately as part of the Power X-Change system.

Figure 2: Key features of the multi-sander, including Softgrip, dust extraction, delta sanding shoe, and large oscillating motion.

Figure 3: The Einhell TE-OS 18/150 Li-Solo is sold without a battery or charger.
4. Setup
4.1 Battery Installation
- Ensure the sander's power switch is in the 'OFF' position.
- Slide a charged 18V Power X-Change battery pack into the battery receptacle on the rear of the sander until it clicks securely into place.
- To remove the battery, press the release button on the battery pack and slide it out.
4.2 Attaching Abrasive Paper
The sander features an 'Extreme Fix' hook-and-loop fastening system for quick and secure abrasive paper changes.
- Ensure the sander is switched off and the battery is removed.
- Align the holes on the abrasive sheet with the holes on the sanding plate.
- Press the abrasive sheet firmly onto the hook-and-loop surface of the sanding plate to secure it.
- To remove, simply peel the abrasive sheet off the sanding plate.

Figure 4: Attaching abrasive paper using the hook-and-loop system.

Figure 5: The sander comes with 6 abrasive sheets (3x P120, 3x P240).
4.3 Dust Extraction
The sander offers two options for dust extraction:
- Integrated Dust Collection Box: Attach the provided dust collection box to the designated port on the sander. This is suitable for most light to medium sanding tasks.
- External Dust Extraction: For prolonged use or when working with fine dust, attach the vacuum adapter to the dust extraction port and connect it to a suitable workshop vacuum cleaner.

Figure 6: Options for dust extraction: integrated dust collector or external vacuum connection.
5. Operating Instructions
5.1 Powering On/Off
- Ensure a charged battery is installed and abrasive paper is securely attached.
- To start the sander, push the ON/OFF switch to the 'I' (ON) position.
- To stop the sander, push the ON/OFF switch to the 'O' (OFF) position.
5.2 Sanding Techniques
- Hold the sander firmly with one hand using the Softgrip surface.
- Place the sanding plate flat on the workpiece before switching the tool on.
- Apply light, even pressure. Do not press too hard, as this can reduce sanding efficiency and damage the workpiece or tool.
- Move the sander in smooth, overlapping strokes across the surface.
- The delta-shaped sanding plate is ideal for sanding corners, edges, and smaller, intricate areas.
- Always switch off the sander and allow it to come to a complete stop before lifting it from the workpiece.

Figure 7: Demonstrating the use of the multi-sander for detailed work on a window frame.
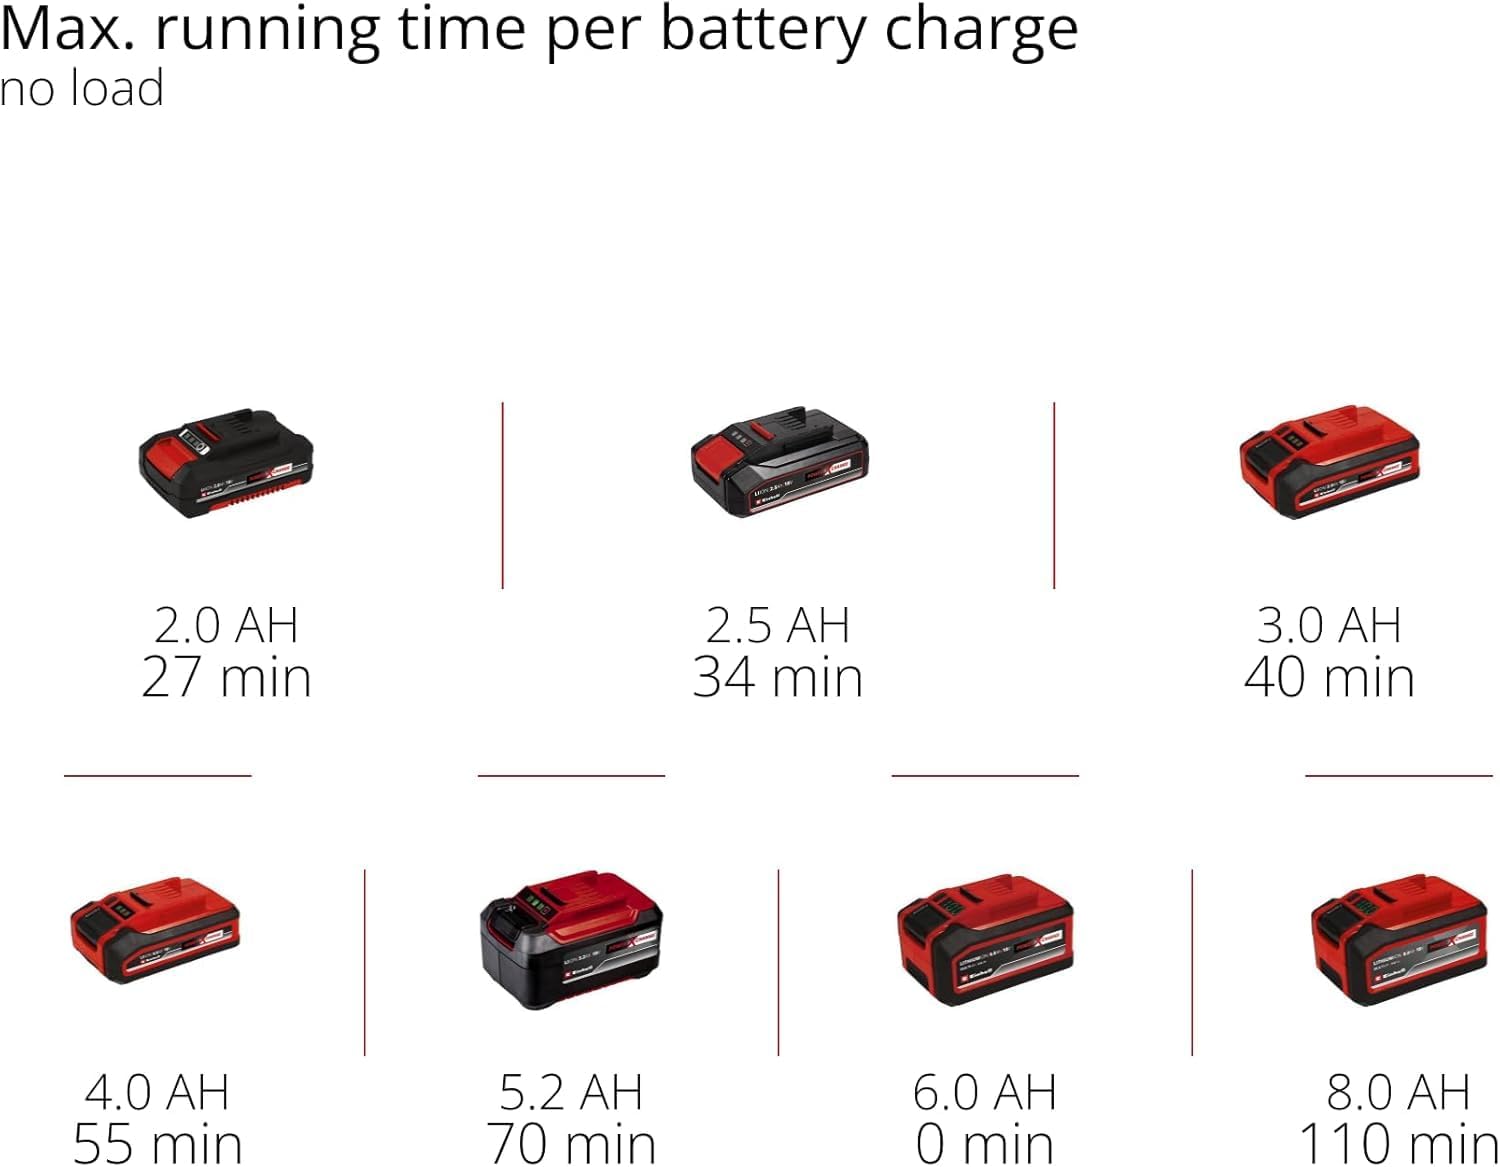
Figure 8: The compact design allows for optimal handling and one-handed control.
5.3 Battery Runtime (No Load)
The approximate maximum running time per battery charge (no load) for various Power X-Change battery capacities is as follows:
- 2.0 AH: 27 minutes
- 2.5 AH: 34 minutes
- 3.0 AH: 40 minutes
- 4.0 AH: 55 minutes
- 5.2 AH: 70 minutes
- 8.0 AH: 110 minutes

Figure 9: Battery runtime chart for various Power X-Change battery capacities.
6. Maintenance
6.1 Cleaning the Dust Collection Box
- Regularly empty the dust collection box to maintain optimal dust extraction performance.
- Remove the dust box from the sander.
- Open the dust box and dispose of the collected dust.
- Clean the filter inside the dust box by tapping it or using compressed air.
- Reattach the dust box securely to the sander.
6.2 General Cleaning and Inspection
- Always remove the battery before any cleaning or maintenance.
- Keep the ventilation slots clean to prevent overheating. Use a soft brush or compressed air.
- Wipe the tool housing with a soft, damp cloth. Do not use harsh cleaning agents or solvents.
- Regularly inspect the sanding plate for wear or damage. Replace if necessary.
- Check the power switch for proper function.
7. Troubleshooting
If you encounter issues with your multi-sander, refer to the following common troubleshooting steps:
| Problem | Possible Cause | Solution |
|---|---|---|
| Sander does not start | Battery not inserted correctly or discharged. | Ensure battery is fully inserted. Charge battery if necessary. |
| Poor sanding performance | Worn or incorrect abrasive paper. Excessive pressure. | Replace abrasive paper. Use appropriate grit. Apply lighter, even pressure. |
| Ineffective dust extraction | Dust box full or filter clogged. Dust port blocked. | Empty dust box and clean filter. Clear any blockages in the dust port. |
| Excessive vibration/noise | Damaged sanding plate or abrasive paper. Loose components. | Inspect sanding plate and abrasive paper for damage. Ensure all components are securely fastened. |
If the problem persists after attempting these solutions, please contact Einhell customer support.
8. Specifications
| Feature | Specification |
|---|---|
| Manufacturer | Einhell |
| Model Number | TE-OS 18/150 Li |
| Power Source | Cordless (Power X-Change 18V) |
| Voltage | 18 Volts |
| Power | 18 Watts |
| Max. Oscillation Speed | 24000 oscillations/min |
| Sanding Plate Type | Delta (Hook-and-loop fastening) |
| Included Abrasive Sheets | 6 sheets (3x P120, 3x P240) |
| Dust Extraction | Integrated dust collection box and external vacuum adapter |
| Product Dimensions (L x W x H) | 22.4 x 10.1 x 14.9 cm |
| Weight | 860 grams (without battery) |
| Battery/Charger | Not included, required (Power X-Change 18V lithium-ion) |
9. Warranty and Support
For warranty information, product registration, or technical support, please refer to the official Einhell website or contact your local Einhell service center. Keep your proof of purchase for any warranty claims.
No official product videos from the seller were found for embedding in this manual.


