1. Introduction
Thank you for choosing the Uten 2200 Electronic Sewing Machine. This manual provides comprehensive instructions for the safe and efficient operation, maintenance, and troubleshooting of your new sewing machine. Designed for both beginners and experienced users, the Uten 2200 offers 60 stitch patterns, automatic features, and robust performance for various sewing projects.
Please read this manual thoroughly before using the machine to ensure proper setup and to maximize your sewing experience.
2. Important Safety Instructions
- Always unplug the machine from the electrical outlet when cleaning, lubricating, or when removing any covers.
- Keep fingers away from all moving parts. Special care is required around the sewing machine needle.
- Use the correct needle plate. The wrong plate can cause the needle to break.
- Do not pull or push fabric while stitching. This may deflect the needle, causing it to break.
- Turn the sewing machine off when making any adjustments in the needle area, such as threading the needle, changing the needle, threading the bobbin, or changing the presser foot.
- Use only original accessories and parts recommended by the manufacturer.
- Do not operate the machine if it has a damaged cord or plug, if it is not working properly, or if it has been dropped or damaged.
- Keep the machine dry. Do not use it in damp or wet conditions.
3. Product Overview
Familiarize yourself with the main components of your Uten 2200 sewing machine.

Figure 3.1: Main components of the Uten 2200 Electronic Sewing Machine. Key parts include the LCD display, speed control, start/stop button, thread tension dial, automatic needle threader, and reverse sewing lever.

Figure 3.2: Front view of the Uten 2200 sewing machine, showcasing its compact design and stitch pattern guide.
4. Setup
4.1 Unpacking and Accessories
Carefully remove the sewing machine and all accessories from the packaging. The accessories are conveniently stored in a removable accessory box located at the front of the machine.
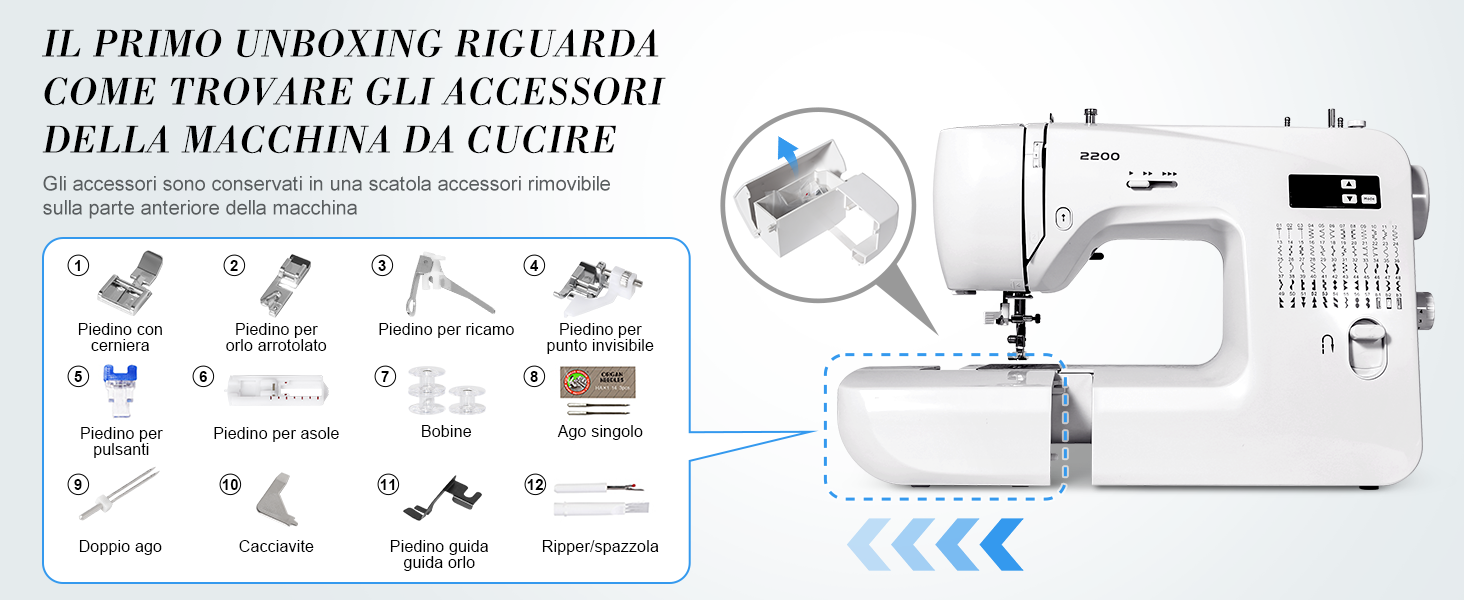
Figure 4.1: Location of the accessory box and a visual guide to the included accessories such as power adapter, foot pedal, needles, various presser feet, bobbins, and tools.

Figure 4.2: A closer look at the standard accessories provided with your Uten 2200, including different presser feet for specialized tasks.
4.2 Power Connection
Connect the power adapter to the machine's cord socket and then plug it into a suitable electrical outlet. Use the power/light switch to turn the machine on or off.
4.3 Bobbin Winding
Proper bobbin winding ensures smooth stitching. Follow the winding path indicated on the machine, place the bobbin onto the bobbin winder spindle, and engage the winder. The machine will automatically stop when the bobbin is full.
4.4 Threading the Machine
Correct threading is crucial for optimal performance. Follow the numbered threading guides on the machine. The Uten 2200 features an automatic needle threader for convenience.

Figure 4.3: The automatic needle threader simplifies the threading process, making it quicker and easier to get started.
5. Operation
5.1 Basic Sewing Controls
The machine can be operated using the foot pedal or the Start/Stop button for hands-free sewing. Adjust the sewing speed using the manual speed control lever (low to fast).
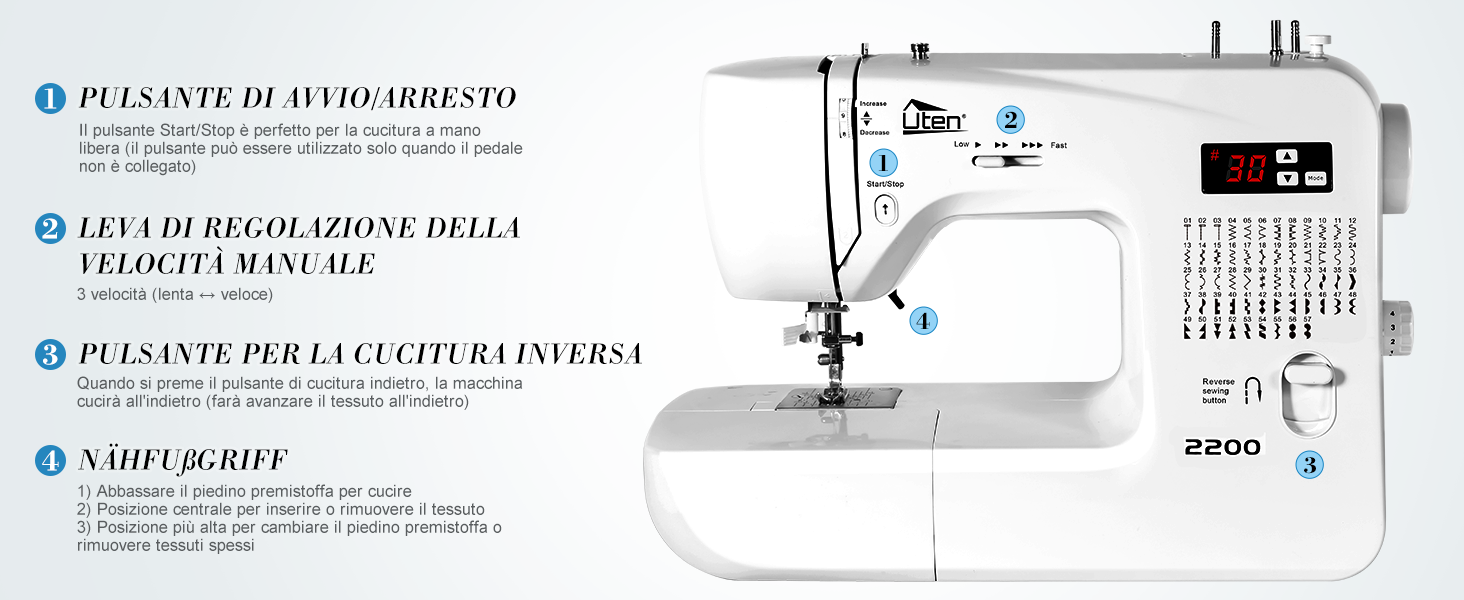
Figure 5.1: Key operational controls: Start/Stop button for hands-free sewing, manual speed control lever, and the reverse sewing button for securing stitches.
5.2 Stitch Selection and LCD Display
The Uten 2200 offers 60 types of stitches. Use the intuitive LCD display and mode selection buttons to easily choose your desired stitch pattern and adjust settings like stitch width and length.

Figure 5.2: The LCD display shows the selected stitch number, and the machine's body features a comprehensive guide to all 60 available stitch patterns.

Figure 5.3: Detailed view of the LCD display and its control buttons for mode selection, increasing/decreasing stitch settings, and indicating stitch width.
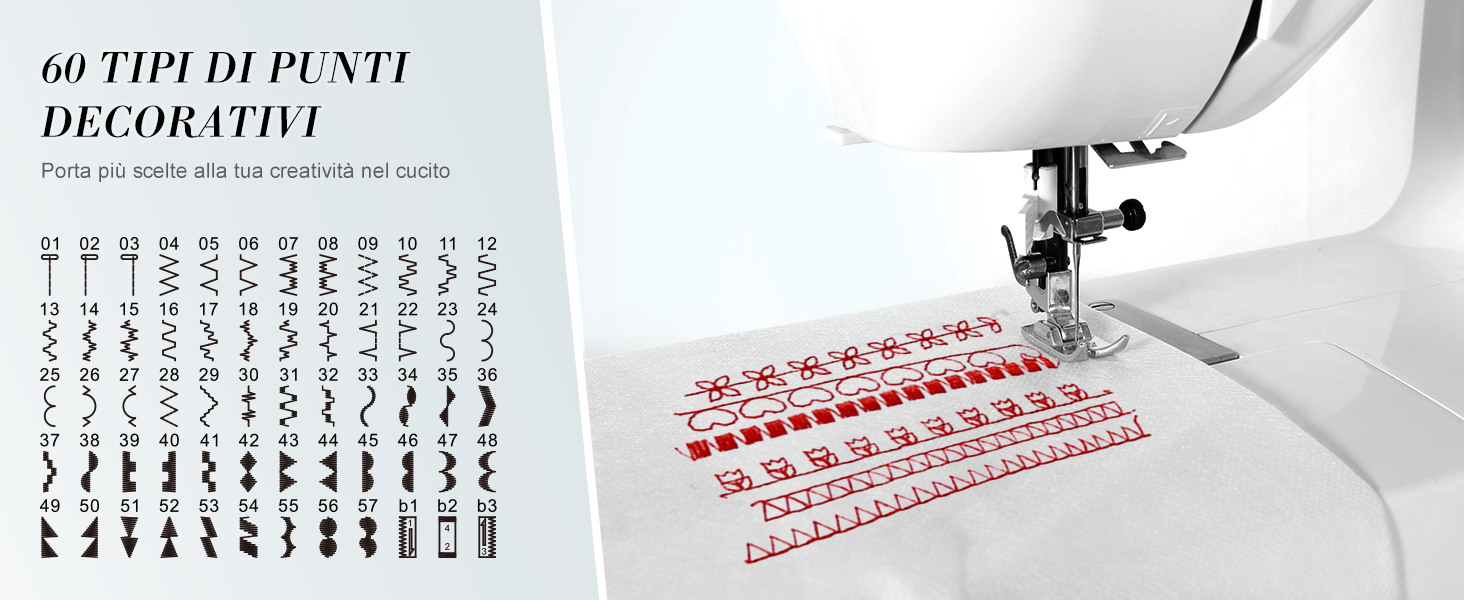
Figure 5.4: Visual representation of the 60 decorative stitch types available, allowing for enhanced creativity in your sewing projects.
5.3 Reverse Sewing
Press the reverse sewing button to stitch backward, which is useful for securing the beginning and end of seams.
5.4 Free Arm Sewing
Remove the accessory box to convert the flatbed into a free arm. This feature is ideal for sewing cylindrical items such as sleeves, pant legs, and small children's garments.
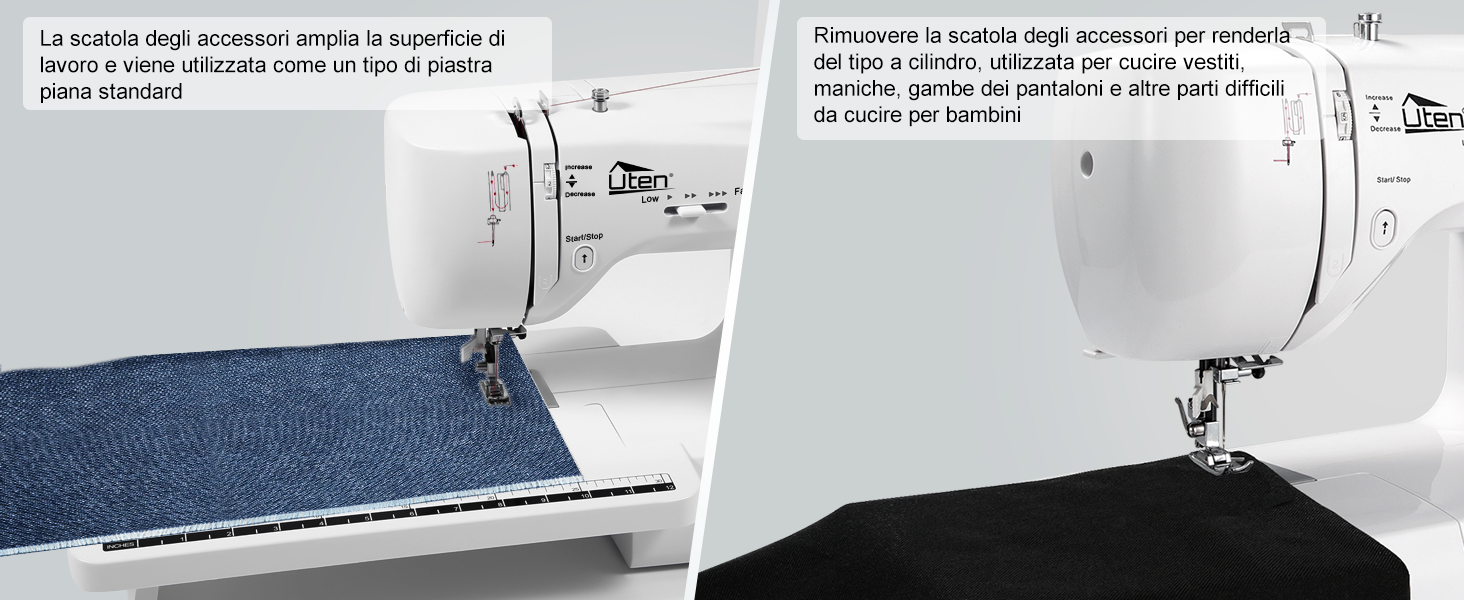
Figure 5.5: The machine's design allows for easy conversion from a standard flatbed to a free arm, enhancing versatility for various sewing tasks.
5.5 Buttonholes
The Uten 2200 supports 3 types of buttonhole stitches. Attach the appropriate buttonhole presser foot and follow the machine's instructions for automatic buttonhole creation.
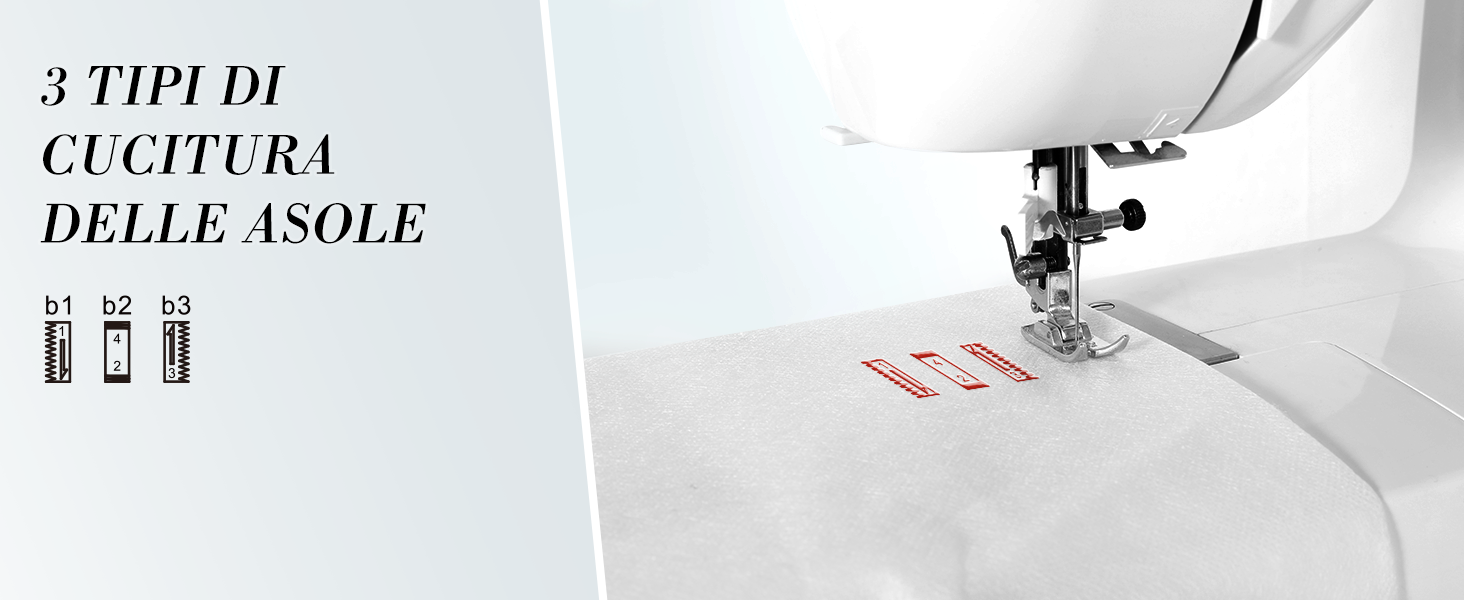
Figure 5.6: The three distinct buttonhole stitch types available, providing options for different fabric and design needs.
5.6 Sewing Thick Fabrics
Equipped with an advanced motor, the Uten 2200 can sew through up to 6 layers of fabric without jamming. Ensure you use the correct needle size and thread tension for thick materials.
- Thin fabrics: Needle size 9 or 11
- Common fabrics: Needle size 11 or 14
- Thick fabrics: Needle size 14 or 16
- Ensure the size and type of the bobbin thread match the upper thread.
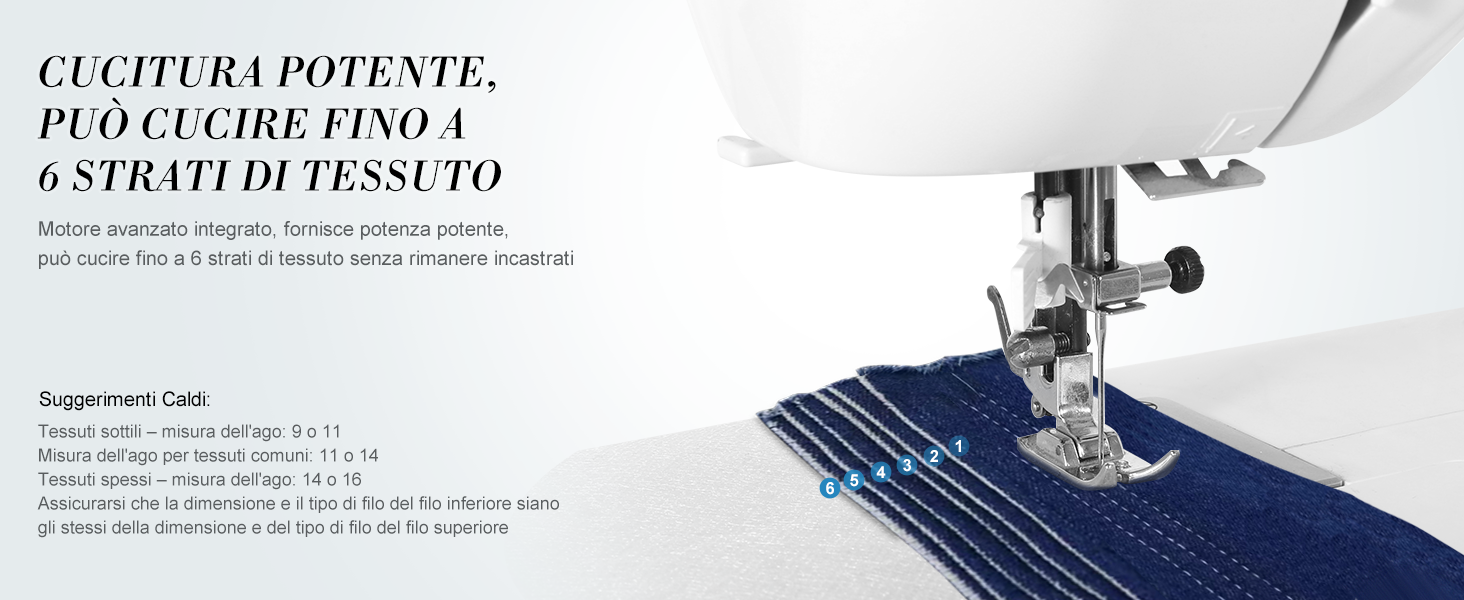
Figure 5.7: The powerful motor allows the Uten 2200 to handle multiple layers of fabric, demonstrating its robust sewing capability.
6. Maintenance
Regular maintenance ensures the longevity and optimal performance of your sewing machine.
6.1 Cleaning
Periodically clean the lint and dust from the bobbin case area and feed dogs using the brush provided. Always unplug the machine before cleaning.

Figure 6.1: The bobbin and drop feed system area, which should be regularly cleaned to prevent lint buildup and ensure smooth operation.
6.2 Needle Replacement
Replace the needle regularly, especially if it becomes bent, dull, or if you notice skipped stitches. Use the screwdriver provided to loosen the needle clamp screw, remove the old needle, insert a new one with the flat side facing the back, and tighten the screw.
7. Troubleshooting
This section addresses common issues you might encounter. For more complex problems, please contact customer support.
| Problem | Possible Cause | Solution |
|---|---|---|
| Skipped Stitches | Incorrectly inserted needle, bent needle, wrong needle size for fabric, improper threading. | Reinsert needle correctly, replace bent needle, use appropriate needle, rethread machine. |
| Thread Breaking | Improper threading, thread tension too tight, poor quality thread, bent needle, burr on needle plate. | Rethread machine, adjust tension, use good quality thread, replace needle, check needle plate for damage. |
| Fabric Not Feeding | Feed dogs lowered, lint buildup in feed dogs, presser foot pressure too low. | Raise feed dogs, clean feed dogs, increase presser foot pressure. |
| Machine Not Starting | Not plugged in, power switch off, foot pedal not connected, bobbin winder engaged. | Check power connection, turn on switch, connect foot pedal, disengage bobbin winder. |
8. Specifications
| Feature | Detail |
|---|---|
| Model Number | Uten 2200 (60 Stitch Points) |
| Dimensions (L x W x H) | Approx. 40 cm x 15.8 cm x 34 cm (15.7 x 6.2 x 13.4 inches) |
| Weight | Approx. 5.5 kg (12.1 lbs) |
| Stitch Patterns | 60 (including decorative and buttonhole stitches) |
| Display | LCD Display |
| Needle Threader | Automatic |
| Free Arm | Yes |
| Lighting | LED Sewing Light |
| Power Source | Electric (Power Adapter included) |

Figure 8.1: Dimensions of the Uten 2200 sewing machine, providing a clear understanding of its size for placement and storage.
9. Warranty and Support
Uten products are manufactured to high-quality standards. For warranty information, please refer to the documentation included with your purchase or visit the official Uten website. If you have any questions, require technical assistance, or need to report an issue, please contact Uten customer support through the retailer where you purchased the product or via the contact information provided on the official Uten website.
For further assistance, you may also refer to the Uten Brand Store on Amazon.


