
CAMPLUX ME40B
Contents
CAMPLUX 4 Gallon Electric Mini-Tank Water Heater User Manual
Model: ME40B
Brand: CAMPLUX ENJOY OUTDOOR LIFE
1. Introduction
Thank you for choosing the CAMPLUX 4 Gallon Electric Mini-Tank Water Heater. This compact, point-of-use water heater is designed to provide hot water efficiently and conveniently, eliminating long waits at the tap. Please read this manual thoroughly before installation and operation to ensure safe and optimal performance of your unit.
This water heater is UL listed and features a glass-lined tank for durability, along with anti-freezing and overheat protection for enhanced safety and longevity.
2. Safety Information
Your safety and the safety of others are paramount. Please observe all safety warnings and instructions in this manual.
- UL Listed: This water heater is UL listed, ensuring it meets recognized safety standards.
- Overheat Protection: The unit automatically shuts down if the water temperature exceeds 203°F (95°C) to prevent scalding and damage.
- Anti-Freezing Mode: An integrated freezing mode helps prevent the water tank from freezing in cold environments, protecting the unit.
- Glass-Lined Tank: Features a durable glass-lined tank for good insulation and corrosion resistance.
- Electrical Safety: Ensure the unit is connected to a properly grounded 120V/12A power supply. Do not use extension cords.
- Pressure Relief: Always install the included T&P (Temperature and Pressure) relief valve to prevent excessive pressure buildup.


3. Product Overview
The CAMPLUX ME40B is a compact electric mini-tank water heater designed for convenience and efficiency. It features a 4-gallon capacity and a 1.44kW heating element.
Key Features:
- Compact Design for easy installation under sinks or in small spaces.
- Adjustable Temperature settings from 68°F to 140°F (20°C to 60°C).
- High Thermal Efficiency up to 98%.
- 1/2" NPT Water Connections for standard plumbing.
- 43.3" (110cm) Power Cord with 3-prong plug (120V/12A).
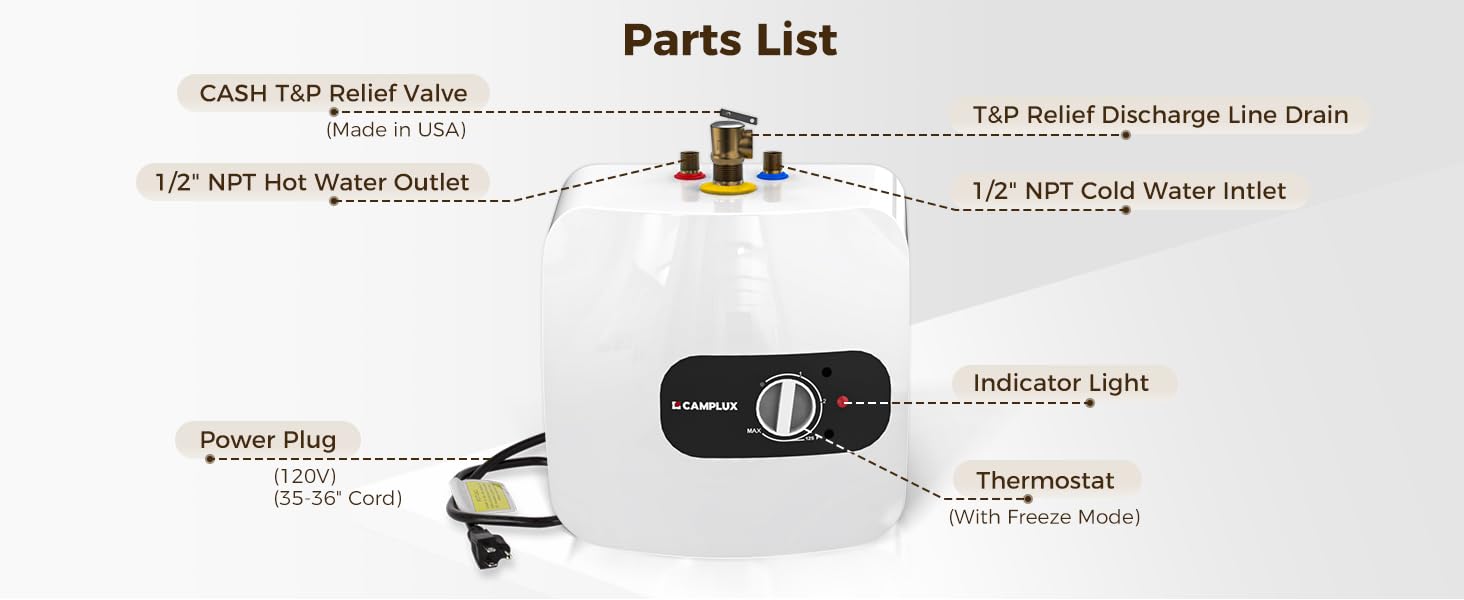
Components:

- T&P Relief Valve: Certified to ANSI Z21.22, protects against over-pressure and over-temperature.
- Thermostat: Control dial for adjusting water temperature, includes a freeze mode setting.
- Indicator Light: Illuminates when the heating element is active.
- Power Plug: Standard 120V, 3-prong plug.
- Water Connections: 1/2" NPT for both hot water outlet (red) and cold water inlet (blue).


4. Specifications
| Feature | Specification |
|---|---|
| Brand | CAMPLUX ENJOY OUTDOOR LIFE |
| Model Number | ME40B |
| Capacity | 4 gallons |
| Power Source | AC |
| Voltage | 120 volts |
| Wattage | 1.44 KW |
| Heat Output | 1.44 KW |
| Maximum Temperature | 203 °F (95°C) |
| Maximum Pressure | 150 psi |
| Product Dimensions (W x H x D) | 14.5" W x 14.5" H x 12.9" D |
| Item Weight | 8.98 kg (19.8 lbs) |
| Material Type | Glass (Lined Tank) |
| Mount Type | Floor, Shelf, Wall |
| Special Features | Anti-Freezing Protection, Overheat Protection |
| Included Components | T&P Relief Valve, Mounting Kits, User Manual |
5. Setup and Installation
The CAMPLUX mini-tank water heater is designed for flexible installation. It can be shelf, wall, or floor-mounted. Ensure you have adequate space and access for maintenance.
Installation Steps:
- Choose Location: Select a suitable location, typically under a sink, ensuring it is close to the point of use and has access to water lines and a power outlet.
- Mounting: Use the included mounting bracket to secure the unit if wall-mounting. For shelf or floor mounting, ensure the surface is level and can support the weight of the unit when full.
- Water Connections: Connect the 1/2" NPT cold water inlet (blue) to your cold water supply and the 1/2" NPT hot water outlet (red) to your hot water faucet line. Install the T&P relief valve on the designated port.
- Fill Tank: Before plugging in the unit, open the hot water faucet to allow the tank to fill completely and purge air from the system. Water should flow steadily from the faucet.
- Power Connection: Once the tank is full, plug the 43.3" cord into a standard 120V/12A grounded electrical outlet.


6. Operating Instructions
Once installed and powered, operating your CAMPLUX water heater is straightforward.
- Power On: After plugging in, the unit will begin heating the water. The indicator light will illuminate.
- Adjust Temperature: Use the thermostat dial on the front of the unit to set your desired water temperature. The temperature range is from 68°F to 140°F (20°C to 60°C).
- Freeze Protection: The thermostat includes a 'Freeze Mode' setting. In cold environments, setting the dial to this mode will activate the anti-freezing function to protect the tank.
- Hot Water On-Demand: The unit will maintain the set temperature, providing hot water as needed at your connected faucet.

7. Maintenance
Regular maintenance ensures the longevity and efficient operation of your water heater.
- Glass-Lined Tank: The glass-lined tank is designed for durability and corrosion resistance, contributing to a service life of 3-5 years.
- Anode Rod: The unit is equipped with an anode rod that offers long-lasting protection against corrosion. Periodically inspect and replace the anode rod as needed, typically every 1-3 years depending on water quality.
- T&P Valve Inspection: Annually check the T&P relief valve to ensure it is not blocked and is functioning correctly. Follow local codes for proper discharge line installation.
- Draining the Tank: If the unit will be unused for an extended period or if there is a risk of freezing, drain the tank completely. Refer to the full user manual for detailed draining procedures.
- Resetting Thermostat: In case of an overheat event, the thermostat may trip. To reset, open the cover and locate the reset button, then press it firmly.
8. Troubleshooting
If you encounter issues with your water heater, please refer to the following common troubleshooting tips:
- No Hot Water:
- Check if the unit is plugged in and the power outlet is functional.
- Ensure the thermostat is set to a desired temperature and not in 'Off' or 'Freeze Mode'.
- Verify that the circuit breaker has not tripped.
- Check if the overheat protection has activated (reset if necessary, see Maintenance section).
- Water Not Hot Enough:
- Increase the temperature setting on the thermostat dial.
- Allow sufficient time for the water to heat, especially after initial fill or heavy use.
- Ensure the cold water inlet valve is fully open.
- Leaking:
- Check all water connections for tightness.
- Inspect the T&P relief valve for drips; this may indicate excessive pressure or a faulty valve.
- If leaking persists, turn off the water supply and power to the unit and contact customer service.
For more detailed troubleshooting or issues not listed here, please consult the comprehensive user manual included with your product or contact CAMPLUX customer support.
9. Warranty and Support
CAMPLUX is committed to providing quality products and excellent customer service.
- Warranty: Your CAMPLUX water heater comes with a 3-year support for parts.
- Customer Service: We offer 24-hour customer service to assist you with any questions or concerns.
- Contact Information: For specific contact details, please refer to the back of your product manual. Your feedback is valuable and helps us improve our products and services.
CAMPLUX aims to be a reliable partner for your home comfort needs. We continuously strive to improve and appreciate your support.
Ask a question about this manual
Ask about setup, troubleshooting, compatibility, parts, safety, or missing instructions. Manuals+ will review the question and use this page’s manual context to help answer it.