1. Introduction
This manual provides detailed instructions for the setup, operation, maintenance, and troubleshooting of your DXM Portable Projector YYB RD-805B. Please read this manual thoroughly before using the projector to ensure proper operation and to maximize its lifespan. This projector is designed to provide a versatile home theater experience, supporting various input sources for entertainment and presentations.

Figure 1.1: Front view of the DXM Portable Projector RD-805B.
2. Product Overview
2.1 Key Features
- Portable Design: Compact and lightweight, suitable for various environments including home, outdoor, and office use.
- Home Theater Experience: Delivers a premium home cinema experience with a larger screen and clear image projection.
- Integrated Audio: Features built-in speakers for convenient sound output. External speakers can be connected for enhanced audio.
- Low Noise Operation: Utilizes advanced fan cooling technology to ensure quieter operation compared to previous models.
- Versatile Connectivity: Supports multiple input options including USB, VGA, HDMI, AV, and TV.
2.2 Component Identification

Figure 2.1: Top view of the projector with control panel and adjustment knobs.
- Lens: Projects the image onto the screen.
- Focus Adjust: Rotates to sharpen the projected image.
- Keystone: Adjusts the image shape to correct trapezoidal distortion.
- Indicator Light: Displays the projector's power status.
- Control Buttons: Includes Power, Menu, Source, and Directional buttons for navigation and selection.

Figure 2.2: Back view of the projector with input/output ports.
- TV Input: For connecting to TV antenna or cable.
- USB Port: For connecting USB storage devices.
- HDMI Port: For connecting HDMI-compatible devices (e.g., laptops, gaming consoles).
- Audio Out: 3.5mm jack for connecting external speakers or headphones.
- AV Input: For connecting devices using RCA composite video and stereo audio cables.
- VGA Port: For connecting computers or other VGA-compatible devices.
- Power Button: Turns the projector on or off.
- Power Cable Port: Connects the power cord to the projector.
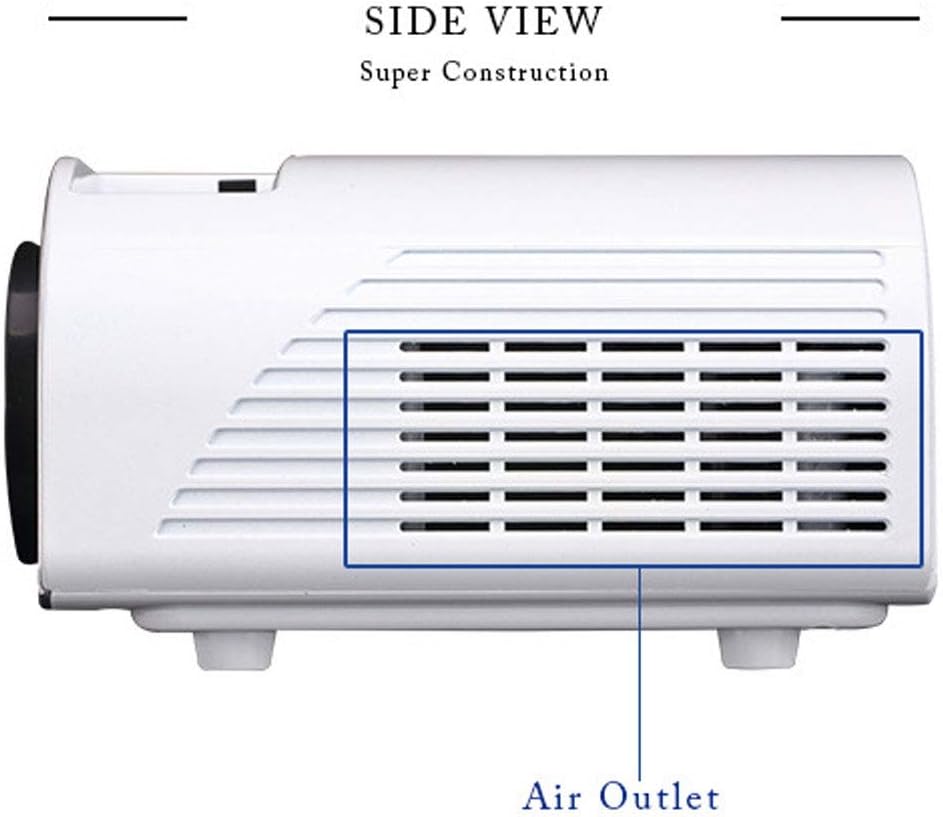
Figure 2.3: Side view of the projector showing the air outlet for cooling.
3. Setup
3.1 Unpacking
Carefully remove the projector and all accessories from the packaging. Verify that all components are present: projector unit, remote controller, power cable, AV cable, and user manual.
3.2 Placement
Place the projector on a stable, flat surface. Ensure there is adequate ventilation around the projector, keeping at least 30cm (12 inches) clear space from walls or other objects to allow for proper airflow through the air inlets and outlets.
The optimal projection distance for a clear image is typically between 1.5 to 4 meters (5 to 13 feet), yielding a picture size of approximately 50 to 80 inches. Adjust the distance to achieve your desired screen size.
3.3 Power Connection
- Connect the power cable to the Power Cable Port on the back of the projector.
- Plug the other end of the power cable into a standard electrical outlet (AC 100-240V, 50/60Hz).
3.4 Connecting Input Devices
The projector supports various input sources. Choose the appropriate port based on your device:
- HDMI: Connect an HDMI cable from your laptop, Blu-ray player, gaming console, or streaming device to the HDMI port on the projector.
- USB: Insert a USB flash drive into the USB port to play media files directly.
- VGA: Connect a VGA cable from your computer to the VGA port.
- AV: Use the provided AV cable to connect devices with RCA composite video and stereo audio outputs (e.g., older DVD players, VCRs).
- TV: Connect a TV antenna or cable to the TV input port for broadcast television.
3.5 Image Adjustment
- Focus: Rotate the Focus Adjust knob (refer to Figure 2.1) until the projected image appears sharp and clear.
- Keystone: If the projected image appears trapezoidal (wider at the top or bottom), adjust the Keystone knob (refer to Figure 2.1) to correct the distortion and make the image rectangular.
4. Operating Instructions
4.1 Power On/Off
- Power On: Press the Power Button on the projector or the remote control. The indicator light will illuminate.
- Power Off: Press the Power Button again. The projector will shut down. Always allow the projector to cool down for a few minutes before unplugging it.
4.2 Source Selection
After powering on, you may need to select the input source:
- Press the 'Source' button on the projector's control panel or the remote control.
- Use the directional buttons to navigate through the available input sources (HDMI, USB, VGA, AV, TV).
- Press 'OK' or 'Enter' to confirm your selection.
4.3 Menu Navigation
To access and adjust projector settings:
- Press the 'Menu' button on the projector or remote control.
- Use the directional buttons to navigate through menu options (e.g., Picture Mode, Sound Mode, Language).
- Press 'OK' or 'Enter' to select an option or enter a sub-menu.
- Use directional buttons to adjust values or select sub-options.
- Press 'Menu' again or 'Exit' to leave the menu.
4.4 Audio Output
The projector has built-in speakers. For enhanced audio, connect external speakers or headphones to the 3.5mm Audio Out port on the back of the projector.
5. Maintenance
5.1 Cleaning the Lens
Use a soft, lint-free cloth specifically designed for optical lenses. Gently wipe the lens in a circular motion. Avoid using abrasive cleaners or excessive force, as this can scratch the lens.
5.2 Cleaning Air Vents
Regularly check the air inlets and outlets for dust accumulation. Use a soft brush or a can of compressed air to gently remove dust from the vents. Do not block the vents during operation, as this can lead to overheating.
6. Troubleshooting
If you encounter issues with your projector, refer to the following common problems and solutions:
| Problem | Possible Cause | Solution |
|---|---|---|
| No image on screen | Power cable loose; Incorrect input source; Device not connected properly. | Check power connection; Select correct input source; Reconnect input device cables securely. |
| Image is blurry | Focus not adjusted; Projector too close/far from screen. | Adjust the Focus knob; Adjust projection distance. |
| Image is trapezoidal | Keystone not adjusted; Projector not perpendicular to screen. | Adjust the Keystone knob; Reposition the projector. |
| No sound | Volume too low; Mute enabled; External audio device not connected/configured. | Increase volume; Disable mute; Check external audio connections and settings. |
| Remote control not working | Batteries low/dead; Obstruction between remote and projector; Remote sensor blocked. | Replace batteries; Remove obstructions; Ensure remote is pointed at the projector's sensor. |
| Projector overheats and shuts down | Air vents blocked; Insufficient ventilation. | Clear air vents; Ensure adequate space around the projector for airflow. |
7. Specifications
The following table outlines the key specifications for the DXM Portable Projector YYB RD-805B:
| Feature | Specification |
|---|---|
| Model Number | RD-805B |
| Unit Size | 210 x 145 x 80 mm |
| Picture Size (Recommended) | 50-80 inches |
| Power Consumption | 100-240V |
| Output Terminal | Stereo earphone, RV power source |
| Menu Language Support | 23 languages |
| Package Dimensions | 11.02 x 9.45 x 3.54 inches |
| Item Weight | 3.19 pounds |
| Connectivity Technology | HDMI, USB, VGA, AV, TV |
| Special Feature | Built-In Speaker, Portable |
| Form Factor | Portable |
| Mounting Type | Tabletop Mount |
| Manufacturer | XUEMEI |
| Date First Available | June 17, 2020 |
8. Warranty and Support
For warranty information, technical support, or service inquiries regarding your DXM Portable Projector YYB RD-805B, please contact the manufacturer, DINGXUEMEI, or your point of purchase. Keep your purchase receipt as proof of purchase for any warranty claims.


