
1. Introduction
This manual provides instructions for the Lexmark CS331dw Color Single-Function Laser Printer. It covers setup, operation, maintenance, and troubleshooting to ensure optimal performance and longevity of your device. The Lexmark CS331dw is designed for efficient color printing in office environments, offering a print speed of up to 24 pages per minute.
2. Safety Information
Read all safety information before using the printer to prevent injury and damage to the product. Keep this guide for future reference.
- Electrical Safety: Connect the printer to a properly grounded electrical outlet. Do not use damaged power cords.
- Heat: Certain internal and external parts of the printer can become hot during operation. Avoid touching these areas.
- Toner Cartridges: Handle toner cartridges carefully. If toner gets on your skin or clothing, wash it off immediately with soap and cold water. Do not incinerate toner cartridges.
- Ventilation: Ensure adequate ventilation around the printer to prevent overheating.
- Placement: Place the printer on a stable, level surface. Avoid placing it near water or in excessively humid environments.
3. What's in the Box
Verify that all components are present upon unpacking:
- Lexmark CS331dw Color Printer
- Starter Toner Cartridges (Black, Cyan, Magenta, Yellow)
- Power Cord
- Setup Guide and Documentation
4. Product Overview
Familiarize yourself with the main components of your Lexmark CS331dw printer.
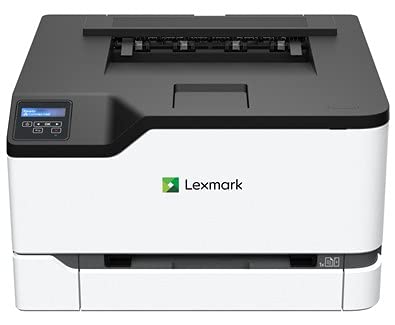
Figure 1: Front view of the Lexmark CS331dw Color Printer, showing the paper tray and output bin.
- Control Panel: Features push buttons for navigation and status indicators.
- Standard Input Tray: Located at the bottom front, holds up to 250 sheets.
- Manual Feed Slot: For single-sheet printing of special media.
- Output Bin: Located at the top, where printed pages are collected.
- Rear Ports: Includes Ethernet port for network connectivity and power input.
5. Setup
5.1 Unpacking and Placement
- Remove the printer from its packaging.
- Remove all protective tapes and packing materials from the exterior and interior of the printer. Refer to the setup guide for specific locations.
- Place the printer on a sturdy, level surface with adequate space for ventilation and access to power and network connections.
5.2 Loading Paper
- Pull out the standard input tray.
- Adjust the paper guides to match the size of the paper you are loading.
- Load paper with the print side facing up. Do not overfill the tray.
- Gently push the tray back into the printer.
5.3 Connecting Power and Network
- Connect the power cord to the printer and then to a grounded electrical outlet.
- For network printing, connect an Ethernet cable from your network router or switch to the Ethernet port on the back of the printer.
- Press the power button to turn on the printer.
5.4 Driver Installation
Install the latest printer drivers from the official Lexmark support website. Follow the on-screen instructions for installation. For mobile printing, download the Lexmark Mobile Print app on your smartphone.
6. Operating Instructions
6.1 Basic Printing
- Ensure the printer is powered on and connected to your computer or network.
- Open the document or image you wish to print on your computer.
- Select Print from the application's menu (e.g., File > Print).
- Choose the Lexmark CS331dw from the list of available printers.
- Adjust print settings such as paper size, orientation, color/monochrome, and number of copies.
- Click Print.
6.2 Mobile Printing
Use the Lexmark Mobile Print app to print directly from your smartphone or tablet. Ensure your mobile device is connected to the same network as the printer.
6.3 Loading Envelopes and Special Media
For envelopes or other special media, use the manual feed slot. Load one sheet at a time, following the on-screen prompts or printer control panel instructions for media type and size selection.
7. Maintenance
7.1 Replacing Toner Cartridges
When a toner cartridge is low or empty, the printer's control panel will display a message. Replace cartridges as follows:
- Open the front cover of the printer.
- Locate the empty toner cartridge (Black, Cyan, Magenta, or Yellow).
- Grasp the handle of the cartridge and pull it straight out.
- Unpack the new Lexmark genuine toner cartridge and gently shake it to distribute the toner.
- Insert the new cartridge into the corresponding slot until it clicks into place.
- Close the front cover.
7.2 Cleaning the Printer
Regular cleaning helps maintain print quality and extends printer life.
- Exterior: Wipe the exterior with a soft, damp, lint-free cloth. Do not use abrasive cleaners.
- Interior: Periodically open the front cover and gently remove any loose toner or paper dust with a dry, lint-free cloth. Avoid touching sensitive components.
7.3 Clearing Paper Jams
If a paper jam occurs, the printer will display an error message. Follow the on-screen instructions or these general steps:
- Turn off the printer and unplug the power cord.
- Open the covers and trays as indicated by the error message or as necessary to access the jammed paper.
- Carefully pull the jammed paper in the direction of the paper path. Avoid tearing the paper.
- Ensure all paper fragments are removed.
- Close all covers and trays, plug in the power cord, and turn on the printer.
8. Troubleshooting
This section addresses common issues you might encounter.
- Printer Not Responding:
- Check power connections and ensure the printer is turned on.
- Verify network cable connection (Ethernet).
- Restart the printer and your computer.
- Ensure printer drivers are correctly installed and updated.
- Poor Print Quality:
- Check toner levels for all colors (Black, Cyan, Magenta, Yellow).
- Ensure you are using genuine Lexmark toner cartridges.
- Perform a print quality calibration from the printer's control panel or driver settings.
- Clean the printer's interior as described in the Maintenance section.
- Paper Jams:
- Refer to Section 7.3 for detailed instructions on clearing paper jams.
- Ensure paper is loaded correctly and not overfilled.
- Use recommended paper types and weights.
9. Specifications
| Feature | Specification |
|---|---|
| Model Number | 40N9120 |
| Printing Technology | Laser |
| Printer Output | Color |
| Max Print Speed (Color) | 24 ppm |
| Max Print Speed (Monochrome) | 24 ppm |
| Maximum Color Print Resolution | 600 x 600 dpi |
| Maximum Black and White Print Resolution | 600 dpi |
| Connectivity Technology | Ethernet |
| Control Method | App, Push Button |
| Ink Color | Black, Cyan, Magenta, Yellow |
| Printer Ink Type | Toner |
| Max Input Sheet Capacity | 251 |
| Output Sheet Capacity | 251 |
| Dual-sided printing | Yes |
| Product Dimensions (LxWxH) | 15.52 x 16.19 x 9.59 inches |
| Item Weight | 35.5 pounds (16.1 kg) |
| Wattage | 395 watts |
10. Warranty and Support
Lexmark provides a standard warranty for this product. For detailed warranty information, please refer to the warranty card included with your printer or visit the official Lexmark website. For technical support, driver downloads, and additional resources, please visit www.lexmark.com/support.


