1. Introduction
Thank you for choosing the Philips TAM2505 HiFi DAB+ Radio. This manual provides essential information for setting up, operating, and maintaining your device. Please read it thoroughly before use to ensure optimal performance and safety.
2. Product Overview
2.1 What's in the Box
- Philips TAM2505 HiFi DAB+ Radio
- AC Adaptor
- Remote Control
- Batteries (for remote control)
- FM Antenna
- Wall Mounting Kit
- Stand
- Quick Start Guide
2.2 Controls and Connections

Figure 2.2.1: Front View. Shows the main unit with the display and speaker grilles.

Figure 2.2.2: Side View. Illustrates the slim profile of the radio.
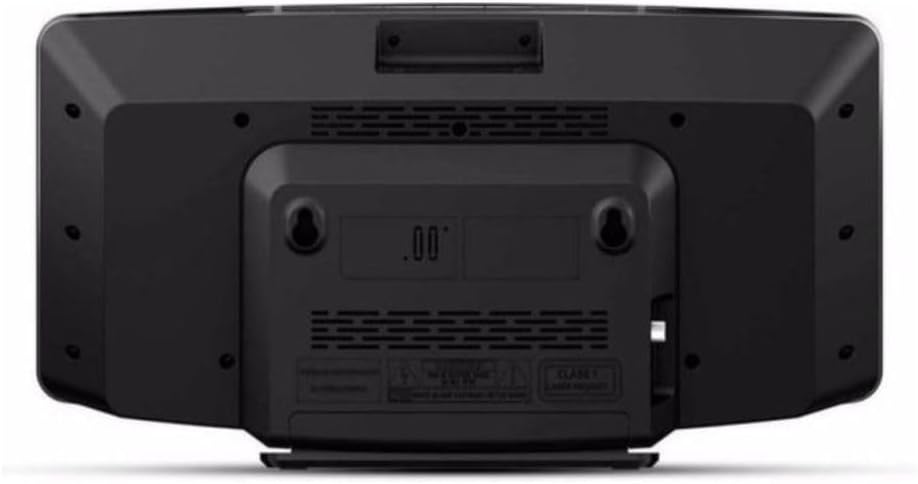
Figure 2.2.3: Back View. Displays the power input, antenna connection, and wall mounting holes.

Figure 2.2.4: Remote Control. Details the layout of buttons for power, source selection, tuning, volume, and presets.
3. Setup
3.1 Unpacking
Carefully remove all components from the packaging. Retain the packaging for future transport or storage.
3.2 Power Connection
- Connect the AC adaptor to the DC IN socket on the back of the radio.
- Plug the AC adaptor into a wall power outlet.
3.3 Antenna Connection
For optimal DAB+ and FM reception, connect the supplied FM antenna to the antenna input on the back of the radio. Extend the antenna fully and adjust its position for the best signal.
3.4 Placement Options
The Philips TAM2505 offers versatile placement options:
- Using the Stand: Attach the provided stand to the bottom of the radio for stable tabletop placement.
- Wall Mounting: Use the included wall mounting kit to securely attach the radio to a wall. Ensure the wall material can support the weight of the unit and follow the instructions provided with the wall mounting kit.

Figure 3.4.1: Tabletop Placement. The radio positioned on a side table, demonstrating its compact size.

Figure 3.4.2: Wall-Mounted Placement. The radio mounted on a wall, showcasing its space-saving design.
4. Operating Instructions
4.1 Power On/Off
Press the Power button on the remote control or the unit to turn the radio on or off.
4.2 Source Selection
Press the DAB, FM, Bluetooth, or AUX IN buttons on the remote control to switch between different audio sources.
4.3 Volume Control
Use the Volume + or Volume - buttons on the remote control to adjust the sound level.
4.4 DAB+ Radio Operation
- Press the DAB button to select DAB+ mode.
- The radio will automatically scan for available DAB+ stations upon first use. To initiate a manual scan, press the MENU button, navigate to 'Full Scan', and press OK.
- Use the Up/Down arrow buttons to browse through the list of available stations.
- Press OK to select a station.
- To save a preset, press and hold the PRESET button, select a preset number, and press OK. To recall a preset, press PRESET briefly, then use the arrow buttons to select and OK to confirm.
4.5 FM Radio Operation
- Press the FM button to select FM mode.
- To auto-scan for stations, press and hold the SCAN button. The radio will scan and save available stations.
- To manually tune, press the Up/Down arrow buttons.
- Saving and recalling presets works similarly to DAB+ mode.
4.6 Bluetooth Pairing and Playback
- Press the Bluetooth button to switch to Bluetooth mode. The display will show 'Pairing' or 'Waiting for connection'.
- On your Bluetooth-enabled device (e.g., smartphone, tablet), enable Bluetooth and search for available devices.
- Select 'Philips TAM2505' from the list of devices.
- Once paired, the radio will indicate a successful connection. You can now play audio from your device through the radio.
4.7 Audio-In Connection
Connect an external audio device (e.g., MP3 player) to the AUX IN port on the radio using a 3.5mm audio cable (not supplied). Press the AUX IN button to select this source.
5. Maintenance
5.1 Cleaning
Wipe the unit with a soft, damp cloth. Do not use abrasive cleaners, alcohol, or benzene, as these may damage the surface. Ensure the unit is unplugged before cleaning.
5.2 Remote Control Battery Replacement
The remote control uses 1 CR2 battery. If the remote control stops responding, replace the battery. Ensure correct polarity when inserting the new battery.
6. Troubleshooting
| Problem | Possible Cause | Solution |
|---|---|---|
| No power | AC adaptor not connected properly. | Ensure the AC adaptor is securely plugged into the radio and a working power outlet. |
| Poor radio reception (DAB+/FM) | Antenna not extended or positioned correctly. Weak signal in your area. | Fully extend the FM antenna and adjust its position. Try moving the radio to a different location. Perform a full scan for DAB+ stations. |
| Bluetooth pairing issues | Bluetooth not enabled on your device. Radio not in pairing mode. Device too far from the radio. | Ensure Bluetooth is enabled on your device. Press the Bluetooth button on the radio to enter pairing mode. Keep your device within 10 meters of the radio. |
| No sound from Audio-In | Audio cable not connected properly. Incorrect source selected. Volume too low. | Check the audio cable connection. Ensure 'AUX IN' source is selected. Increase the volume on both the radio and the connected device. |
7. Technical Specifications
| Feature | Specification |
|---|---|
| Model Number | TAM2505/10 |
| Product Dimensions | 40 x 11 x 22 cm |
| Item Weight | 1.7 kg |
| Power Source | Corded Electric |
| Wattage | 10 W |
| Connectivity Technology | Bluetooth 5, 3.5mm Audio-In |
| Tuner Technology | DAB+, FM |
| Material Type | Plastic |
| Colour | Black |
| Included Components | Power Adapter, Remote Control, Batteries, FM Antenna, Wall Mounting Kit, Stand, Quick Start Guide |
8. Warranty and Support
This Philips product is covered by a standard manufacturer's warranty. For detailed warranty information, please refer to the warranty card included with your product or visit the official Philips Audio support website.
For technical support, troubleshooting assistance, or to register your product, please visit the Philips support page or contact their customer service. Keep your purchase receipt as proof of purchase for warranty claims.
You can find more information and support at: Philips Audio Support


