
Important Safety Instructions
Please read this manual carefully before operating your Lifetime Air 3-in-1 Portable Air Conditioner. Keep this manual for future reference.
- Always ensure the unit is placed on a flat, stable surface.
- Do not block air inlets or outlets.
- Do not insert objects into the unit.
- Unplug the unit before cleaning or maintenance.
- Keep the unit away from water and moisture.
- This appliance is not intended for use by persons (including children) with reduced physical, sensory or mental capabilities, or lack of experience and knowledge, unless they have been given supervision or instruction concerning use of the appliance by a person responsible for their safety.
Product Overview
The Lifetime Air 3-in-1 Portable Air Conditioner provides versatile climate control for your space. It functions as an air conditioner for cooling, a dehumidifier to reduce moisture, and a fan for air circulation. It features a remote control and a programmable timer for convenient operation.
Included Components:
- 1 x Air Conditioner Unit
- 1 x Remote Control
- 1 x Hot Air Exhaust Hose
- 1 x Window Connection for Hose
- 1 x Air Conditioner Connection for Hose
Setup
1. Placement
Place the air conditioner on a firm, level surface near a window. Ensure there is at least 30 cm (12 inches) of clear space around the unit for proper airflow.
2. Exhaust Hose Installation
- Attach the air conditioner connection to one end of the hot air exhaust hose.
- Connect the other end of the exhaust hose to the window connection.
- Insert the air conditioner connection into the exhaust outlet on the back of the unit.
- Open the window and place the window connection securely in the window opening to vent hot air outside. Ensure the window is closed as much as possible around the connection to prevent outside air from entering.

Image: The product packaging box, showing the unit and its 3-in-1 functions. This image provides a general view of the product and its branding.
3. Power Connection
Plug the power cord into a grounded electrical outlet. Ensure the voltage matches the unit's requirements.
Operating Instructions
The unit can be operated using the control panel on the unit or the included remote control.
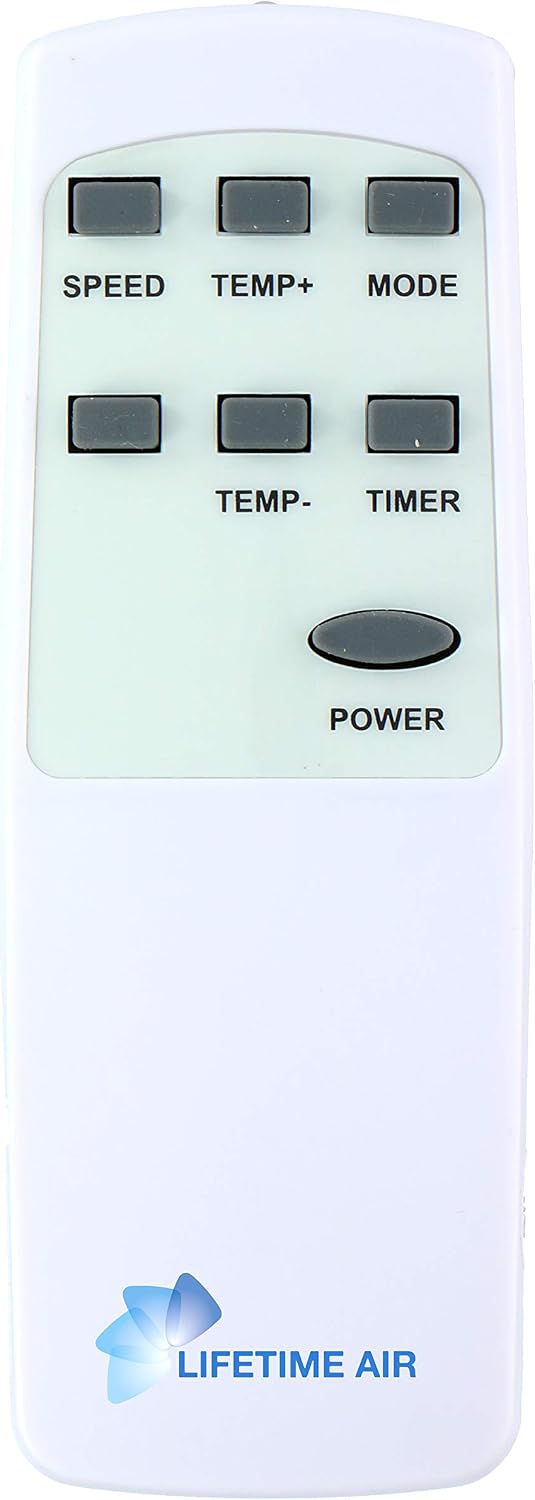
Image: The remote control for the Lifetime Air portable air conditioner, showing buttons for Power, Speed, Temp+, Temp-, Mode, and Timer.
Remote Control Functions:
- POWER: Press to turn the unit ON or OFF.
- MODE: Press to cycle through operating modes: Cool, Dehumidify, Fan.
- TEMP+ / TEMP-: Adjust the desired temperature setting.
- SPEED: Adjust fan speed (Low, Medium, High).
- TIMER: Set the auto-on or auto-off timer.
Operating Modes:
- Cooling Mode: Select "Cool" mode. Use TEMP+ / TEMP- to set your desired temperature. The unit will cool the room to the set temperature.
- Dehumidifier Mode: Select "Dehumidify" mode. The unit will remove excess moisture from the air. The fan speed is typically fixed in this mode.
- Fan Mode: Select "Fan" mode. The unit will circulate air without cooling. Use SPEED to adjust fan intensity.
Timer Function:
Press the TIMER button to set the desired operating duration (auto-off) or to schedule when the unit should turn on (auto-on). Use TEMP+ / TEMP- to adjust the hours. The timer can typically be set from 1 to 24 hours.
Maintenance
1. Cleaning the Air Filter
The air filter should be cleaned every two weeks or more frequently depending on usage and air quality. A dirty filter can reduce efficiency.
- Unplug the unit from the power outlet.
- Locate and remove the air filter (usually on the back or side of the unit).
- Wash the filter with warm, soapy water. Rinse thoroughly.
- Allow the filter to air dry completely before reinstalling. Do not expose to direct sunlight.
2. Draining Water
The unit has a 0.5 L tank capacity for condensed water. In high humidity conditions, the tank may fill up. The unit may stop operating when the tank is full and display an indicator. Drain the water as follows:
- Unplug the unit.
- Place a shallow pan or tray under the drain outlet (usually at the bottom rear of the unit).
- Remove the drain plug/cap.
- Allow all water to drain completely.
- Replace the drain plug/cap securely.
3. Storage
Before storing the unit for an extended period:
- Ensure all water is drained from the unit.
- Clean the air filter.
- Run the unit in fan mode for a few hours to dry the interior.
- Unplug the power cord and coil it neatly.
- Cover the unit with a plastic bag or cloth to protect it from dust.
- Store in a dry, cool place.
Troubleshooting
| Problem | Possible Cause | Solution |
|---|---|---|
| Unit does not turn on. | No power; Power cord not plugged in; Circuit breaker tripped. | Check power connection; Reset circuit breaker. |
| Unit does not cool effectively. | Dirty air filter; Exhaust hose not properly installed; Room too large; Doors/windows open. | Clean air filter; Ensure exhaust hose is sealed; Close doors/windows; Consider unit capacity for room size. |
| Unit is noisy. | Unit not on a level surface; Obstruction in fan. | Place on a level surface; Check for and remove obstructions (after unplugging). |
| Water leakage. | Drain plug not secured; Unit tilted. | Ensure drain plug is tightly closed; Place unit on a level surface. |
| Unit stops operating. | Water tank full (in dehumidify/cool mode); Overheating protection activated. | Drain water tank; Allow unit to cool down before restarting. |
Specifications
| Model | 1230W / 11000 BTU |
| Power | 1230 Watt |
| Cooling Capacity | 11000 BTU / 3.2 KW |
| Tank Capacity | 0.5 L |
| Recommended Area | Up to 100 m³ |
| Product Dimensions | 33 x 29 x 69 cm |
| Item Weight | 25 kg |
| Form Factor | Portable |
Warranty and Support
Specific warranty information is not provided in the product details. For warranty claims or technical support, please contact your retailer or the manufacturer directly. Keep your proof of purchase for any warranty-related inquiries.


