
GIGABYTE B550M DS3H
Contents
GIGABYTE B550M DS3H Motherboard User Manual
Model: B550M DS3H
1. Introduction
This user manual provides detailed instructions for the installation, operation, and maintenance of your GIGABYTE B550M DS3H Motherboard. The B550M DS3H is an Ultra Durable motherboard designed to support AMD Ryzen 5000 Series/3rd Gen Ryzen and 3rd Gen Ryzen with Radeon Graphics Processors, featuring a Pure Digital VRM Solution, PCIe 4.0 x16 Slot, Dual PCIe 4.0/3.0 M.2 Connectors, and GIGABYTE 8118 Gaming LAN.

Figure 1.1: GIGABYTE B550M DS3H Motherboard and retail packaging.
2. Safety Information
Always observe the following safety precautions to prevent damage to the motherboard or injury to yourself:
- Disconnect the power cord from the wall outlet before installing or removing any components.
- Wear an anti-static wrist strap or frequently touch a grounded metal object to discharge static electricity before handling the motherboard or other components.
- Handle the motherboard by its edges to avoid touching sensitive components.
- Ensure proper ventilation within your PC case to prevent overheating.
- Do not expose the motherboard to moisture or extreme temperatures.
3. Package Contents
Verify that all items are present in your motherboard package:
- GIGABYTE B550M DS3H Motherboard
- User Manual / Multilingual Installation Guide
- SATA Data Cables (typically two)
- I/O Shield (if not pre-attached)
- M.2 Screw Package
4. Setup and Installation
4.1 Motherboard Layout
Familiarize yourself with the key components and connectors on the motherboard before installation.

Figure 4.1: Top-down view of the B550M DS3H Motherboard highlighting key areas like the CPU socket, RAM slots, and PCIe slots.
4.2 CPU Installation (Socket AM4)
- Locate the AM4 CPU socket on the motherboard.
- Lift the load lever on the side of the socket.
- Align the triangular mark on the CPU with the corresponding mark on the socket.
- Gently place the CPU into the socket. Do not force it.
- Lower the load lever to secure the CPU in place.
- Apply thermal paste and install the CPU cooler according to its manufacturer's instructions.
4.3 RAM Installation (DDR4)
The B550M DS3H supports Dual Channel ECC/Non-ECC Unbuffered DDR4 memory across 4 DIMM slots. Refer to the motherboard's silkscreen for proper dual-channel configuration (typically slots A2 and B2 first).
- Open the clips at both ends of the DIMM slot.
- Align the notch on the DDR4 memory module with the key in the DIMM slot.
- Press down firmly on both ends of the memory module until the clips snap into place.
4.4 Storage Installation (M.2 & SATA)
This motherboard features Dual Ultra-Fast NVMe PCIe 4.0/3.0 M.2 Connectors and multiple SATA 6Gb/s ports.
M.2 SSD Installation:
- Locate the M.2 slots on the motherboard.
- Remove the M.2 standoff screw from the desired slot.
- Insert the M.2 SSD into the slot at an angle.
- Gently push down the SSD and secure it with the M.2 screw.
SATA Device Installation:
- Connect one end of the SATA data cable to a SATA port on the motherboard.
- Connect the other end of the SATA data cable to your SATA HDD/SSD.
- Connect a SATA power cable from your power supply to the storage device.
4.5 Expansion Cards Installation (PCIe)
The motherboard includes an Ultra Durable PCIe 4.0 Ready x16 Slot for graphics cards and additional PCIe 3.0 x1 slots for other expansion cards.
- Align the expansion card with the desired PCIe slot.
- Press down firmly until the card is fully seated in the slot and the retention clip locks.
- Secure the card to the PC case with a screw.
4.6 Power Connections
Connect the main 24-pin ATX power connector and the 8-pin ATX 12V CPU power connector from your power supply to the corresponding ports on the motherboard.
4.7 Front Panel Connections
Connect your PC case's front panel cables (Power Button, Reset Button, HDD LED, Power LED, USB, Audio) to the appropriate headers on the motherboard. Refer to the motherboard manual for exact pin configurations.
4.8 Rear I/O Panel
The rear I/O panel provides various ports for connecting external devices.
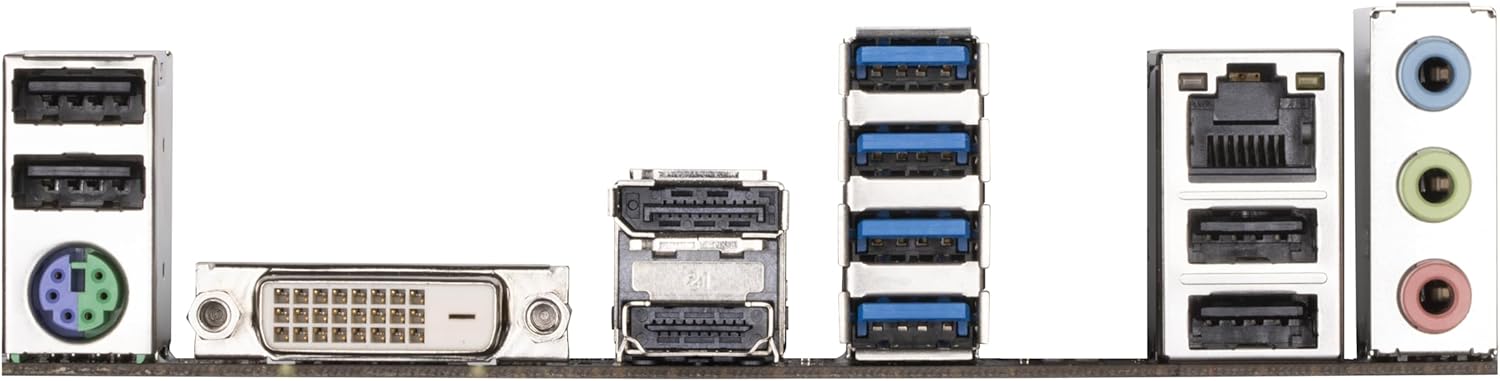
Figure 4.2: Rear I/O Panel showing ports for USB, HDMI, DVI, LAN, and Audio.
Key ports include:
- PS/2 Keyboard/Mouse Port
- USB 2.0/1.1 Ports
- DVI-D Port
- HDMI Port
- USB 3.2 Gen 1 Ports
- RJ-45 LAN Port
- Audio Jacks
5. Operating Your Motherboard
5.1 BIOS/UEFI Setup
The BIOS (Basic Input/Output System) or UEFI (Unified Extensible Firmware Interface) is firmware that initializes hardware during the booting process and provides runtime services for operating systems. To enter BIOS Setup, press the DEL key during the Power-On Self-Test (POST) process. Here you can configure system settings, boot order, and hardware parameters.
5.2 Driver Installation
After installing your operating system, install the necessary drivers for the motherboard's components (chipset, LAN, audio, etc.). These drivers are typically provided on a support DVD or can be downloaded from the GIGABYTE official website. Installing the correct drivers ensures optimal performance and stability.
5.3 System Boot
Once all components are installed and drivers are loaded, your system should boot normally. If you encounter issues, refer to the Troubleshooting section.
6. Maintenance
6.1 Cleaning
Regularly clean your PC case and motherboard to prevent dust buildup, which can lead to overheating and component failure. Use compressed air to remove dust from fans, heatsinks, and other components. Ensure the system is powered off and unplugged before cleaning.
6.2 BIOS Updates (Q-Flash Plus)
GIGABYTE's Q-Flash Plus feature allows you to update the BIOS without installing the CPU, memory, or graphics card. This is useful for supporting newer CPUs or resolving compatibility issues. To use Q-Flash Plus:
- Download the latest BIOS file from the GIGABYTE website.
- Rename the downloaded BIOS file to GIGABYTE.bin and save it to the root directory of a USB flash drive (FAT32 format).
- Insert the USB flash drive into the designated Q-Flash Plus USB port on the rear I/O panel.
- Connect the 24-pin ATX power connector and the 8-pin ATX 12V power connector to the motherboard.
- Press the Q-Flash Plus button. The QFLED will flash during the BIOS updating process.
- Wait until the QFLED stops flashing, indicating the BIOS update is complete.
7. Troubleshooting
| Problem | Possible Cause | Solution |
|---|---|---|
| System does not power on. | Power cables not connected, faulty PSU, front panel power button not connected. | Check 24-pin and 8-pin power connections. Test PSU. Verify front panel header connections. |
| No display output. | Graphics card not seated, monitor cable loose, integrated graphics (if applicable) not enabled. | Reseat graphics card. Check monitor cable. Ensure CPU has integrated graphics if using onboard video. |
| System reboots unexpectedly. | Overheating, unstable power, faulty RAM. | Check CPU/case fan connections. Ensure adequate cooling. Test RAM modules individually. |
| Operating system not found. | Boot order incorrect, faulty storage drive, OS not installed. | Check BIOS boot order. Verify storage drive connections. Install OS if not already done. |
8. Specifications
| Feature | Detail |
|---|---|
| Brand | GIGABYTE |
| Model Name | B550M DS3H |
| CPU Socket | Socket AM4 |
| Compatible Processors | AMD Ryzen 3rd Gen / 5000 Series |
| Chipset Type | AMD B550 |
| RAM Memory Technology | DDR4 |
| Memory Speed | Up to 4733 MHz (OC) |
| Memory DIMMs | 4 (Dual Channel ECC/Non-ECC Unbuffered) |
| PCIe Slots | 1x PCIe 4.0/3.0 x16, 2x PCIe 3.0 x1 |
| M.2 Connectors | 2x (NVMe PCIe 4.0/3.0) |
| SATA Ports | 4x SATA 6Gb/s |
| LAN | GIGABYTE 8118 Gaming GbE LAN |
| USB Ports (Rear) | 4x USB 3.2 Gen 1, 2x USB 2.0/1.1 |
| Display Interfaces | HDMI, DVI-D |
| Audio | 8-Channel HD Audio |
| Form Factor | Micro ATX (244mm x 244mm) |
| Item Weight | 1.39 pounds |
| Product Dimensions | 9.61 x 9.61 x 1.38 inches |
9. Warranty and Support
For warranty information, technical support, and driver downloads, please visit the official GIGABYTE website. Keep your proof of purchase for warranty claims.
GIGABYTE provides comprehensive support resources, including FAQs, driver updates, and utility software, to ensure the best experience with your motherboard.
Official GIGABYTE Support: https://www.gigabyte.com/Support
Ask a question about this manual
Ask about setup, troubleshooting, compatibility, parts, safety, or missing instructions. Manuals+ will review the question and use this page’s manual context to help answer it.