Introduction
Thank you for choosing the DINGXUEMEI DXM Security Camera Wireless Monitor A11. This compact and versatile IP camera provides high-definition surveillance with wireless connectivity, supporting TF card storage and USB power. Designed for ease of use, it offers a 150-degree wide-angle view to help you monitor your home or office effectively.
This manual provides detailed instructions on setting up, operating, and maintaining your security camera, along with troubleshooting tips and product specifications. Please read this manual thoroughly before using the device to ensure optimal performance and longevity.
Package Contents
Please verify that all items are present in your package:
- DINGXUEMEI DXM Security Camera A11
- USB Charging Cable
- Magnetic Bracket/Mount
- User Manual (this document)

Image: The DINGXUEMEI DXM Security Camera A11 shown with its included USB charging cable and magnetic bracket.
Product Overview

Image: The compact DINGXUEMEI DXM Security Camera A11, demonstrating its small size and discreet design.
The DXM Security Camera A11 is designed for discreet and effective surveillance. Its small form factor allows for flexible placement, and the magnetic bracket provides versatile mounting options.
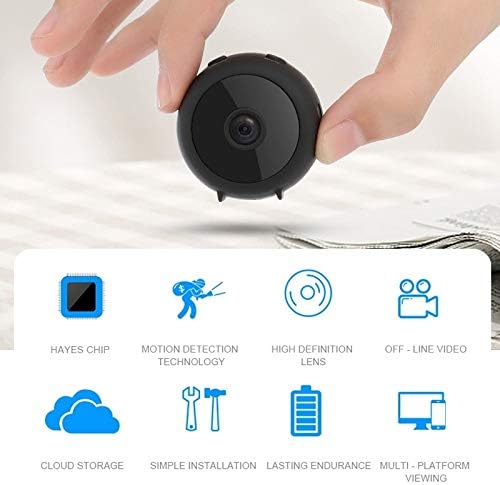
Image: A hand holding the camera, illustrating its very compact and portable design.
Key Features:
- HD 1080P Video: Records clear video at 1920 x 1080P resolution.
- Wide Angle Lens: Features a 150-degree wide-angle lens for broader coverage.
- Wireless Connectivity: Supports WiFi for remote monitoring.
- TF Card Support: Compatible with TF cards up to 128GB for local storage.
- Motion Detection: Built-in abnormal alarm push function for immediate notifications.
- Battery Powered: Equipped with a 350mAh battery for portable use.
- Multi-Platform Viewing: Accessible via Android and iOS devices.

Image: An infographic highlighting the camera's core features, such as its advanced chip, motion detection, high-definition lens, offline video capability, cloud storage, ease of installation, battery life, and multi-platform viewing.
Setup Guide
1. Charging the Camera
Before first use, fully charge the camera. Connect the provided USB cable to the camera's USB port and the other end to a USB power adapter (recommended 1000mA or more) or a computer's USB port.
- The charging indicator light will be solid ON while charging.
- The charging indicator light will turn OFF once the camera is fully charged.
- A full charge typically takes approximately 1 hour.

Image: The camera being charged via its USB cable, connected to a power adapter.
2. Inserting a TF Card (Optional)
To enable local recording, insert a TF (microSD) card into the designated slot on the camera. The camera supports TF cards up to 128GB.
- Ensure the camera is powered off before inserting or removing the TF card.
- Gently push the TF card into the slot until it clicks into place.
- To remove, gently push the card again until it pops out.
3. App Installation and WiFi Connection
The camera can be controlled via a mobile application available for Android and iOS devices. Refer to the camera's packaging or a QR code (if provided) for the specific app name and download link.
- Download and install the official camera application from your device's app store.
- Power on the camera. The WiFi indicator will show different states:
- AP Mode: Slow flash (camera acting as its own hotspot).
- Router Mode (Connecting/Disconnected): Flashing (attempting to connect or re-connect to a router).
- Router Mode (Connected): Solid ON (successfully connected to a router).
- Open the app and follow the on-screen instructions to add your camera. This typically involves connecting your phone to the camera's AP mode WiFi network first, then configuring the camera to connect to your home/office WiFi network.
- Once connected, you can view the live feed and access camera settings through the app.
4. Mounting the Camera
The camera comes with a magnetic bracket for flexible placement. The bracket allows for 360-degree rotation, enabling you to adjust the camera's angle as needed.
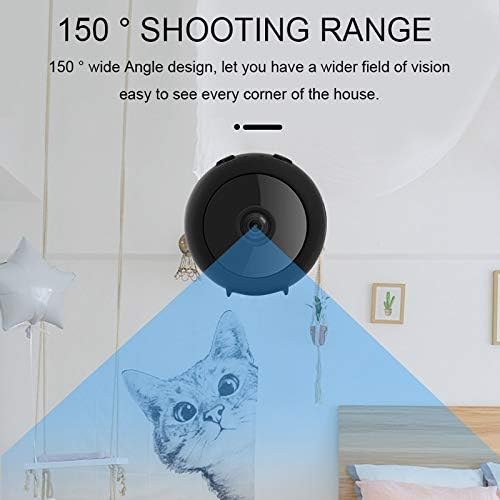
Image: The camera mounted on a desk using its magnetic bracket, demonstrating its versatile positioning.
- Attach the camera to the magnetic base.
- Place the base on any flat, stable surface or attach it to a metallic surface for secure mounting.
- Adjust the camera's angle to achieve the desired viewing area.
Operating Instructions
Live View and Recording
Once the camera is connected to your WiFi network and the app, you can access the live video feed from your smartphone or tablet.
- Open the camera application on your device.
- Select your camera from the device list to view the live stream.
- The camera provides a 150-degree wide-angle view, capturing a broad area.

Image: A visual representation of the camera's 150-degree wide shooting range, showing its ability to cover a large area.
Recordings are saved to the inserted TF card in AVI format with H.264 encoding. You can typically access recorded footage through the app's playback feature.
Motion Detection and Alarms
The camera features an abnormal alarm push function. When motion or unusual activity is detected, the camera will automatically begin recording and send a notification to your connected mobile device.

Image: A smartphone displaying an "Abnormal Alarm Push" notification, indicating motion detection and immediate alerts.
- Ensure motion detection is enabled in the camera's app settings.
- Configure notification settings within the app to receive alerts.
Cloud Storage (If Applicable)
The camera supports cloud storage for video content. This feature ensures that your recordings are securely uploaded to the cloud, protecting them from loss even if the camera or memory card is damaged or stolen. Refer to your app's settings for cloud storage subscription options and activation.
Maintenance
Cleaning
- Use a soft, dry cloth to clean the camera lens and body.
- Do not use liquid cleaners or aerosols, as they may damage the device.
Battery Care
- Avoid exposing the camera to extreme temperatures (above 75°C) to protect the battery.
- Charge the camera regularly to maintain battery health, even if not in constant use.
Firmware Updates
Periodically check the camera application for available firmware updates. Keeping your camera's firmware updated ensures optimal performance, security, and access to new features.
Troubleshooting
| Problem | Possible Cause | Solution |
|---|---|---|
| Camera not turning on. | Low battery or no power. | Charge the camera fully using the provided USB cable and a suitable power adapter. |
| Cannot connect to WiFi. | Incorrect WiFi password; camera too far from router; WiFi indicator flashing incorrectly. |
|
| No recording to TF card. | TF card not inserted correctly; card full; card not formatted; faulty card. |
|
| Poor video quality. | Insufficient lighting; dirty lens; network issues. |
|
| No alarm push notifications. | Motion detection disabled; app notification settings incorrect; network issues. |
|
Specifications
| Feature | Detail |
|---|---|
| Model | A11 |
| Video Resolution | 1920 x 1080P (HD) |
| Sensor | 1/4 inch crystal image H62 |
| Lens Angle | 140° horizontal (150° wide angle) |
| Focal Length | 2.8mm |
| Video Format | AVI (H.264 encoding) |
| Remote Support Frame Rate | 1080P@15fps (interpolation), 720P@25-30fps |
| Connectivity | Wireless (WiFi), Wired (USB for power/data) |
| Storage | TF Card (up to 128GB) |
| Power Source | Battery Powered (350mAh pure cobalt, high temperature resistance 75°C) |
| Charging Input | USB (360mA limit current, recommended 1000mA+ charger) |
| Charging Time | Approx. 1 hour for full charge |
| Power Consumption (Local Recording) | 200-210mA (no WiFi, IR off) |
| Power Consumption (WiFi On) | 240-260mA (IR off) |
| Power Consumption (IR Full On) | 110mA (local), 350mA (remote) |
| PCB | 4 layers, 1.0MM thickness, immersion gold process |
| Controller Type | iOS (also Android via app) |
| Supported Languages (App) | Android: English, French, German, Chinese; iOS: English, French, German, Chinese, Japanese, Korean |
| Dimensions | 14 x 9 x 4 cm (Package) |
| Weight | 182 g (Package) |
| Manufacturer | XUEMEI (Brand: DINGXUEMEI) |
Warranty and Support
For warranty information and technical support, please refer to the contact details provided on the product packaging or the official DINGXUEMEI website. Keep your purchase receipt as proof of purchase for warranty claims.
For common issues, please consult the Troubleshooting section of this manual or the FAQ section within the mobile application.