1. Introduction
The FoxAlien LE-4040 Desktop Laser Engraver is designed to provide a cost-effective and user-friendly solution for engraving and cutting various materials. This machine is suitable for hobbyists, amateurs, and beginners, enabling them to explore creative projects with ease. Its design emphasizes fast assembly and simple operation, making it an accessible tool for DIY enthusiasts.
This manual provides essential information regarding the assembly, operation, maintenance, and safety precautions for your LE-4040 laser engraver. Please read it thoroughly before operating the machine to ensure safe and efficient use.

Figure 1: FoxAlien LE-4040 Desktop Laser Engraver
The image displays the LE-4040 laser engraver, a black-framed machine with a laser module actively engraving a logo onto a light brown material. The laser beam is visible, indicating operation. The machine features a sturdy frame, a control board with a fan, and cable management.
2. Safety Information
WARNING: The laser unit of the LE-4040 belongs to Class 4. This class of laser is hazardous and can cause severe eye and skin damage from direct or scattered exposure. Strict adherence to safety guidelines is mandatory.
- Eye Protection: Always wear the provided protective eyewear (goggles) or equivalent certified laser safety glasses while the machine is in operation. Never look directly at the laser beam or its reflection.
- Skin Protection: Avoid direct skin exposure to the laser beam.
- Ventilation: Operate the machine in a well-ventilated area to dissipate fumes and smoke produced during engraving and cutting.
- Fire Hazard: Laser engraving can ignite flammable materials. Keep a fire extinguisher nearby and never leave the machine unattended during operation.
- Material Compatibility: Only engrave or cut materials known to be safe for laser processing. Avoid materials that produce toxic fumes or are highly reflective.
- Children and Pets: Keep children and pets away from the operating area.
- Emergency Stop: Familiarize yourself with the location of the power switch for immediate shutdown in case of an emergency.
3. Package Contents
Upon unpacking, please verify that all the following components are present and undamaged:
- 1x LE-4040 Engraving Machine (Main Parts Pre-installed)
- 1x Power Supply
- 3x Hex Wrench
- 1x USB Cable
- 1x U Disk (containing software and drivers)
- 1x Goggle (Protective Eyewear)
- 1x User Manual (this document)
- Packs x Screws

Figure 2: LE-4040 Package Contents
This image displays all the individual components that come with the LE-4040 laser engraving machine. It includes the pre-assembled frame parts, the laser module, control board, power supply, USB cable, hex wrenches, protective goggles, a U disk, and a user manual, all neatly arranged.
4. Setup
The LE-4040 is designed for quick assembly, with most main parts pre-installed. Typical assembly time is 10-20 minutes.
- Unpack Components: Carefully remove all items from the packaging and place them on a clean, flat surface. Refer to the "Package Contents" section to ensure all parts are present.
- Assemble Frame: Follow the instructions in the included quick start guide (if separate from this manual) to connect the pre-assembled frame sections. Ensure all screws are tightened securely using the provided hex wrenches.
- Connect Wiring: All wires are clearly labeled and bundled. Connect the motor cables, limit switch cables, and laser module cable to the corresponding ports on the control board. The wiring is designed for easy connection.
- Install Laser Module: Mount the laser module onto the gantry. The laser module position is adjustable by knobs, allowing for easy height adjustment.
- Power Connection: Connect the power supply to the machine and then plug it into a suitable power outlet.
- USB Connection: Connect the machine to your computer using the provided USB cable.
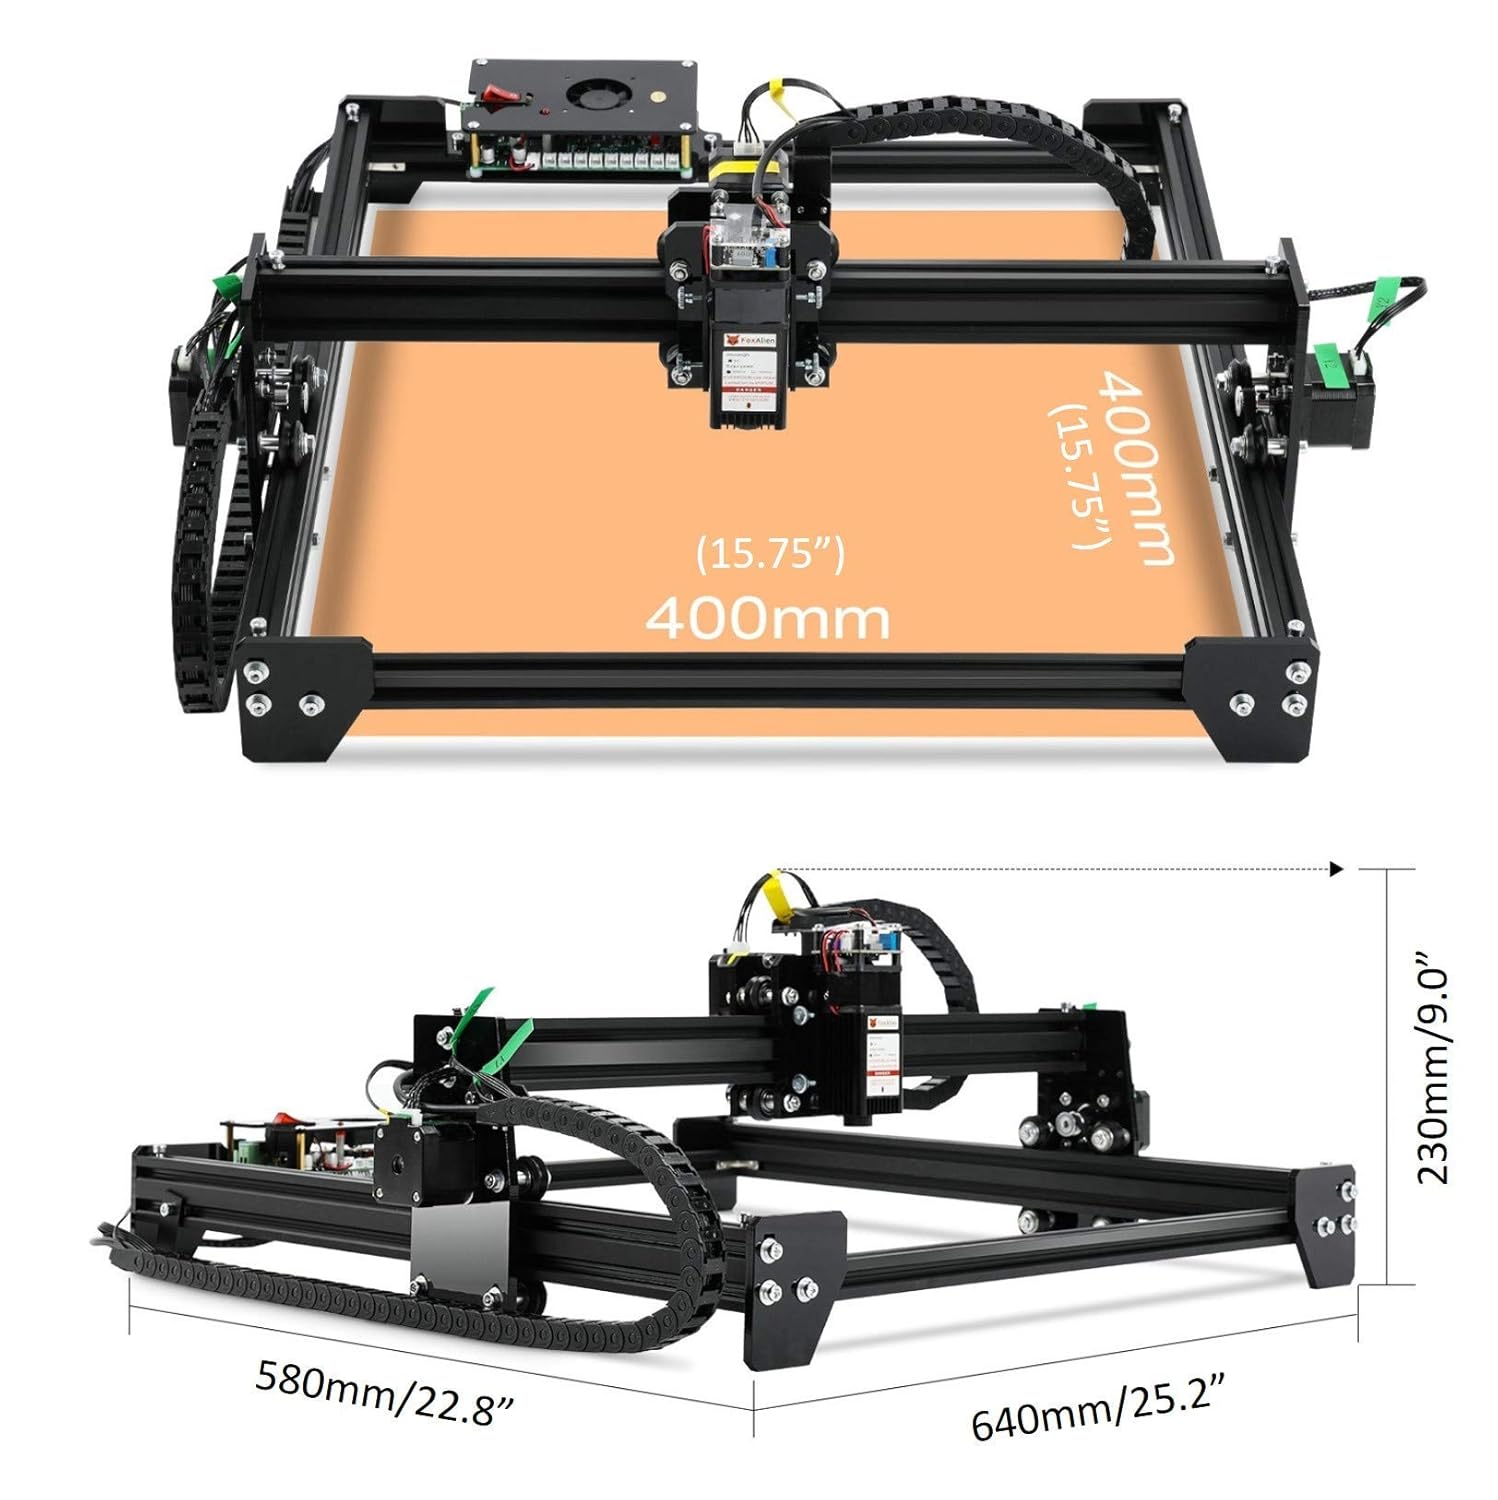
Figure 3: LE-4040 Product Dimensions
This image provides a top-down and side-view diagram of the LE-4040 laser engraver, detailing its dimensions. The engraving area is shown as 400mm x 400mm (15.75" x 15.75"). Overall product dimensions are 640mm (25.2") in length, 580mm (22.8") in width, and 230mm (9.0") in height.

Figure 4: Key Machine Features
This composite image highlights four key features: the adjustable laser module position with up/down arrows, silent wheels for smooth movement, the Grbl control board with a cooling fan, and a smooth drag chain for cable management.
5. Operating Instructions
The LE-4040 is compatible with various GRBL-based software, including LaserGRBL, Candle (Grblcontrol), and LightBurn. The U Disk provided contains necessary drivers and potentially basic software.
- Software Installation: Install the preferred GRBL control software on your computer. Drivers for the USB connection may also need to be installed from the U Disk.
- Connect and Power On: Ensure the machine is connected to your computer via USB and the power supply is plugged in. Turn on the machine's power switch.
- Software Connection: Open your chosen software (e.g., LaserGRBL). Select the correct COM port for the engraver and connect.
- Load Material: Place the material to be engraved or cut onto the working area. Ensure it is flat and secured if necessary.
- Adjust Laser Focus: The LE-4040 features an adjustable laser module and an upgraded fixed-lens with a focusing distance of 30mm. Adjust the laser module height using the knobs until the laser spot is at its smallest point on the material surface.
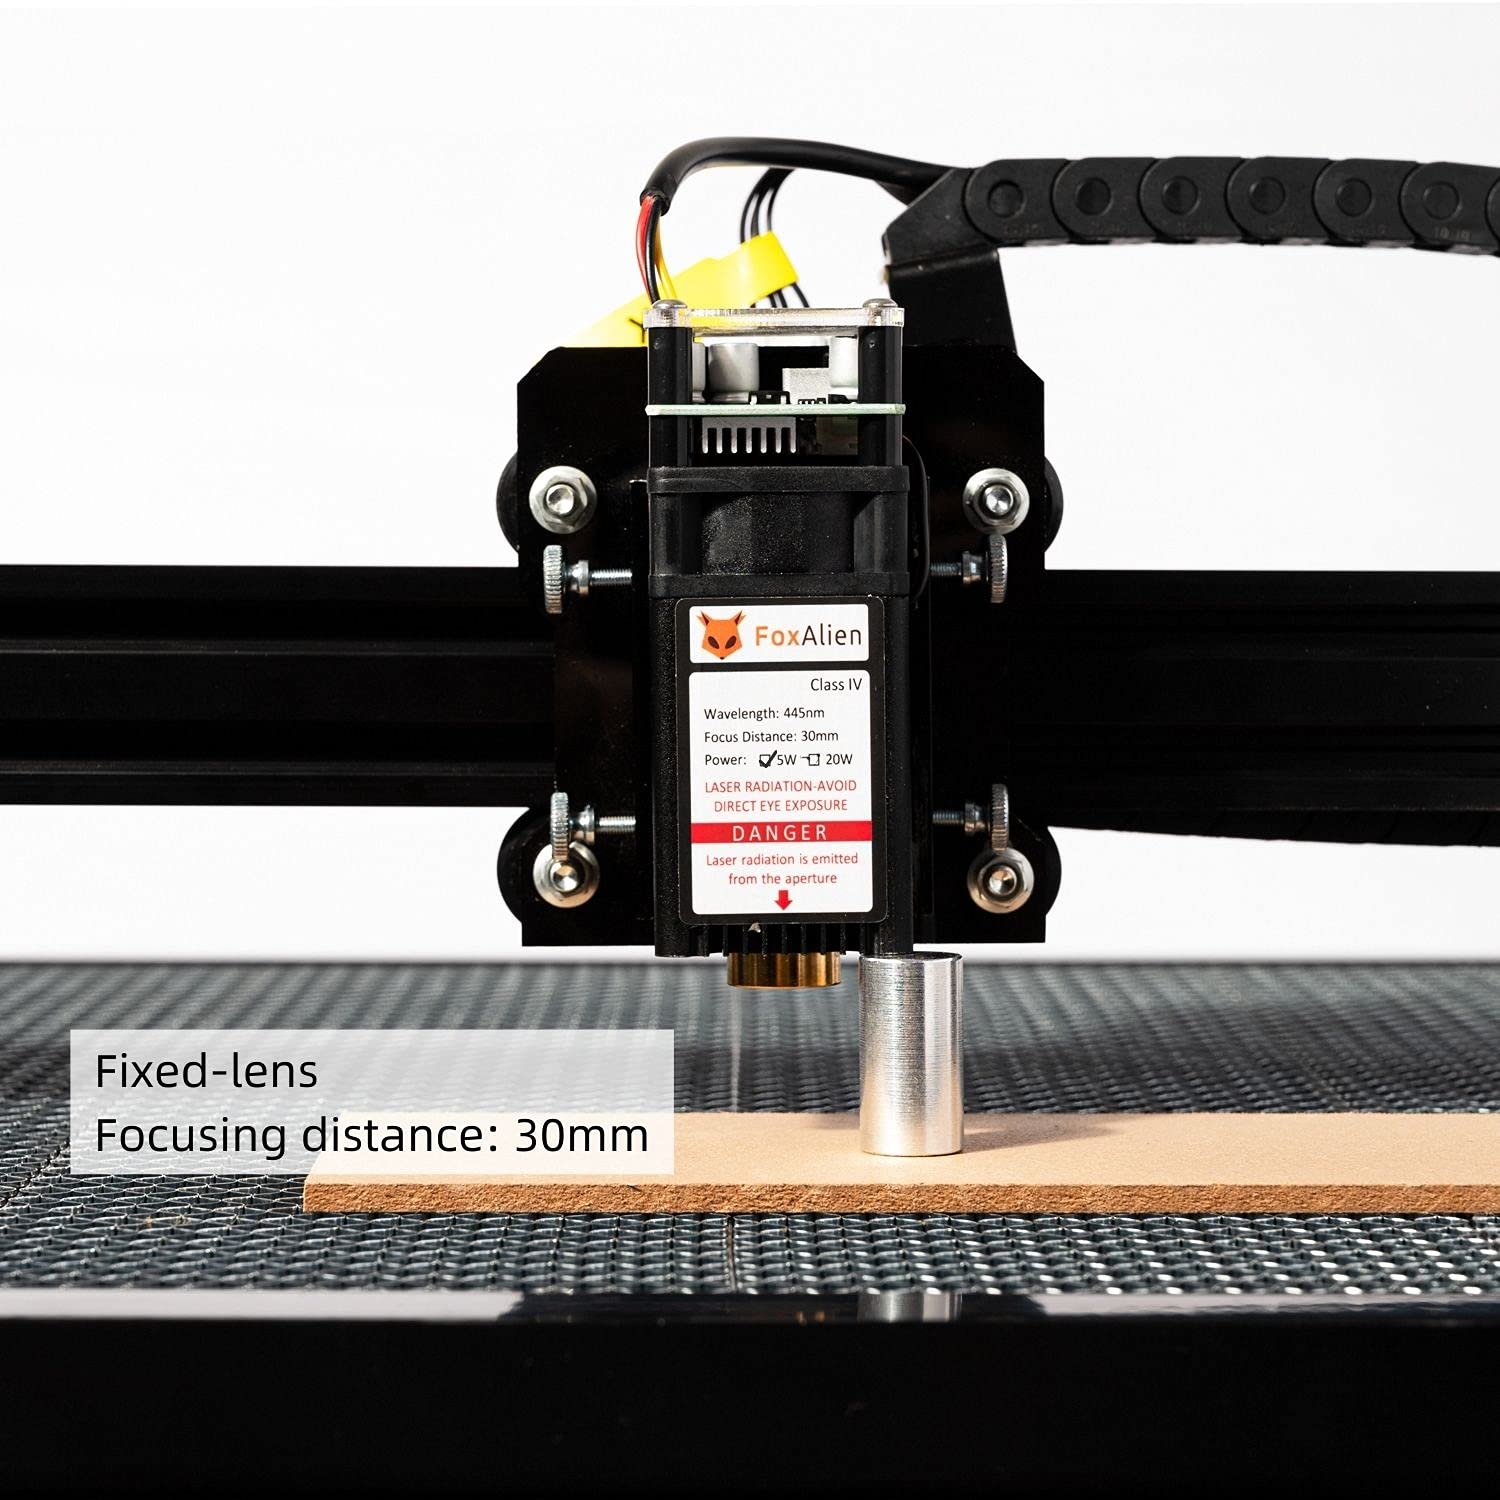
Figure 5: Fixed-Lens Focusing Distance
This image shows a close-up of the laser module with a metal cylinder placed beneath it, illustrating the optimal focusing distance of 30mm from the laser's aperture to the material surface.

Figure 6: Upgraded Fixed-Lens Laser Module
A detailed view of the laser module, highlighting its upgraded fixed-lens design for improved stability and durability. The label indicates Wavelength: 445nm, Focus Distance: 30mm, Power: 5W (5000mW), and Class IV laser radiation warning.
- Prepare Design: Import or create your design in the software. Set engraving parameters such as power (S0-S1000 range), speed (max 3000mm/min), and number of passes.
- Start Engraving: Ensure all safety precautions are in place, especially wearing protective eyewear. Initiate the engraving process from the software. Monitor the machine during operation.
Applicable Materials
The LE-4040 is capable of engraving and cutting a wide range of materials. Always test on a scrap piece of material first to determine optimal settings.

Figure 7: Applicable Materials for Carving/Cutting
This image displays examples of materials suitable for the LE-4040, including Wood, Cardboard, Bamboo, MDF, Leather, Fabric, Acrylic, and Lacquered metal. Each material is shown with an example of an engraved or cut design.
6. Maintenance
Regular maintenance ensures the longevity and optimal performance of your LE-4040 laser engraver.
- Cleaning: Regularly clean the machine, especially the laser lens and the working area, to remove dust, debris, and residue from engraving. Use a soft, lint-free cloth.
- Lubrication: Periodically check and lubricate the moving parts, such as the guide rails and lead screws, if applicable, to ensure smooth operation.
- Belt Tension: Inspect the tension of the X and Y axis belts. They should be taut but not overly tight. Adjust if necessary.
- Cable Inspection: Check all cables for any signs of wear or damage. Ensure connections are secure.
- Storage: When not in use, store the machine in a clean, dry environment, away from direct sunlight and extreme temperatures.
7. Troubleshooting
This section addresses common issues you might encounter. For more complex problems, refer to online resources or contact support.
| Problem | Possible Cause | Solution |
|---|---|---|
| Machine not powering on. | Power cable loose; power supply faulty; power outlet issue. | Check power cable connections. Test power supply with another device. Try a different power outlet. |
| Laser not firing or weak. | Incorrect focus; laser module cable loose; laser module faulty; software power setting too low. | Adjust laser focus. Check laser module cable connection. Increase laser power setting in software. |
| Machine not connecting to computer. | Incorrect COM port selected; missing/corrupt drivers; USB cable faulty. | Verify COM port in device manager and software. Reinstall drivers from U Disk. Try a different USB cable. |
| Engraving quality is poor/inconsistent. | Improper focus; material not flat; incorrect speed/power settings; dirty lens. | Re-focus the laser. Ensure material is flat. Adjust speed and power settings. Clean the laser lens. |
| Machine makes unusual noises. | Loose components; debris in moving parts; motor issue. | Check for loose screws. Clean rails and belts. If noise persists, contact support. |
8. Specifications
| Feature | Detail |
|---|---|
| Model Number | LE-4040 |
| Laser Output Power | 5000mW (5W) |
| Laser Class | Class 4 |
| Engraving Area | 40 x 40 cm (15.75 x 15.75 inches) |
| Product Size (LxWxH) | 64 x 58 x 23 cm (25.2 x 22.9 x 9.06 inches) |
| Step Motor | 42 step motor (Dual Y-axis motors) |
| Accuracy | 0.1mm |
| Power Supply | 12V/5A |
| Support Software | LaserGRBL, Candle (Grblcontrol), LightBurn, Compatible with all GRBL software |
| Support OS | Windows XP, Windows 7, Windows 8, Windows 10 |
| Item Weight | 5 kg 810 g |
9. Warranty and Support
For information regarding warranty coverage, technical support, or service, please refer to the official FoxAlien website or contact their customer service directly. Details are typically provided with your purchase documentation or on the manufacturer's website.
When contacting support, please have your product model number (LE-4040) and purchase details readily available.


