1. Introduction
This manual provides essential information for the installation, operation, and maintenance of your USPEEDA Carburetor Replacement Kit. This kit is designed to replace the carburetor and associated components in various Homelite string trimmers and other small engines, restoring optimal performance.
Please read this manual thoroughly before attempting any installation or maintenance to ensure proper function and safety.
2. Safety Information
WARNING: Always disconnect the spark plug wire before performing any maintenance or installation on the engine to prevent accidental starting.
- Ensure the engine is cool before handling any components.
- Wear appropriate personal protective equipment (PPE), such as gloves and eye protection, during installation.
- Work in a well-ventilated area, especially when dealing with fuel.
- Keep fuel and flammable materials away from open flames or ignition sources.
- Dispose of old parts and fuel according to local regulations.
- If you are unsure about any step, consult a qualified technician.
3. Package Contents
The USPEEDA Carburetor Replacement Kit includes the following components:
- 1 x Carburetor
- 2 x Primer Bulbs
- 2 x Air Filters
- 1 x Spark Plug
- 1 x Fuel Filter
- 2 x Gaskets
- 2 x Fuel Lines
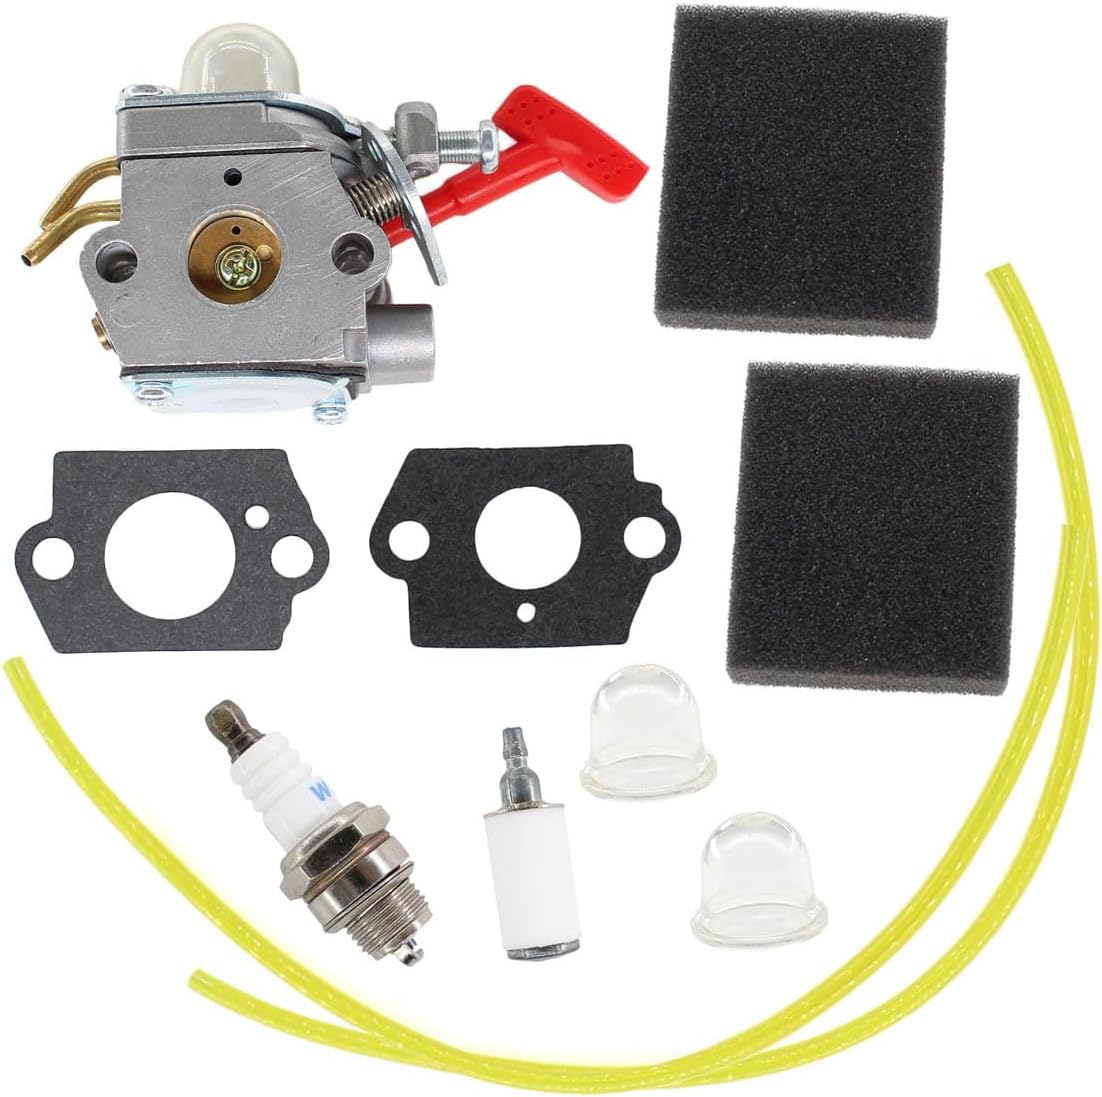
Figure 3.1: Overview of all components included in the USPEEDA Carburetor Replacement Kit.
4. Compatible Models
This carburetor replacement kit is compatible with a wide range of Homelite models. Please verify your model number against the list below:
- GST18 UT-20593-B, UT-20593-C
- GSTBC UT-15084-B, UT-15084-C, UT-15084-A
- HBC18 UT-15075-1, UT-15075-C, UT-15075-A, UT-15075
- HBC28 UT-15096/15097
- HBC30 UT-15071-1, UT-15085-B/C, UT-15071-A, UT-15085, UT-15071
- HBC30B UT-15086-B/C, UT-15086-A, UT-15072, UT-15086
- HBC30Bi UT-15175
- HBC30i UT-15174
- HGT UT-20583-B, UT-20583-A
- HLT15 UT-20602, UT-20602-A/B/C, UT-20605-A
- HLT16 UT-20585-1, UT-20585-C, UT-20606-A
- HLT17C UT-20596-B, UT-20586-A, UT-20596-A, UT-20586, UT-20596
- HLT18 UT-20584-1, UT-20584-B, UT-20607-A, UT-20584
- HLT28 UT-20595-3, UT-20595-C, UT-20608-A, UT-20595-2, UT-20595-A
- ST145 UT-20556-B, UT-20592-A
- ST155 UT-20539-D, UT-20563-B, UT-20539-E, UT-20544-E, UT-20539-C, UT-20563-A
- ST175 UT-20590-C/D
- ST175BC UT-20553-C, UT-20597
- ST175C UT-20599-A/B, UT-20564-A
- ST175G UT-20590-B, UT-20590-C/D, UT-20604-A, UT-20590-A
- ST185BC UT-15039-D, UT-15039-E, UT-15102, UT-15039-C
- ST275 UT-20594-1A/2A, UT-20594-1, UT-20594-A/B, UT-20594-2
- ST285BC UT-20581-3, UT-20598-1, UT-20581-E, UT-20615, UT-20581-C
- ST385 UT-15088-A/B
- ST385BC UT-15040-1, UT-15040-H/J/K, UT-15040-E, UT-15042-E, UT-15059-B
- ST385i UT-15173
- SX135 UT-20601, UT-20601-1/A/B/C, UT-20609-A
- SX135C UT-20667
- 2000 UT-26026
- 2100 UT-26027
- BC3000 UT-15099-R
This kit also replaces carburetor part numbers: A03003, A07139, A04445A, WT-220, WT-318, WT-363-1, WT-363X, WT-318X, WT-165, WT-71C, WT-220X, WT-363, WT-476-1, WT-476, WT-458.
5. Setup and Installation
Replacing a carburetor requires careful attention. If you are not comfortable performing this procedure, it is recommended to seek professional assistance.
5.1 Preparation
- Ensure the engine is completely cool.
- Disconnect the spark plug wire to prevent accidental starting.
- Drain any fuel from the fuel tank into an approved container.
- Clean the area around the carburetor to prevent debris from entering the engine.
5.2 Removal of Old Carburetor
- Locate the carburetor on your engine. It is typically mounted between the air filter and the engine block.
- Carefully disconnect the fuel lines from the carburetor. Note their positions for reinstallation.
- Disconnect the throttle linkage and choke linkage from the carburetor. Take a photo or make a diagram if necessary.
- Remove the mounting bolts or nuts that secure the carburetor to the engine.
- Gently remove the old carburetor and any old gaskets.

Figure 5.1: Side view of the carburetor, highlighting key connection points.
5.3 Installation of New Carburetor
- Install new gaskets provided in the kit between the engine and the carburetor, ensuring proper alignment.
- Mount the new carburetor onto the engine, securing it with the original mounting bolts/nuts. Do not overtighten.
- Reconnect the throttle linkage and choke linkage to the new carburetor. Ensure they move freely.
- Connect the new fuel lines and fuel filter as per the original configuration. Ensure secure connections to prevent leaks.
- Replace the old spark plug with the new one provided.
- Replace the old air filter with the new ones provided.
- Install the new primer bulbs if applicable.

Figure 5.2: Carburetor with choke lever and adjustment screws visible.
5.4 Initial Start-up
- Refill the fuel tank with the appropriate fuel mixture for your engine.
- Prime the carburetor by pressing the primer bulb until fuel is visible.
- Reconnect the spark plug wire.
- Start the engine according to your equipment's manufacturer instructions.
- Allow the engine to warm up before making any adjustments.
6. Operation and Adjustment
After installation, minor adjustments may be necessary for optimal engine performance. Most small engine carburetors have two main adjustment screws: High (H) speed and Low (L) speed.
6.1 High (H) Speed Adjustment
Controls the fuel mixture at high engine RPMs. Adjust this screw to achieve maximum engine speed without sputtering or bogging down. Turning clockwise leans the mixture (less fuel), counter-clockwise enriches it (more fuel).
6.2 Low (L) Speed Adjustment
Controls the fuel mixture at idle and low engine RPMs. Adjust this screw to achieve a smooth, consistent idle without stalling. Turning clockwise leans the mixture, counter-clockwise enriches it.
6.3 Idle Speed Adjustment
Some carburetors also have an idle speed screw (T or LA) that adjusts the engine's idle RPM. Turn clockwise to increase idle speed, counter-clockwise to decrease.
NOTE: Specific adjustment procedures vary by engine model. Refer to your equipment's original service manual for precise tuning instructions. Improper adjustment can damage the engine.

Figure 6.1: Top view of the carburetor, indicating the primer bulb and potential adjustment screw locations.
7. Maintenance
Regular maintenance of your carburetor and associated components ensures long-term performance and reliability.
- Fuel Quality: Always use fresh, clean fuel mixed to the correct ratio for 2-stroke engines. Stale or contaminated fuel is a primary cause of carburetor issues.
- Fuel Filter: Inspect and replace the fuel filter periodically (e.g., annually or every 50 hours of operation) to prevent debris from reaching the carburetor.
- Air Filter: Clean or replace the air filter regularly. A clogged air filter can cause the engine to run rich and affect carburetor performance.
- Spark Plug: Inspect the spark plug for wear and proper gap. Replace as needed.
- Storage: Before long-term storage, drain the fuel system or use a fuel stabilizer to prevent gum and varnish buildup in the carburetor.

Figure 7.1: Angled view of the carburetor, showing the fuel inlet and primer bulb, critical for maintenance checks.
8. Troubleshooting
This section addresses common issues you might encounter after installing the new carburetor.
| Problem | Possible Cause | Solution |
|---|---|---|
| Engine won't start | No fuel, clogged fuel filter, spark plug issue, incorrect choke setting. | Check fuel level, replace fuel filter, inspect/replace spark plug, ensure choke is set correctly for starting. |
| Engine starts but stalls | Idle speed too low, L-speed mixture incorrect, air leak. | Adjust idle speed screw, adjust L-speed screw, check for loose connections or damaged gaskets. |
| Engine lacks power at high RPM | H-speed mixture incorrect, clogged air filter, exhaust restriction. | Adjust H-speed screw, clean/replace air filter, check exhaust for blockages. |
| Fuel leaks | Loose fuel lines, damaged primer bulb, improperly seated gaskets. | Tighten fuel line clamps, replace primer bulb, re-seat or replace gaskets. |
For persistent issues, it is recommended to consult a professional small engine mechanic.
9. Specifications
| Attribute | Detail |
|---|---|
| Brand | USPEEDA |
| Item Weight | 6.6 ounces |
| Product Dimensions | 4.72 x 2.76 x 2.36 inches |
| ASIN | B089F87BPL |
| UPC | 664918062798 |
| Manufacturer | USPEEDA |
10. Warranty and Support
For any questions regarding the USPEEDA Carburetor Replacement Kit, including installation assistance or troubleshooting, please contact the seller directly through the platform where the purchase was made.
The seller for this product is USPEEDA - US Direct Shipping. Please refer to their specific return and warranty policies as applicable.
For general information, you may visit the USPEEDA brand page on Amazon.