Introduction
This manual provides comprehensive instructions for the safe and efficient operation, maintenance, and troubleshooting of your CROWNFUL Automatic Bread Machine, Model FGen. Please read this manual thoroughly before first use and retain it for future reference.
Important Safeguards
When using electrical appliances, basic safety precautions should always be followed to reduce the risk of fire, electric shock, and injury to persons, including the following:
- Read all instructions before operating the bread machine.
- Do not touch hot surfaces. Use handles or knobs.
- To protect against electric shock, do not immerse cord, plugs, or the appliance in water or other liquid.
- Close supervision is necessary when any appliance is used by or near children.
- Unplug from outlet when not in use and before cleaning. Allow to cool before putting on or taking off parts.
- Do not operate any appliance with a damaged cord or plug, or after the appliance malfunctions or has been damaged in any manner.
- The use of accessory attachments not recommended by the appliance manufacturer may cause injuries.
- Do not use outdoors.
- Do not let cord hang over edge of table or counter, or touch hot surfaces.
- Do not place on or near a hot gas or electric burner, or in a heated oven.
- Extreme caution must be used when moving an appliance containing hot oil or other hot liquids.
- To disconnect, turn any control to "off", then remove plug from wall outlet.
- Do not use appliance for other than intended use.
- Avoid contact with moving parts.
- Do not place the bread machine against a wall or other appliances. Leave at least 10 cm free space on all sides.
- Do not cover the bread machine with a towel or other materials as heat and steam must be able to escape freely.
Product Overview and Components
Familiarize yourself with the parts of your CROWNFUL Automatic Bread Machine.

Image: The CROWNFUL Automatic Bread Machine FGen, black with a silver top, shown alongside freshly sliced bread and strawberries.
Included Accessories:

Image: A visual representation of the accessories included with the bread machine, such as the bread pan, bread hook, stirring rod, measuring spoon, measuring cup, user manual, and recipe book.
- Bread Pan
- Bread Hook
- Stirring Rod (Kneading Paddle)
- Measuring Spoon
- Measuring Cup
- User Manual (this document)
- Recipe Book
Key Features:
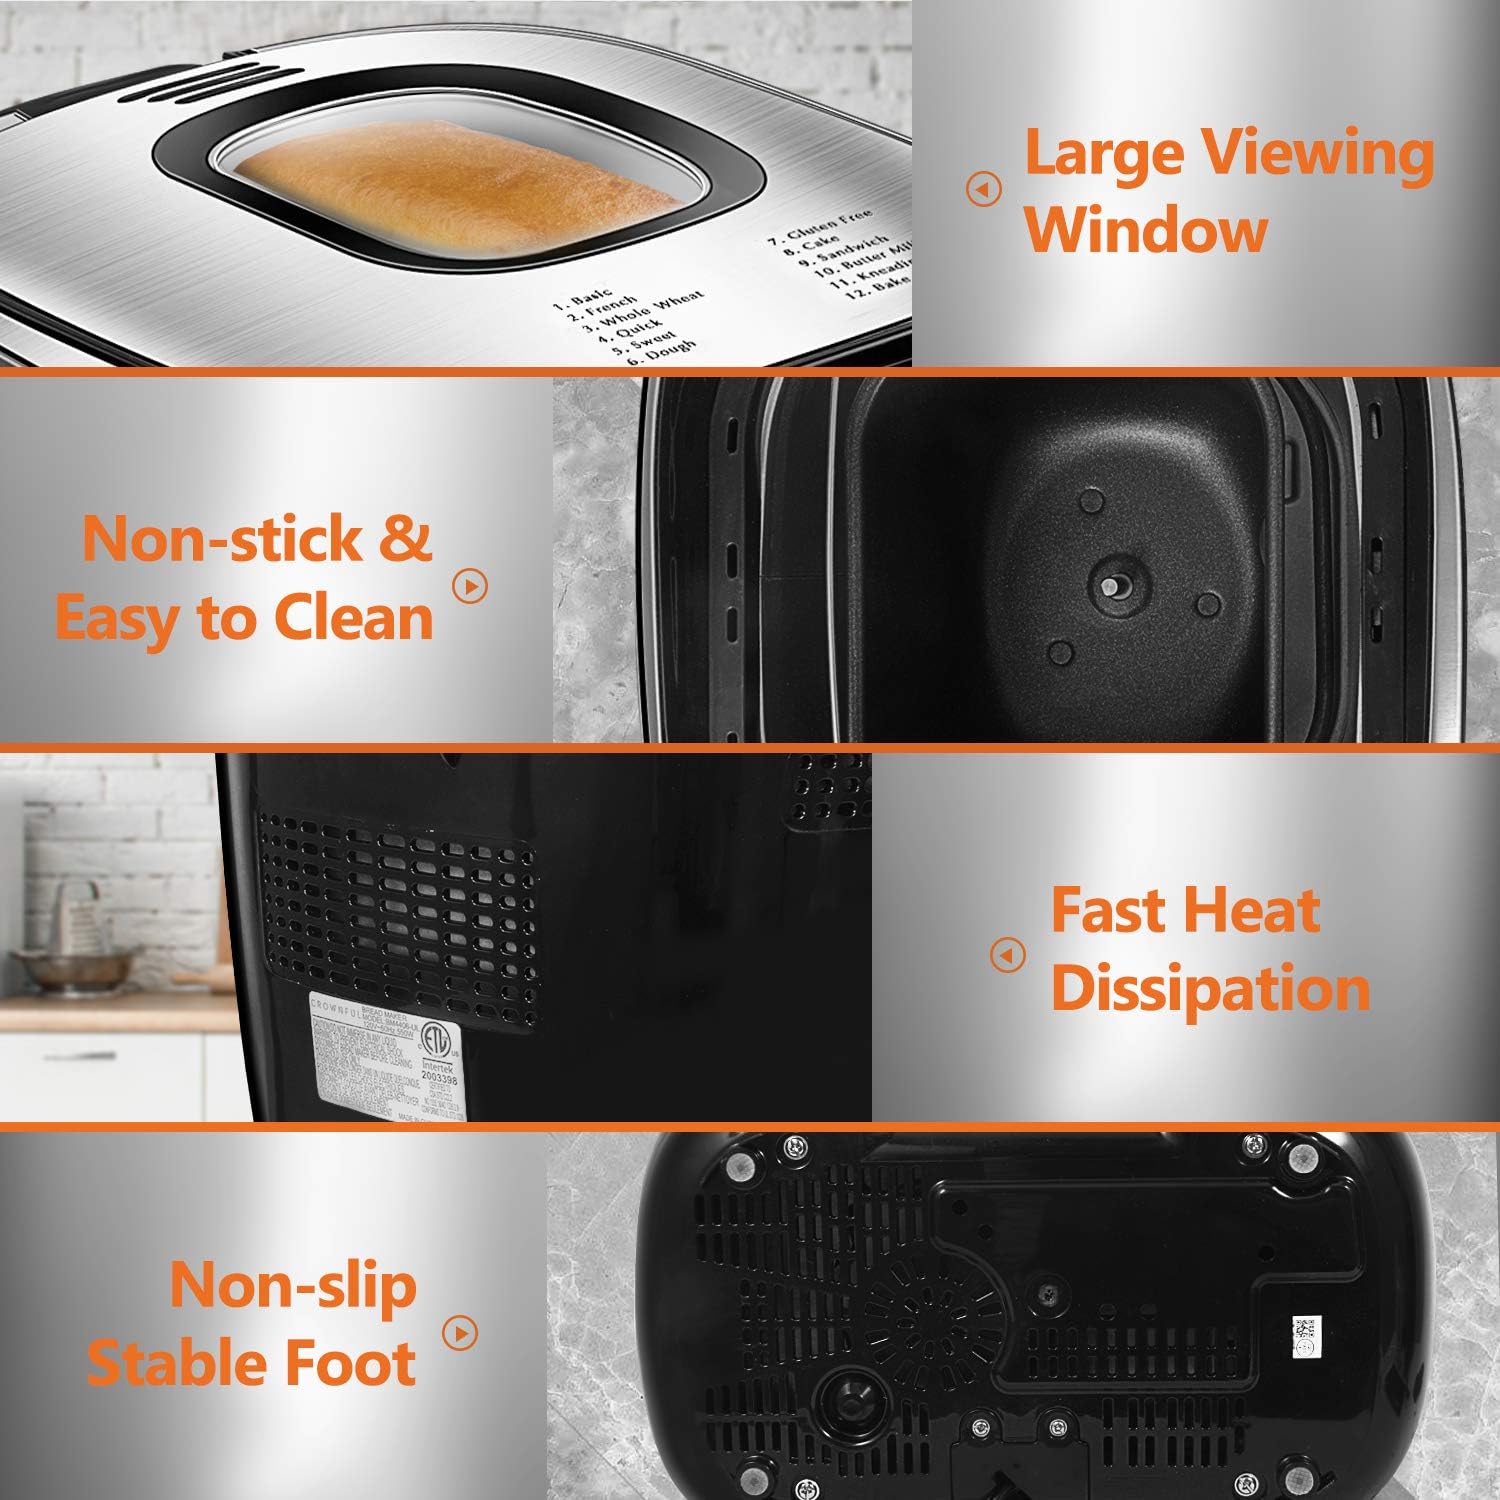
Image: Detailed views highlighting the bread machine's large viewing window, non-stick bread pan, fast heat dissipation vents, and non-slip feet for stability.
- Large Transparent Viewing Window
- Non-stick Bread Pan for easy cleaning
- Fast Heat Dissipation System
- Non-slip Stable Feet
- LCD Digital Control Panel
Before First Use (Setup)
- Unpacking: Carefully remove the bread machine and all accessories from the packaging.
- Cleaning: Wash the bread pan and kneading paddle with warm, soapy water. Rinse thoroughly and dry all parts. Wipe the exterior of the appliance with a damp cloth. Do not immerse the main unit in water.
- Placement: Place the bread machine on a stable, flat, heat-resistant surface, ensuring adequate ventilation around the unit. Keep it away from walls or other appliances (at least 10 cm clearance).
- Initial Bake Cycle (Optional): To eliminate any manufacturing odors, you may run a short "Bake" cycle (Program 12) without ingredients. Ensure the area is well-ventilated.
Operating Instructions
Basic Operation Steps:

Image: A visual guide showing the three main steps: adding ingredients to the bread pan, selecting a program on the control panel, and the final baked bread.
- Insert Kneading Paddle: Place the kneading paddle onto the shaft inside the bread pan.
- Add Ingredients: Add ingredients to the bread pan in the order specified by your recipe (typically liquids first, then dry ingredients, with yeast last). Ensure ingredients are at room temperature.
- Place Bread Pan: Insert the bread pan into the bread machine and turn it clockwise until it clicks into place. Close the lid.
- Plug In: Connect the power cord to a grounded electrical outlet. The machine will beep, and the display will show the default program.
- Select Program: Press the MENU button to cycle through the 12 available programs until your desired program is selected.
- Select Loaf Size: Press the LOAF button to choose between 1.5 LB or 2.0 LB loaf sizes.
- Select Crust Color: Press the COLOR button to select Light, Medium, or Dark crust.
- Start Baking: Press the START/STOP button to begin the program. The machine will start kneading.
- Adding Fruits/Nuts: For programs that allow it, the machine will beep during the kneading cycle to indicate when to add fruits, nuts, or other additional ingredients. Open the lid carefully and add them.
- End of Cycle: Once the program is complete, the machine will beep and automatically enter the "Keep Warm" phase for 60 minutes.
- Remove Bread: Press and hold the START/STOP button for a few seconds to stop the "Keep Warm" function. Unplug the machine. Using oven mitts, carefully remove the bread pan by turning it counter-clockwise and lifting it out. Invert the pan to release the bread. If the kneading paddle remains in the bread, use the bread hook to remove it.
- Cooling: Allow the bread to cool on a wire rack for at least 15-20 minutes before slicing.
Program Menu Options:

Image: The control panel displaying the 12 pre-programmed menu options, with examples of baked goods like basic bread, gluten-free bread, pizza dough, and cake.
- 1. Basic: For white and mixed breads, mainly consisting of wheat flour.
- 2. French: For light breads made from fine flour.
- 3. Whole Wheat: For breads with a high percentage of whole wheat flour.
- 4. Quick: For quick bread recipes that use baking powder or soda.
- 5. Sweet: For breads with high sugar, fats, and proteins.
- 6. Dough: For preparing dough for rolls, pizza, or other baked goods that will be baked in a conventional oven.
- 7. Gluten-Free: For gluten-free bread recipes.
- 8. Cake: For mixing and baking cakes.
- 9. Sandwich: For light and fluffy sandwich bread.
- 10. Butter Milk Bread: Specific program for buttermilk bread.
- 11. Kneading: For kneading dough only.
- 12. Bake: For baking only, useful for additional baking time or pre-baked dough.
Loaf Size and Crust Color:
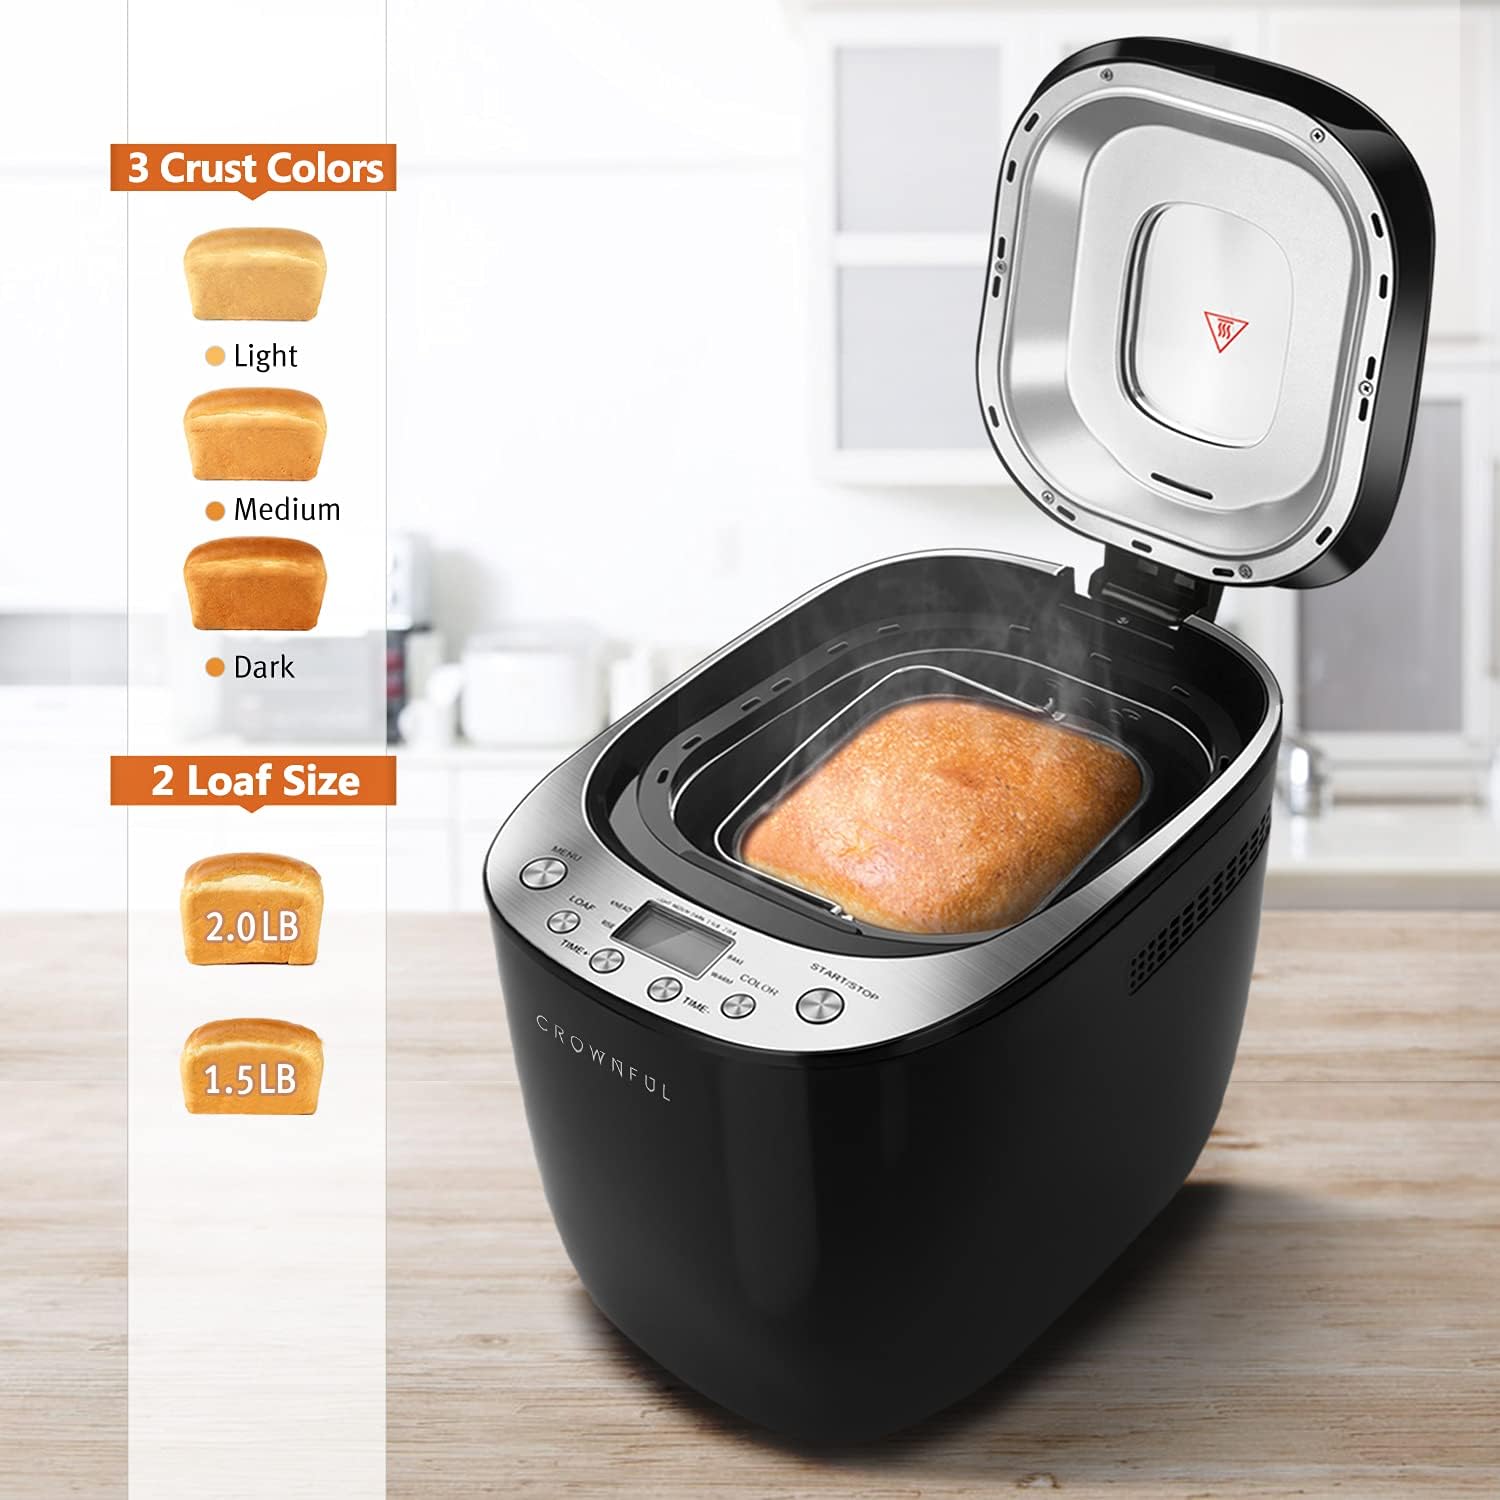
Image: A visual guide illustrating the three crust color options (light, medium, dark) and two loaf size options (1.5 lb and 2.0 lb) available on the bread machine.
- Loaf Sizes: Choose between 1.5 LB and 2.0 LB depending on your recipe and desired yield.
- Crust Colors: Select Light, Medium, or Dark to achieve your preferred crust crispness and color.
Delay Timer and Keep Warm Function:

Image: An infographic highlighting key features such as 360-degree surrounding baking, a 13-hour delay timer, 10-minute memory keeping, a 1-hour keep warm function, and low noise operation (65 dB).
- Delay Timer (up to 13 hours): Use the TIME+ and TIME- buttons to set a delayed start time. This allows you to add ingredients and have fresh bread ready at a later time.
- Keep Warm (1 hour): After the baking cycle finishes, the bread machine automatically enters a 60-minute "Keep Warm" phase to maintain the bread's temperature.
- Power Interruption Recovery (10 minutes): The machine has a built-in memory function that can recover from power interruptions lasting up to 10 minutes, ensuring your baking process continues without significant disruption.
Maintenance and Cleaning
Proper cleaning and maintenance will extend the life of your bread machine.
- Before Cleaning: Always unplug the appliance and allow it to cool completely before cleaning.
- Bread Pan and Kneading Paddle: Remove the bread pan and kneading paddle. Wash them with warm, soapy water. The bread pan is non-stick and can be cleaned easily. The product care instructions state "Dishwasher Safe" for the pan, but hand washing is recommended to preserve the non-stick coating.
- Exterior: Wipe the exterior of the bread machine with a soft, damp cloth. Do not use abrasive cleaners or immerse the main unit in water.
- Interior: Wipe the interior of the baking chamber with a damp cloth. Remove any crumbs or residue.
- Lid: Clean the lid, especially the viewing window, with a damp cloth.
- Storage: Ensure all parts are completely dry before storing the bread machine in a cool, dry place.
Troubleshooting
If you encounter issues with your bread machine, refer to the following common problems and solutions:
| Problem | Possible Cause | Solution |
|---|---|---|
| Bread does not rise | Expired yeast, incorrect water temperature, too much salt, not enough sugar. | Check yeast expiration date. Use lukewarm water (38-43°C). Ensure correct ingredient measurements. |
| Bread is too dense | Too much flour, not enough liquid, old yeast. | Measure ingredients precisely. Ensure yeast is fresh. |
| Bread collapses in the middle | Too much liquid, too much yeast, high humidity. | Reduce liquid slightly. Reduce yeast slightly. Adjust recipe for humid conditions. |
| Kneading paddle stuck in bread | Common occurrence. | Use the provided bread hook to carefully remove the paddle after the bread has cooled slightly. |
| Machine beeps and displays error code | Overheating, ingredient imbalance, mechanical issue. | Unplug and let the machine cool down. Check for obstructions. Consult the full user manual for specific error codes. |
For further assistance, please refer to the comprehensive troubleshooting section in the full user manual or contact CROWNFUL customer support.
Specifications
| Feature | Detail |
|---|---|
| Brand | CROWNFUL |
| Model Number | FGen |
| Color | Black |
| Product Dimensions | 37.08 x 25.02 x 27.94 cm (14.6 x 9.85 x 11 inches) |
| Item Weight | 4.54 kg (10 Pounds) |
| Capacity | 2 Liters (supports 1.5 LB and 2.0 LB loaf sizes) |
| Power/Wattage | 550 watts |
| Voltage | 120 Volts |
| Material | Plastic |
| Auto Shut-off | Yes |
| Number of Programs | 12 |
| Crust Colors | Light, Medium, Dark |
| Delay Timer | Up to 13 hours |
| Keep Warm Function | 1 hour |
| Power Interruption Recovery | 10 minutes |
Warranty and Support
Your CROWNFUL Automatic Bread Machine Model FGen comes with a 1-Year Warranty for all parts and accessories. CROWNFUL also provides lifetime support for its products.
For any concerns, questions, or technical assistance regarding your product, please contact CROWNFUL customer support. Customer satisfaction is a top priority.
Please refer to the warranty card included with your product for specific terms and conditions.


