
RYOBI RY1419MTVNM
Contents
RYOBI RY1419MTVNM 1900 PSI Electric Pressure Washer User Manual
Model: RY1419MTVNM
1. Introduction
This manual provides essential instructions for the safe operation, assembly, maintenance, and troubleshooting of your RYOBI RY1419MTVNM 1900 PSI 1.2 GPM Cold Water Wheeled Electric Pressure Washer. Please read this manual thoroughly before operating the unit to ensure proper use and to prevent injury or damage.

Image 1.1: The RYOBI RY1419MTVNM Electric Pressure Washer, showcasing its compact design with integrated hose and wand storage.
2. Important Safety Information
Always observe basic safety precautions when using this product to reduce the risk of fire, electric shock, and personal injury. Keep this manual for future reference.
2.1 Electrical Safety
- Ensure the power outlet is properly grounded.
- Do not operate the pressure washer in wet conditions or near standing water.
- Inspect the power cord for damage before each use. Do not use if damaged.
- Always connect to a circuit protected by a Ground Fault Circuit Interrupter (GFCI).
2.2 Operation Safety
- Wear appropriate personal protective equipment (PPE), including eye protection, hearing protection, and gloves.
- Never point the spray gun at people, pets, or electrical devices.
- Keep children and bystanders away from the operating area.
- Do not operate the unit if you are fatigued or under the influence of drugs or alcohol.
- Ensure all connections are secure before starting the unit.
3. Product Components
Your RYOBI pressure washer includes the following main components:
- Pressure Washer Unit: Main body containing the motor and pump.
- Trigger Handle: Controls water flow from the spray wand.
- Spray Wand: Attaches to the trigger handle and holds the nozzles.
- High-Pressure Hose (25 ft): Connects the pressure washer unit to the trigger handle.
- Detergent Hose: For drawing detergent from an external container.
- Nozzles: Includes a turbo nozzle, 15-degree nozzle, and soap nozzle.
- Wheels: For easy transport of the unit.
- Telescoping Handle: For convenient mobility and compact storage.

Image 3.1: Side view of the pressure washer, highlighting the integrated wheels and telescoping handle for portability.
4. Setup and Assembly
Follow these steps to prepare your pressure washer for operation:
- Attach the High-Pressure Hose: Connect one end of the high-pressure hose to the outlet on the pressure washer unit and the other end to the trigger handle. Ensure connections are hand-tight.
- Connect the Spray Wand: Insert the spray wand into the trigger handle and twist until it locks securely.
- Select and Attach Nozzle: Pull back the collar on the spray wand, insert the desired nozzle (e.g., 15-degree for general cleaning), and release the collar to lock it in place. Tug on the nozzle to ensure it is secure.
- Connect Water Supply: Attach a standard garden hose (not included) to the water inlet on the pressure washer unit. Ensure the garden hose is free of kinks and has a minimum diameter of 5/8 inch. Turn on the water supply completely.
- Prime the Pump: Squeeze the trigger on the spray gun to release air from the system. Hold the trigger until a steady stream of water flows from the nozzle, indicating the pump is primed.
- Connect Power: Plug the pressure washer's power cord into a grounded 120V AC outlet protected by a GFCI.
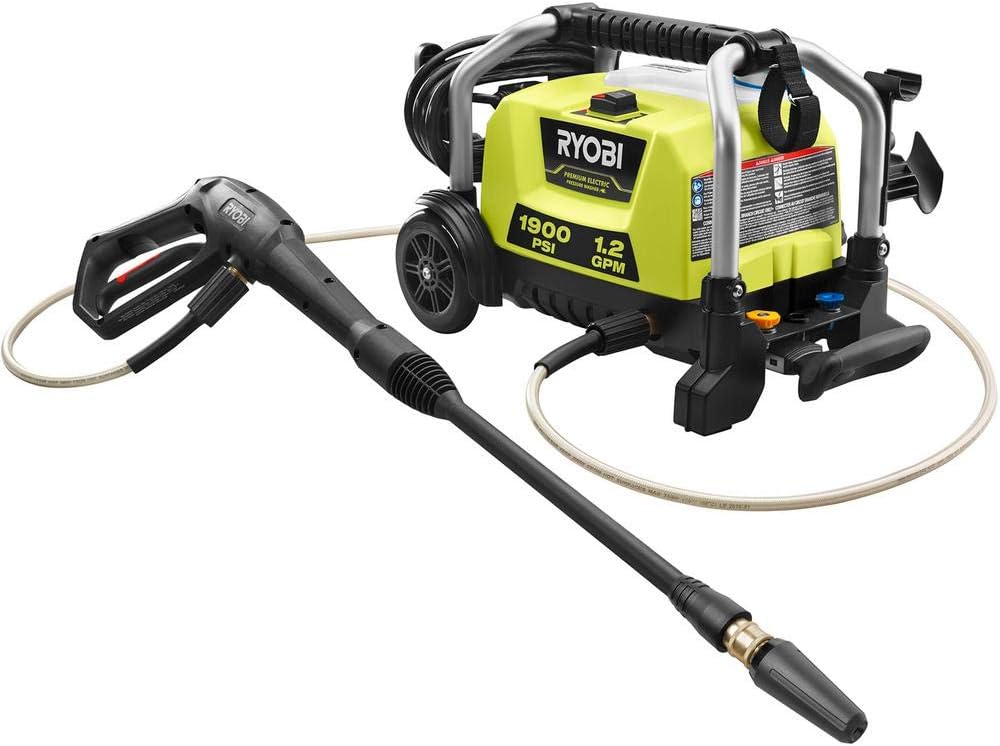
Image 4.1: The pressure washer fully assembled with the high-pressure hose and spray wand attached, ready for water and power connection.
5. Operating Instructions
5.1 Starting the Pressure Washer
- Ensure water supply is fully open and the pump is primed.
- Turn the ON/OFF switch on the unit to the "ON" position. The motor will start.
- Squeeze the trigger on the spray gun to begin spraying.
5.2 Using Nozzles
- Turbo Nozzle: Provides a concentrated, oscillating stream for tough cleaning tasks like removing stubborn dirt from concrete.
- 15-Degree Nozzle: Offers a powerful, fan-shaped spray for general cleaning of various surfaces.
- Soap Nozzle: Delivers a wide, low-pressure spray for applying detergents.
5.3 Detergent Application
- Ensure the soap nozzle is attached to the spray wand.
- Insert the detergent hose into a container of pressure washer safe detergent.
- Start the pressure washer and squeeze the trigger. The unit will automatically draw detergent and mix it with water at a low pressure.
- Apply detergent to the cleaning surface, allowing it to soak as recommended by the detergent manufacturer.
- To rinse, remove the detergent hose from the detergent container and replace the soap nozzle with a high-pressure nozzle (e.g., 15-degree).
5.4 Shutting Down and Storage
- Turn the ON/OFF switch to the "OFF" position.
- Turn off the water supply.
- Squeeze the trigger on the spray gun to release any remaining pressure in the system.
- Disconnect the garden hose, high-pressure hose, and power cord.
- Drain all water from the unit, hoses, and spray gun to prevent freezing and damage.
- Store the unit in a dry, protected area where temperatures will not fall below freezing.

Image 5.1: An individual demonstrating the use of the RYOBI pressure washer for cleaning an outdoor patio surface.
6. Maintenance
Regular maintenance ensures optimal performance and extends the life of your pressure washer.
- Nozzle Cleaning: If a nozzle becomes clogged, use the included nozzle cleaning tool (or a small paper clip) to clear any debris. Rinse thoroughly with water.
- Water Inlet Filter: Periodically check and clean the water inlet filter to prevent debris from entering the pump.
- Hose Inspection: Inspect the high-pressure hose and garden hose for cuts, kinks, or leaks before each use. Replace damaged hoses immediately.
- Winterization: If storing the unit in an area where temperatures may drop below freezing, it is crucial to winterize the pressure washer. This involves flushing the system with an anti-freeze solution designed for pressure washers or RVs. Consult your local RYOBI service center for specific recommendations.
- General Cleaning: Wipe down the exterior of the unit with a damp cloth. Do not use harsh chemicals.
7. Troubleshooting
Refer to the table below for common issues and their solutions.
| Problem | Possible Cause | Solution |
|---|---|---|
| Unit will not start | Power cord not plugged in; GFCI tripped; ON/OFF switch in "OFF" position; no power at outlet. | Ensure power cord is securely plugged in; reset GFCI; turn switch to "ON"; check power supply. |
| Low or no pressure | Water supply off or restricted; clogged nozzle; air in pump; incorrect nozzle selected. | Ensure water supply is fully open; clean nozzle; prime pump by squeezing trigger; select appropriate nozzle. |
| Pulsating pressure | Air in pump; water supply restricted; clogged nozzle. | Prime pump; ensure adequate water flow; clean nozzle. |
| Water leaks | Loose connections; damaged O-rings or seals; cracked hose. | Tighten all connections; inspect and replace O-rings/seals; replace damaged hoses. |
8. Product Specifications
| Specification | Value |
|---|---|
| Model Number | RY1419MTVNM |
| Brand | RYOBI |
| Power Source | Corded Electric |
| Maximum Pressure | 1900 PSI |
| Maximum Flow Rate | 1.2 Gallons Per Minute (GPM) |
| Hose Length | 25 feet (8 meters) |
| Item Weight | 22 Pounds |
| Product Dimensions (L x W x H) | 22" x 13" x 14" |
| Color | Black, Lime, Silver |
| UPC | 046396033383 |

Image 8.1: Dimensional overview of the RYOBI RY1419MTVNM pressure washer, indicating its length, width, and height.
9. Warranty and Support
For warranty information, technical support, or to locate an authorized service center, please refer to the warranty card included with your product or visit the official RYOBI website. Keep your purchase receipt as proof of purchase for warranty claims.
RYOBI Customer Service: For assistance, please contact RYOBI customer support through their official channels.
Ask a question about this manual
Ask about setup, troubleshooting, compatibility, parts, safety, or missing instructions. Manuals+ will review the question and use this page’s manual context to help answer it.