
1. Setup and Installation
Proper setup ensures optimal performance and longevity of your WANAI Full-Automatic Washing Machine. Please follow these steps carefully.
1.1 Unpacking
Carefully remove all packaging materials, including any foam inserts and plastic wraps, from the washing machine. Inspect the machine for any signs of damage during transit. Keep packaging for future transport if needed.
1.2 Placement
Place the washing machine on a firm, level surface to prevent vibration and noise during operation. Ensure there is adequate space around the machine for ventilation and access to water and power connections. Avoid placing it in direct sunlight or in areas with high humidity.
1.3 Water Connection
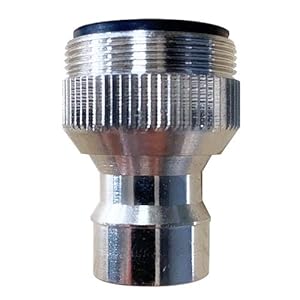
Connect the water inlet hose to a cold water faucet. The machine is designed for cold water intake only. Use the provided faucet adapter if necessary to ensure a secure, leak-free connection. Tighten the connection firmly by hand, then use a wrench for an additional quarter turn, being careful not to overtighten.

1.4 Drainage Setup
Attach the drain hose to the designated outlet on the back of the machine. Position the other end of the drain hose into a sink or a suitable drain. Ensure the drain hose is securely placed to prevent accidental dislodgement during the drain cycle, which could lead to water spillage.
1.5 Power Connection
Plug the power cord into a standard 110V American electrical outlet. Ensure the outlet is properly grounded and capable of handling the machine's power requirements.
1.6 Setup Overview Video
2. Operating Instructions
Your WANAI Full-Automatic Washing Machine offers various settings for efficient and convenient laundry care.
2.1 Control Panel Overview
The control panel features intuitive buttons and a digital display for easy operation.
- Power: Turns the machine on or off.
- Water Level: Selects the desired water volume (1L to 8L).
- Program: Cycles through the available wash programs.
- Start/Pause: Starts or pauses the selected wash cycle.
- Digital Display: Shows remaining time, water level, and program selection.
2.2 Wash Programs
The machine offers 10 standard programs to suit different fabric types and soil levels:
- Common
- Soak
- Normal
- Quick
- Blanket
- Wash and Rinses
- Wash and Spin
- Spin
- Rinses and Spin
- Air-dry
2.3 Step-by-Step Washing Guide
- Load Laundry: Open the top lid and place your clothes into the stainless steel tub. Do not exceed the maximum capacity of 15 pounds.
- Add Detergent: Pour the appropriate amount of detergent into the detergent dispenser. Refer to the detergent level indicators on the control panel (1-2L, 3-4L, 5-6L, 7-8L) for guidance based on your load size.
- Close Lid: Ensure the top lid is securely closed before starting the cycle.
- Power On: Press the 'Power' button to turn on the machine.
- Select Water Level: Press the 'Water Level' button repeatedly to choose the desired water volume for your load.
- Select Program: Press the 'Program' button to cycle through the available wash programs until your desired program is selected.
- Start Cycle: Press the 'Start/Pause' button to begin the wash cycle. The machine will automatically fill with water and proceed through the selected program.
2.4 Operation Demonstration Video
3. Maintenance
Regular maintenance helps keep your washing machine in excellent condition and ensures efficient operation.
3.1 Cleaning the Stainless Steel Tub
The stainless steel tub is designed for durability and to prevent rusting or snagging clothes. Periodically clean the tub by running a self-clean cycle or by wiping it down with a damp cloth and mild detergent. Ensure no residue is left behind.
3.2 Cleaning the Built-in Filter Box
The machine features a built-in filter box to collect lint and debris. Regularly check and clean the filter box to maintain optimal washing performance and prevent lint transfer to clothes. To clean, remove the filter box, empty its contents, rinse under running water, and reinsert it securely.
3.3 Exterior Cleaning
Wipe the exterior of the machine with a soft, damp cloth. Avoid using abrasive cleaners or solvents that could damage the finish.
4. Troubleshooting
If you encounter issues with your washing machine, refer to the following common problems and solutions:
- Machine Not Starting:
Ensure the power cord is securely plugged into a working outlet. Check if the lid is fully closed. Verify that a program and water level have been selected, and the 'Start/Pause' button has been pressed. - Water Leakage:
Check all water inlet and drain hose connections for tightness. Ensure the drain hose is properly positioned in the sink or drain and not kinked. Inspect hoses for any damage or cracks. - Excessive Vibration/Noise:
Confirm the machine is placed on a level surface. Adjust the leveling feet if necessary. Ensure the laundry load is balanced inside the tub. - Clothes Still Contain Lint:
Clean the built-in filter box regularly. Ensure you are not overloading the machine, which can hinder proper lint removal. - Water Not Draining:
Check the drain hose for kinks or blockages. Ensure the drain pump is clear of any obstructions.
If the problem persists after attempting these solutions, please contact WANAI customer support.
5. Specifications
| Feature | Specification |
|---|---|
| Brand | WANAI |
| Model Number | 1 |
| Item Weight | 15 Pounds |
| Product Dimensions | 20.8 x 21.3 x 33.9 inches |
| Efficiency | High Efficiency |
| Capacity | 15 Pounds |
| Max Spin Speed | 1500 rpm |
| Installation Type | Freestanding |
| Special Feature | Full-automatic |
| Color | Gray |
| Control Console | Push Button |
| Standard Cycles | 10 |
| Access Location | Top Load |
| Voltage | 110 Volts |
| Material Type | Plastic (Body), Stainless Steel (Tub) |
6. Warranty and Support
For warranty information, technical assistance, or any product-related inquiries, please contact WANAI customer support through the retailer where the product was purchased or visit the official WANAI website for contact details.