1. Introduction
The KeeKit WA50B Wireless Refrigerator Thermometer is designed to monitor temperatures in various environments, including refrigerators, freezers, and general indoor/outdoor spaces. This device features a main console with a built-in sensor and two remote wireless sensors, allowing for simultaneous display of indoor and two remote temperatures. Key functionalities include an audible alarm for temperature deviations and a min/max record function to track temperature fluctuations over time.

Image 1.1: The KeeKit WA50B main display unit and its two wireless remote sensors.
2. Safety Information
- Read all instructions thoroughly before operating the device.
- Do not expose the main unit or sensors to extreme temperatures, direct sunlight, or excessive moisture.
- Use only the specified battery types (AAA for main unit, AA for remote sensors). Ensure correct polarity during installation.
- Keep the device and its components out of reach of children.
- Do not attempt to disassemble or repair the unit. Contact customer support for assistance.
3. Product Components
The KeeKit WA50B package includes the following items:
- 1 x Main Display Unit (Console)
- 2 x Wireless Remote Sensors
- 1 x User Manual (this document)

Image 3.1: Contents of the KeeKit WA50B product package.
4. Setup
4.1 Battery Installation
- Main Display Unit: Open the battery compartment cover on the back of the main unit. Insert 2 x AAA batteries, ensuring correct polarity (+/-). Close the cover.
- Wireless Remote Sensors: Open the battery compartment cover on each remote sensor. Insert 2 x AA batteries into each sensor, ensuring correct polarity (+/-). Close the covers.
The main unit and sensors should automatically connect once batteries are installed. The sensor readings will appear on the main display.

Image 4.1: Battery installation for the main unit and remote sensors.
4.2 Sensor Placement
The main display unit offers multiple installation options:
- Standing: Use the integrated bracket on the back to stand the unit on a table or counter.
- Hanging: Utilize the hanging hole on the back to mount the unit on a wall.
- Magnetic Attachment: The unit has integrated magnets, allowing it to be attached to a refrigerator door or any metallic surface.
The remote sensors are designed for placement inside refrigerators, freezers, or other desired locations. They feature clamps and suspended holes for convenient attachment to shelves or other surfaces.
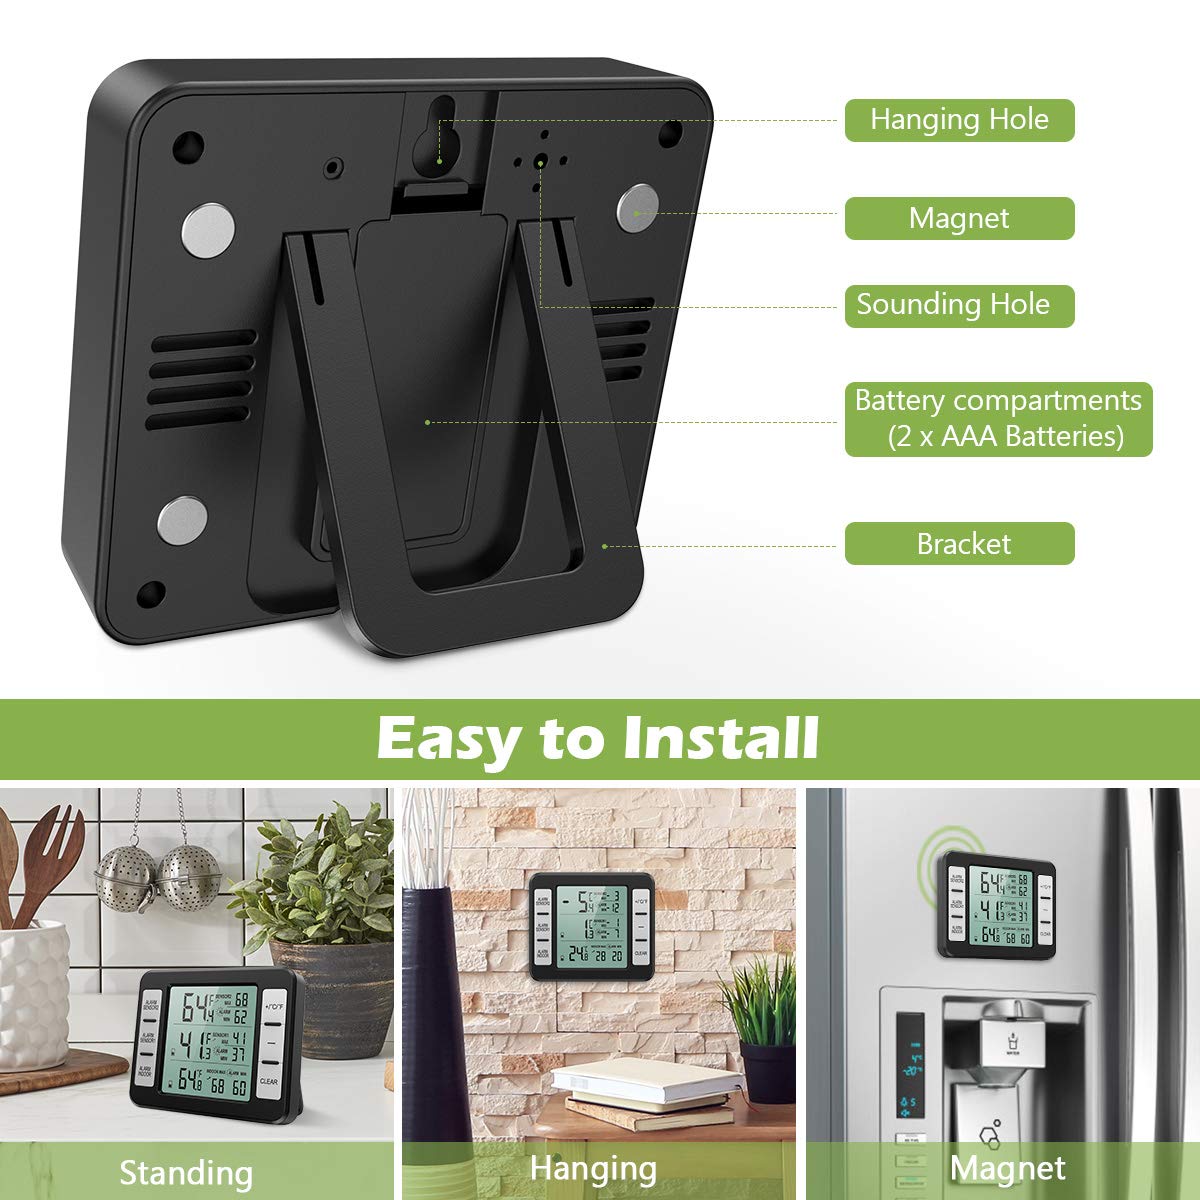
Image 4.2: Installation options for the main display unit.

Image 4.3: Example placement of remote sensors inside a refrigerator.
5. Operating Instructions
5.1 Display Overview
The main display unit shows indoor temperature and the temperatures from the two remote sensors. It also indicates maximum and minimum recorded temperatures and alarm settings.

Image 5.1: Main display unit with labeled components.
- ALARM SENSOR2: Button for setting alarm for Sensor 2.
- ALARM SENSOR1: Button for setting alarm for Sensor 1.
- ALARM INDOOR: Button for setting alarm for Indoor temperature.
- +/°C/°F: Button to increase values during alarm setup or switch between Celsius and Fahrenheit.
- -: Button to decrease values during alarm setup.
- CLEAR: Button to clear recorded MAX/MIN temperatures.
5.2 Temperature Unit Selection
Press the +/°C/°F button to toggle the temperature display between Celsius (°C) and Fahrenheit (°F).
5.3 Min/Max Temperature Record
The device automatically records the maximum and minimum temperatures for indoor, Sensor 1, and Sensor 2 readings. To clear these records, press the CLEAR button.
5.4 Temperature Alarm Setup
The device features an audible alarm that can be set for each temperature channel (Indoor, Sensor 1, Sensor 2).
- Press and hold the corresponding alarm button (ALARM INDOOR, ALARM SENSOR1, or ALARM SENSOR2) for 3 seconds to enter the temperature alarm setup mode for that sensor.
- While the value is flashing, use the + or - buttons to adjust the desired maximum (MAX) or minimum (MIN) alarm temperature.
- Press the alarm button again to confirm the setting and exit the setup mode. This prevents false alarms during normal use, such as when a refrigerator door is briefly opened.

Image 5.2: Steps for setting the temperature alarm.
6. Maintenance
6.1 Cleaning
Wipe the main unit and sensors clean with a soft, damp cloth. Do not use abrasive cleaners or immerse the devices in water. The sensors are designed to be freezer safe, but direct water exposure should be avoided.
6.2 Battery Replacement
When the battery indicator on the display shows low power, replace the batteries in the respective unit (main unit or sensor) with new ones of the correct type and polarity. Remove batteries if the device will not be used for an extended period.
7. Troubleshooting
| Problem | Possible Cause | Solution |
|---|---|---|
| No display on main unit | Dead or incorrectly installed batteries. | Check battery polarity and replace with fresh AAA batteries. |
| Remote sensor not displaying temperature | Dead or incorrectly installed batteries in sensor; sensor out of range; interference. | Replace sensor batteries (AA). Move sensor closer to the main unit. Avoid placing near large metal objects or electronics that may cause interference. |
| Inaccurate temperature readings | Sensor placed too close to heat/cold source; environmental factors. | Relocate the sensor to a more central position within the monitored area. Allow time for the sensor to stabilize. |
| Alarm not sounding or setting | Incorrect alarm settings; device malfunction. | Review alarm setup steps (Section 5.4) to ensure correct MAX/MIN values are set. If issue persists, contact customer support. |
8. Specifications
- Model: WA50B
- Indoor Temperature Range: -10℃ to 60℃ (14℉ to 140℉)
- Outdoor Temperature Range: -40℃ to 60℃ (-40℉ to 140℉)
- Transmission Range: Up to 100 meters / 328 feet (in open area)
- Power Source (Main Unit): 2 x AAA batteries (not included)
- Power Source (Remote Sensors): 2 x AA batteries per sensor (4 x AA total, not included)
- Main Unit Dimensions: Approximately 3.7 in (L) x 3.1 in (H) x 0.8 in (W)
- Remote Sensor Dimensions: Approximately 1.4 in (L) x 4.1 in (H) x 0.6 in (W)
- Material: Plastic
- Display Type: LCD

Image 8.1: Product dimensions for the main unit and remote sensors.
9. Warranty and Support
KeeKit is committed to providing quality products and customer satisfaction. This product comes with the following:
- 1-Year Warranty: Covers manufacturing defects and malfunctions under normal use.
- 30-Day Return Guarantee: For eligible returns within 30 days of purchase.
- 90-Day Replacement Guarantee: For product replacements within 90 days of purchase due to covered issues.
- 24/7 Online Customer Support: Assistance available around the clock.
- Lifetime Technical Support Service: Ongoing technical assistance for the lifespan of the product.
For any questions, troubleshooting, or warranty claims, please contact KeeKit customer support through the official website or your purchase platform.