Introduction
This manual provides detailed instructions for the installation, operation, and maintenance of your MSI MAG B460M Mortar Gaming Motherboard. Designed for 10th Gen Intel Core processors, this motherboard offers robust performance and features for a stable computing experience. Please read this manual thoroughly before proceeding with installation or use.
Safety Information
Always observe the following safety precautions to prevent damage to the motherboard or injury to yourself:
- Disconnect the power cord from the wall outlet before touching any component.
- Wear an anti-static wrist strap when handling components to prevent electrostatic discharge (ESD).
- Handle components by their edges; avoid touching pins or circuitry.
- Ensure proper ventilation in your PC case to prevent overheating.
- Keep the motherboard away from moisture and extreme temperatures.
Package Contents
Verify that all items listed below are present in your motherboard package:

Image: Contents of the MSI MAG B460M Mortar Motherboard retail box, including the motherboard, user manual, quick installation guide, MSI case badge, product registration card, driver DVD, and two SATA cables.
- MSI MAG B460M Mortar Motherboard
- User Manual
- Quick Installation Guide
- MSI Case Badge
- Product Registration Card
- Driver DVD
- 2 x SATA Cables
Motherboard Layout and Features
Familiarize yourself with the key components and connectors on your motherboard.

Image: Top-down view of the MSI MAG B460M Mortar Motherboard highlighting its premium thermal solution, including an extended heatsink, M.2 Shield Frozr, heatsinks with 7W/mK thermal pad, and pump fan support.
- Extended Heatsink: Enlarged heatsink for improved heat dissipation.
- M.2 Shield Frozr: Thermal solution for M.2 SSDs to prevent throttling.
- Heatsinks with 7W/mK Thermal Pad: High-quality thermal pads for efficient heat transfer.
- Pump Fan Support: Dedicated header for liquid cooling pump.
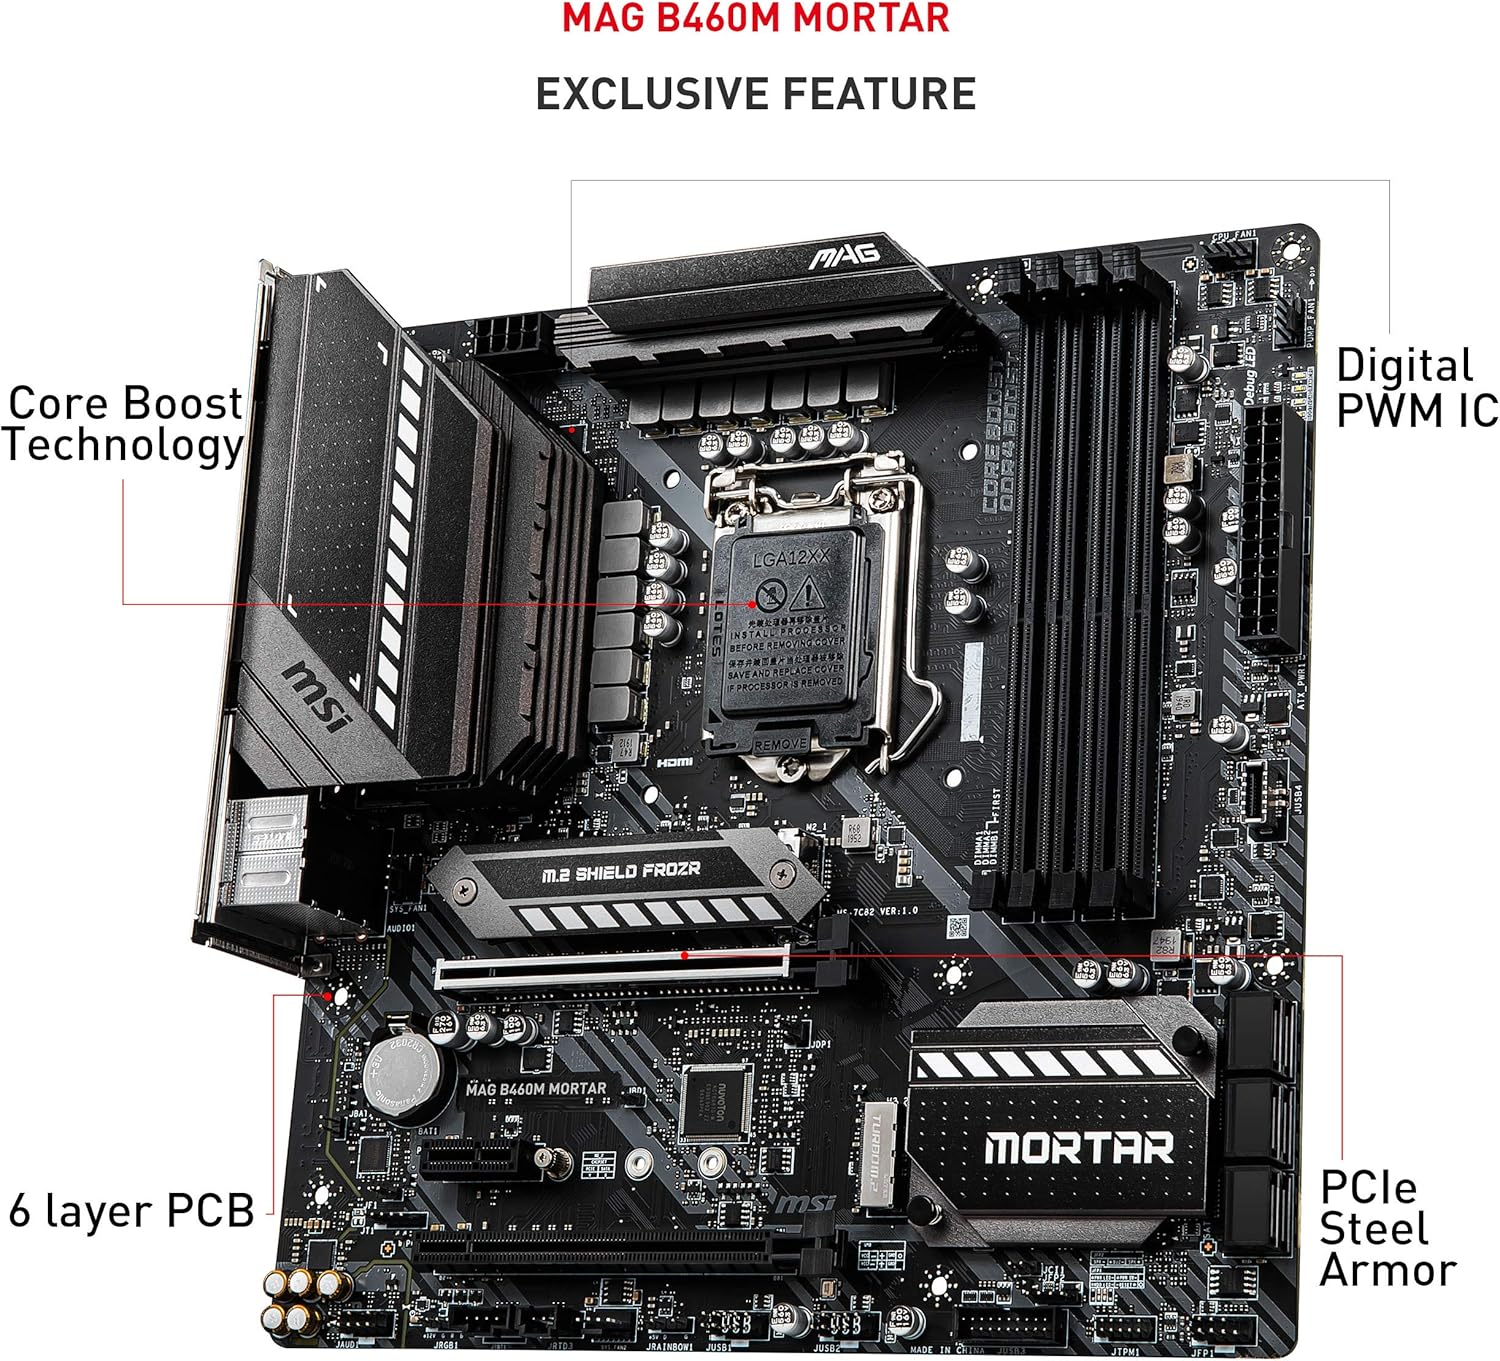
Image: Angled view of the MSI MAG B460M Mortar Motherboard, pointing out exclusive features such as Core Boost Technology, Digital PWM IC, 6-layer PCB, and PCIe Steel Armor.
- Core Boost Technology: Optimized power delivery for multi-core processors.
- Digital PWM IC: Ensures precise and stable power delivery to the CPU.
- 6-layer PCB: Enhanced PCB design for improved signal integrity and durability.
- PCIe Steel Armor: Reinforced PCIe slots for heavy graphics cards.

Image: Another angled view of the MSI MAG B460M Mortar Motherboard, highlighting high-speed transmission features like Turbo USB, DDR4 Boost, 2.5G Network Solution, and Turbo M.2.
- Turbo USB: Optimized USB ports for faster data transfer.
- DDR4 Boost: Isolated memory circuitry for optimal performance and stability.
- 2.5G Network Solution: High-speed Ethernet for reliable network connectivity.
- Turbo M.2: M.2 slots supporting NVMe SSDs for ultra-fast storage.

Image: Detailed view of the rear I/O panel of the MSI MAG B460M Mortar Motherboard, showing ports for PS/2 keyboard/mouse, DisplayPort, HDMI, USB 3.2 Gen 1 (Type-A and Type-C), 2.5G LAN, HD Audio Connectors, and Optical S/PDIF OUT.
- PS/2 Keyboard / Mouse Port: For legacy peripherals.
- DisplayPort & HDMI: Video output ports.
- USB 3.2 Gen 1 (Type-A & Type-C): High-speed USB connectivity.
- 2.5G LAN: High-speed wired network connection.
- HD Audio Connectors & Optical S/PDIF OUT: Audio input/output.
Setup and Installation
Follow these steps for proper installation of your motherboard and components.
1. CPU Installation (LGA 1200 Socket)
- Locate the LGA 1200 socket on the motherboard.
- Open the CPU socket lever and lift the metal load plate.
- Carefully align the notches on your 10th Gen Intel Core processor with the keys on the socket.
- Gently place the CPU into the socket without forcing it.
- Close the load plate and secure it with the lever.
- Install the CPU cooler according to its manufacturer's instructions.
2. Memory (RAM) Installation
- Locate the DDR4 DIMM slots. For dual-channel configuration, refer to the motherboard manual for recommended slot pairing.
- Open the clips at both ends of the DIMM slot.
- Align the notch on the DDR4 memory module with the key in the DIMM slot.
- Press down firmly on both ends of the memory module until the clips snap into place.
3. Storage Device Installation
The motherboard supports both M.2 NVMe SSDs and SATA drives.
M.2 SSD Installation:
- Locate the M.2 slots and remove the M.2 Shield Frozr heatsink if present.
- Insert the M.2 SSD into the slot at a 30-degree angle.
- Gently push down the SSD and secure it with the provided screw or M.2 standoff.
- Reinstall the M.2 Shield Frozr heatsink.
SATA Drive Installation:
- Connect one end of a SATA data cable to a SATA port on the motherboard.
- Connect the other end of the SATA data cable to your SATA HDD/SSD.
- Connect a SATA power cable from your power supply unit (PSU) to the drive.
4. Graphics Card (GPU) Installation
- Locate the primary PCIe x16 slot (often reinforced with Steel Armor).
- Open the retention clip at the end of the slot.
- Align your graphics card with the slot and press down firmly until it is seated and the clip snaps into place.
- Secure the graphics card to the PC case with screws.
- Connect any necessary PCIe power cables from your PSU to the graphics card.
5. Power Connections
- Connect the 24-pin ATX main power connector from your PSU to the motherboard.
- Connect the 8-pin (or 4+4-pin) ATX 12V CPU power connector from your PSU to the motherboard.
- Connect any case fans, front panel connectors (USB, audio, power/reset buttons, LEDs) to their respective headers on the motherboard. Refer to the motherboard manual for exact header locations.
Operating Instructions
1. First Boot and BIOS/UEFI Setup
- After assembling your PC, connect a monitor, keyboard, and mouse.
- Power on your system. Press the DEL key repeatedly during startup to enter the BIOS/UEFI setup utility.
- In the BIOS, you can configure boot order, system time, fan speeds, and other advanced settings.
- Save changes and exit the BIOS to continue with operating system installation.
2. Driver Installation
After installing your operating system, install the necessary drivers for optimal performance. Use the included Driver DVD or download the latest drivers from the MSI website.
- Chipset Drivers
- LAN Drivers (for 2.5G Ethernet)
- Audio Drivers
- Graphics Drivers (for integrated graphics or discrete GPU)
- USB Drivers
Maintenance
Regular maintenance helps ensure the longevity and stable performance of your motherboard.
1. Cleaning
- Periodically clean dust from the motherboard and case fans using compressed air.
- Ensure the system is powered off and unplugged before cleaning.
- Avoid using liquid cleaners directly on components.
2. BIOS Updates
Check the MSI website for the latest BIOS updates. BIOS updates can improve system stability, compatibility, and performance. Follow MSI's instructions carefully when updating the BIOS to avoid system damage.
Troubleshooting
This section addresses common issues you might encounter.
- No Power: Ensure all power cables (24-pin ATX, 8-pin CPU) are securely connected. Check PSU functionality.
- No Display: Verify that the monitor is connected to the correct video output (either motherboard or graphics card). Reseat the graphics card and RAM modules.
- System Instability/Crashes: Check RAM seating, CPU cooler installation, and ensure all drivers are up to date. Monitor temperatures.
- Network Connectivity Issues: Ensure LAN cable is properly connected. Install or update LAN drivers. Check router/modem.
Product Overview Video
Video: An official product overview video from MSI, showcasing the key features and design of the MSI MAG B460M Mortar Motherboard. This video provides a visual guide to the motherboard's capabilities and design elements.
Specifications
| Feature | Detail |
|---|---|
| Brand | MSI |
| Series | MAG B460M MORTAR |
| Item Model Number | B460M Mortar |
| CPU Socket | LGA 1200 |
| Compatible Processors | 10th Gen Intel Core / Pentium Celeron |
| Chipset Type | Intel B460 |
| RAM Memory Technology | DDR4 |
| Memory Speed | Up to 2933 MHz |
| Number of USB 2.0 Ports | 2 |
| LAN | 2.5G LAN with LAN Manager |
| Storage | Dual M.2 Slots, SATA ports |
| Audio | Audio Boost |
| Product Dimensions | 9.6 x 9.6 x 1.5 inches |
| Item Weight | 3.17 pounds |
| Platform | Windows 10 |
Warranty and Support
For warranty information and technical support, please refer to the official MSI website or contact MSI customer service. Keep your proof of purchase for warranty claims.
Online Resources:


