1. Introduction
The AVMatrix SC2030 is a professional-grade cross converter designed for seamless conversion between SDI and HDMI signals. This versatile device supports up/down scaling and frame rate conversion, making it suitable for various broadcasting and AV post-production applications. It also features analog audio embedding for comprehensive signal management. Control and configuration are easily managed via built-in DIP switches or PC software through a micro USB connection.
Key Features:
- Input: 1x HDMI or 1x SDI, 1x Analog Audio
- Output: 2x 3G-SDI, 1x HDMI
- Up/down scaling and frame rate conversion capabilities
- Analog audio embedding
- Automatic detection and configuration for HDMI/SDI inputs
- Easy control via DIP switches or PC software (Micro USB)
- Dual threaded locking power for redundant power supply
- Detachable bracket design for wall mounting
2. Safety Information
Please read and understand all safety instructions before operating this device. Failure to follow these instructions may result in electric shock, fire, or damage to the product.
- Power Supply: Use only the specified power adapter. Ensure the power source voltage is compatible with the device. The device supports dual threaded locking power for redundancy.
- Ventilation: Do not block any ventilation openings. Ensure adequate airflow around the unit to prevent overheating.
- Moisture: Do not expose the device to rain, moisture, or liquids. Avoid placing objects filled with liquids on or near the device.
- Cleaning: Disconnect power before cleaning. Use a dry, soft cloth. Do not use liquid or aerosol cleaners.
- Servicing: Do not attempt to service this product yourself. Refer all servicing to qualified service personnel.
- Placement: Place the device on a stable, flat surface. Avoid placing it in direct sunlight or near heat sources.
3. Product Overview
The AVMatrix SC2030 is a compact and robust converter designed for professional video environments. Below is a visual guide to its various ports and controls.

Figure 3.1: Front and Rear Panel Overview of the SC2030 Converter. This image displays the input ports (SDI In, HDMI In, Audio In, USB) on one side and output ports (DC Power 2, DC Power 1, HDMI Out, SDI Out 2, SDI Out 1) on the other side, along with the DIP switches.
Input Ports:
- SDI IN: Connect your 3G/HD/SD-SDI source here.
- HDMI IN: Connect your HDMI source here.
- AUDIO IN: Connect an analog audio source (3.5mm jack) for embedding into the output signal.
- USB: Micro USB port for PC software control and power supply.
Output Ports:
- SDI OUT 1 & 2: Two 3G-SDI outputs for connecting to SDI monitors or other devices.
- HDMI OUT: HDMI output for connecting to HDMI displays.
- POWER 1 & 2: Dual threaded locking power inputs for redundant power supply, ensuring continuous operation.

Figure 3.2: Side view of the SC2030 Converter highlighting the DIP switches for configuration.
4. Setup and Connection
Follow these steps to set up your AVMatrix SC2030 converter:
- Power Connection: Connect the provided power adapter to either POWER 1 or POWER 2 input on the converter. For redundancy, connect a second power adapter to the other power input.
- Input Source Connection:
- For SDI input: Connect your SDI source device (e.g., camera, SDI DVR) to the SDI IN port using a BNC cable.
- For HDMI input: Connect your HDMI source device (e.g., camera, Blu-Ray DVD, game console) to the HDMI IN port using an HDMI cable.
- For analog audio embedding: Connect your analog audio source to the AUDIO IN (3.5mm jack) port.
- Output Device Connection:
- For SDI output: Connect your SDI display or other SDI devices to the SDI OUT 1 and/or SDI OUT 2 ports using BNC cables.
- For HDMI output: Connect your HDMI display or projector to the HDMI OUT port using an HDMI cable.
- Configuration (DIP Switches): Before powering on, configure the desired output format, audio embedding, and control mode using the DIP switches. Refer to the "Operating Instructions" section for detailed DIP switch settings.
- Power On: Once all connections are secure and DIP switches are set, connect the power adapter(s) to a power outlet. The device will power on automatically.
5. Operating Instructions
The SC2030 offers flexible control options via DIP switches or PC software. The device automatically detects the input signal (HDMI or SDI).
5.1 DIP Switch Configuration
The DIP switches allow you to set the output resolution, frame rate, audio embedding options, and control mode. The table below details the functions of each DIP switch (1=ON, 0=OFF).
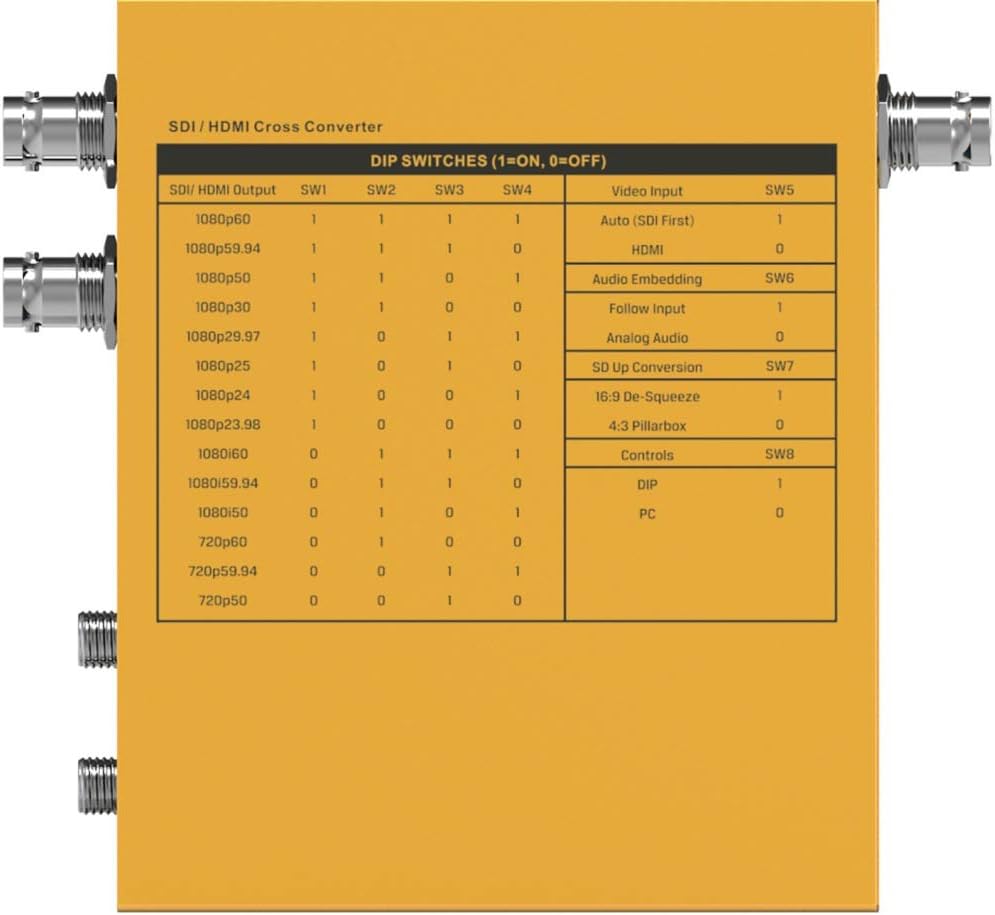
Figure 5.1: Detailed DIP Switch Settings for the SC2030. This table shows how to configure SDI/HDMI output, video input, audio embedding, SD up conversion, and control modes using the 8 DIP switches.
DIP Switch Functions:
- SW1-SW4 (SDI/HDMI Output): These switches control the output resolution and frame rate. Refer to the table in Figure 5.1 for specific combinations (e.g., 1080p60, 1080p59.94, 720p60).
- SW5 (Video Input):
- 1: Auto (SDI First) - Prioritizes SDI input.
- 0: HDMI - Forces HDMI input.
- SW6 (Audio Embedding):
- 1: Follow Input - Audio follows the selected video input.
- 0: Analog Audio - Embeds audio from the 3.5mm analog audio input.
- SW7 (SD Up Conversion):
- 1: 16:9 De-Squeeze - Converts 4:3 SD input to 16:9.
- 0: 4:3 Pillarbox - Maintains 4:3 aspect ratio with pillarbox bars.
- SW8 (Controls):
- 1: DIP - Control via physical DIP switches.
- 0: PC - Control via PC software connected via USB.
5.2 PC Software Control
For advanced configuration and real-time monitoring, connect the SC2030 to a PC via the Micro USB port. Ensure SW8 is set to '0' (PC control mode). Download and install the official AVMatrix control software from the manufacturer's website. The software provides a graphical interface to adjust all settings available via DIP switches, plus potentially more granular control and firmware updates.
6. Maintenance
Proper maintenance ensures the longevity and optimal performance of your SC2030 converter.
- Cleaning: Regularly wipe the exterior of the device with a soft, dry, lint-free cloth. Do not use harsh chemicals, solvents, or abrasive cleaners.
- Ventilation: Ensure that the ventilation holes are free from dust and obstructions.
- Cable Connections: Periodically check all cable connections for tightness and wear. Loose connections can lead to signal degradation.
- Storage: If storing the device for an extended period, disconnect it from power and store it in a cool, dry place away from direct sunlight and extreme temperatures.
- Firmware Updates: Check the AVMatrix website periodically for firmware updates. Keeping the firmware updated can improve performance and add new features.
7. Troubleshooting
If you encounter issues with your SC2030 converter, refer to the following common problems and solutions:
- No Video Output:
- Verify all cables (HDMI, SDI) are securely connected.
- Ensure the input source is active and outputting a signal.
- Check DIP switch settings for correct output resolution and input selection (SW5).
- Try a different input source or output display to isolate the problem.
- Ensure the power adapter is connected and the device is powered on.
- No Audio Output:
- Check audio cable connections.
- Verify DIP switch SW6 is set correctly for audio embedding (Follow Input or Analog Audio).
- Ensure the audio source is active and outputting sound.
- Check audio settings on the connected display or receiving device.
- Incorrect Resolution/Frame Rate:
- Adjust DIP switches SW1-SW4 to match the desired output resolution and frame rate.
- Ensure the connected display supports the selected resolution and frame rate.
- Device Not Responding to PC Software:
- Ensure SW8 is set to '0' (PC control mode).
- Verify the Micro USB cable is properly connected.
- Check if the AVMatrix control software is correctly installed and running on your PC.
- Try restarting the PC and the converter.
- Overheating:
- Ensure the device has adequate ventilation and is not covered.
- Operate the device within its specified operating temperature range.
8. Specifications
Below are the technical specifications for the AVMatrix SC2030 Updown Cross Converter:
| Feature | Specification |
|---|---|
| Brand | AVmatrix |
| Model Number | SC2030 |
| Mounting Type | Wall Mount |
| Interface Type | HDMI, SDI |
| Number of Channels | 2 |
| Product Dimensions | 6.8 x 6.7 x 3.7 inches |
| Item Weight | 2.44 pounds |
| SDI Video Input | SD/HD/3G-SDI x 1 |
| HDMI Video Input | HDMI type A x 1 |
| Analog Audio Input | 1/8" (3.5mm) jack x 1 |
| SDI Video Output | SD/HD/3G-SDI x 2 |
| HDMI Video Output | HDMI type A x 1 |
| SDI Input Format Support | 1080p 60/59.94/50/30/29.97/25/24/23.98, 1080i 60/59.94/50, 720p 60/59.94/50/30/29.97/25/24/23.98, 625i, 525i |
| HDMI Input Format Support | 1080p 60/59.94/50/30/29.97/25/24/23.98, 1080i 60/59.94/50, 720p 60/59.94/50, 480i, 60/59.94 |
| SDI Compliance | SMPTE 292M, SMPTE 259M, SMPTE 424M |
| SDI Color Space and Precision | YUV 4:2:2 |
| HDMI Input Color Space and Precision | RGB 4:4:4, YUV 4:2:2, YUV 4:4:4 |
| SDI/HDMI Output Format Support | 1080p 60/59.94/50, 1080i 60/59.94/50, 720p 60/59.94/50 |
| Power Connector | Threaded locking connector, Micro USB |
| Voltage Range | USB 3.3-5V, DC 6-23V |
| Power Consumption | 4W |
| Operating Temperature | -20°C ~ 60°C |
| Storage Temperature | -30°C ~ 70°C |
| Relative Humidity | 0% ~ 90% non-condensing |
| Warranty | 3 year limited warranty |

Figure 8.1: Detailed Technical Specifications of the SC2030 Converter, including inputs, outputs, supported formats, power, and environmental conditions.
9. Warranty and Support
9.1 Warranty Information
The AVMatrix SC2030 converter comes with a 3-year limited warranty from the date of purchase. This warranty covers defects in materials and workmanship under normal use. It does not cover damage caused by misuse, accident, unauthorized modifications, or external causes such as power surges.
For warranty claims, please retain your proof of purchase and contact AVMatrix customer support.
9.2 Customer Support
For technical assistance, troubleshooting, or general inquiries regarding your AVMatrix SC2030, please visit the official AVMatrix website or contact their customer support team. You may find FAQs, driver downloads, and additional resources online.


