1. Introduction
The Viark Lil is a compact and efficient Full HD 1080p DVB-S2 satellite receiver designed for high-quality television viewing. It supports H.265 HEVC decoding and offers versatile connectivity options including LAN and USB WiFi with an external antenna. This manual provides detailed instructions for setting up, operating, and maintaining your Viark Lil receiver to ensure optimal performance.
2. Safety Information
- Electrical Safety: Ensure the receiver is connected to a power source with the correct voltage (12 Volts). Do not expose the device to rain or moisture to prevent electric shock or fire.
- Ventilation: Place the receiver in a well-ventilated area. Do not block ventilation openings. Overheating can cause malfunction.
- Handling: Avoid dropping or subjecting the receiver to strong impacts. Do not attempt to open the casing; refer all servicing to qualified personnel.
- Cleaning: Disconnect the power before cleaning. Use a soft, dry cloth. Do not use liquid or aerosol cleaners.
3. Package Contents
Please check the box for the following items:
- Viark Lil Satellite Receiver
- Remote Control (requires 2 AAA batteries, included)
- External Power Supply
- User Manual
- External WiFi Antenna (USB)
4. Product Overview
4.1 Front Panel

Image 1: Front view of the Viark Lil receiver, showing the display, power/signal indicators, and navigation buttons.
The front panel features a digital display that shows channel numbers or time. It also includes LED indicators for Power and Signal status, along with basic navigation buttons (Up, Down, Power) for direct control.
4.2 Rear Panel

Image 2: Rear view of the Viark Lil receiver, detailing all available ports: LNB IN, two USB 2.0 ports, LAN, HDMI, Coaxial, AV, and DC-12V power input.
The rear panel provides all necessary connection ports:
- LNB IN: For connecting the satellite dish cable.
- USB 2.0 (x2): For connecting external storage devices (for PVR/Timeshift) or the included WiFi antenna.
- LAN: Ethernet port for wired internet connection.
- HDMI: High-Definition Multimedia Interface for connecting to your TV.
- COAXIAL: Digital audio output.
- AV: Analog video/audio output (3.5mm jack).
- DC-12V: Power input for the external power adapter.
4.3 Remote Control
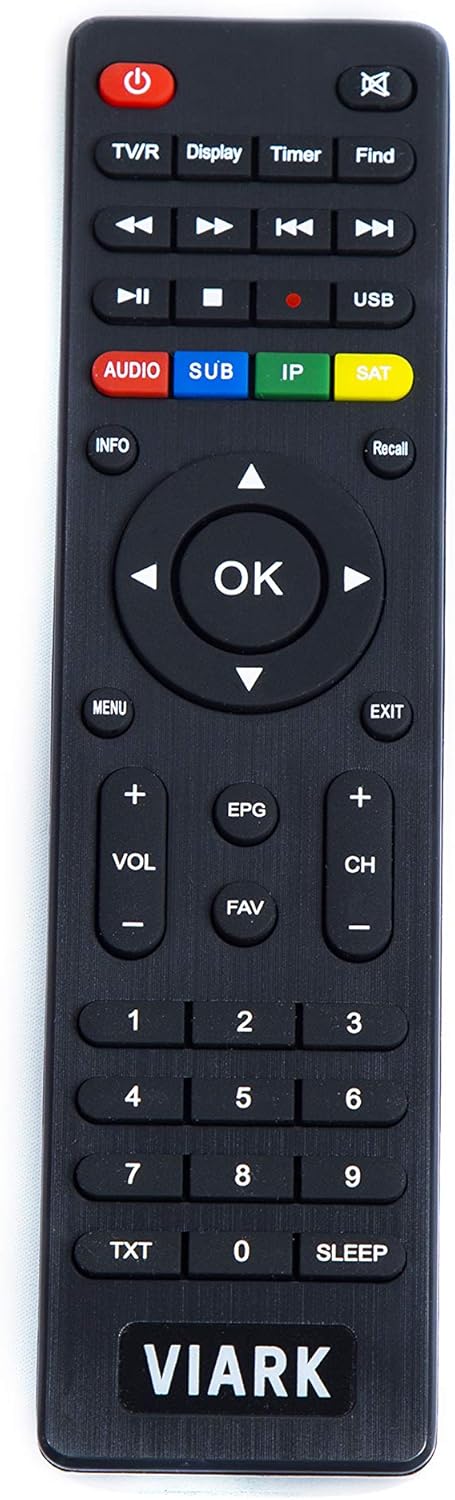
Image 3: A close-up of the Viark Lil remote control, displaying its various buttons for power, TV/R, display, timer, find, media playback, audio, subtitle, IP, SAT, info, recall, OK, menu, exit, volume, EPG, FAV, channel, number pad, TXT, and sleep functions.
The remote control allows full operation of the receiver. It includes buttons for power, channel navigation, volume control, menu access, media playback, PVR functions, and dedicated buttons for audio, subtitles, and satellite selection.
5. Setup
5.1 Connecting the Receiver
- Satellite Dish Connection: Connect the cable from your satellite dish to the LNB IN port on the rear panel.
- TV Connection: Connect an HDMI cable from the HDMI port on the receiver to an HDMI input on your television. Alternatively, use an AV cable for older TVs.
- Network Connection (Optional):
- Wired: Connect an Ethernet cable from your router to the LAN port.
- Wireless: Insert the provided USB WiFi antenna into one of the USB 2.0 ports.
- Power Connection: Connect the external power adapter to the DC-12V port on the receiver, then plug the adapter into a power outlet.
5.2 Initial Power On and First-Time Setup
After connecting all cables, turn on your TV and select the correct HDMI input. The receiver should power on automatically or can be turned on using the power button on the front panel or remote control. The first time you power on, a setup wizard will guide you through basic configurations:
- Language Selection: Choose your preferred language for the menu.
- Time Zone: Set your local time zone.
- Satellite Configuration: Select your satellite(s) and configure LNB settings (e.g., Universal, Single, DiSEqC 1.0/1.1/1.2/1.3 (USALS)).
- Channel Scan: Perform an automatic or manual channel scan to find available channels. The receiver supports blind search, FastScan, multi-satellite search, multi-TP search, and PID search.
5.3 Network Setup
To access internet-dependent features, configure your network connection:
- Wired (LAN): If an Ethernet cable is connected, the receiver should automatically obtain an IP address via DHCP.
- Wireless (WiFi): Go to the Network Settings menu, select 'WiFi', and choose your network from the list. Enter the password if prompted.
6. Operating Instructions
6.1 Basic Functions
- Power On/Off: Press the POWER button on the remote or front panel.
- Channel Change: Use the CH+/- buttons or the number pad on the remote.
- Volume Control: Use the VOL+/- buttons.
- Menu Access: Press the MENU button to access the main menu for settings and features.
- Information: Press the INFO button to display current channel information.
6.2 Channel Management
The receiver supports managing up to 200 satellites, 8000 transponders, and 20000 channels. You can add and edit satellites and transponders. Create favorite channel groups for quick access. The Recall function allows you to quickly switch between recently viewed channels.
6.3 PVR and Timeshift
Connect a USB storage device (e.g., USB flash drive or external hard drive) to one of the USB 2.0 ports to enable PVR (Personal Video Recorder) and Timeshift functions.
- PVR: Record programs directly to your USB device. Schedule recordings via the EPG (Electronic Program Guide).
- Timeshift: Pause live television and resume watching later.
6.4 Media Playback
The Viark Lil receiver includes a multimedia player that supports various formats:
- Video: AVI, MKV, MP4, MOV, 3GP, MPG, VOB, DAT, TS, M2TS, FLV.
- Audio: MP3, WMA, FLAC, OGG, MP2.
You can pause, fast forward, rewind, skip tracks, and create music playlists.
6.5 System Settings
Access the main menu to configure various system settings:
- Audio/Subtitles: Select preferred audio tracks and subtitle languages. Supports Dolby Digital (AC3) and MPEG4 AAC-HE (AAC+).
- Teletext: Access teletext services.
- Parental Control: Set up parental locks for channels or programs.
- Resolution: Adjust video output resolution (480p, 480i, 576p, 576i, 720p, 1080i, 1080p).
- Weather Application: Access weather forecasts (requires internet connection).
7. Maintenance
7.1 Cleaning
To clean the receiver, first disconnect it from the power supply. Use a soft, dry, lint-free cloth to wipe the exterior. Do not use abrasive cleaners, waxes, or solvents.
7.2 Software Updates
Periodically check the manufacturer's website for available software updates. Updates can improve performance, add new features, or fix bugs. Follow the instructions provided with the update file carefully. Information regarding guaranteed software updates is not available.
8. Troubleshooting
If you encounter issues with your Viark Lil receiver, refer to the following common problems and solutions:
| Problem | Possible Cause | Solution |
|---|---|---|
| No Power | Power cable disconnected, power outlet faulty, power adapter malfunction. | Check power cable connection. Try a different power outlet. Ensure the power adapter is working. |
| No Signal | Satellite cable disconnected, dish misalignment, incorrect LNB settings. | Check LNB IN cable connection. Verify satellite dish alignment. Review LNB and satellite settings in the menu. |
| No Picture/Sound on TV | Incorrect HDMI/AV input selected on TV, faulty HDMI/AV cable, receiver not outputting signal. | Ensure TV is on the correct input. Try a different HDMI/AV cable. Restart the receiver. |
| No Internet Connection | LAN cable disconnected, incorrect WiFi password, router issue. | Check LAN cable. Re-enter WiFi password. Restart your router. |
| Remote Control Not Working | Dead batteries, obstructed IR sensor. | Replace batteries (2 AAA). Ensure no obstacles between remote and receiver. |
9. Specifications
| Feature | Description |
|---|---|
| Model Number | LIL |
| Brand | VIARK |
| Type | DVB-S2 Full HD Satellite Receiver |
| Decoding | MPEG-II/MPEG-IV/H.264/H.265 |
| Resolution | 480p & 480i, 576p & 576i, 720p 50 & 60 Hz, 1080i 50 & 60 Hz, 1080p 50 & 60 Hz |
| LNB Polarization | 13V/18V V/off, Imax = 300mA |
| Demodulation | QPSK, 8PSK, 16APSK, 32APSK |
| DiSEqC Support | 1.0/1.1/1.2/1.3 (USALS) |
| Flash Memory | 16 MB |
| DDR3 Memory | 2 GB |
| Video RAM | 128 Mbit/s |
| Tuner Functions | Blind search, FastScan, multi-satellite, multi-TP, auto/manual search, PID search |
| Channel Capacity | 200+ satellites, 8000 transponders, 20000 channels |
| PVR & Timeshift | Supported (with external USB storage) |
| Audio Output Mode | Surround (Dolby Digital AC3, MPEG4 AAC-HE) |
| Connectivity | LAN 10/100 Mbit/s, External USB WiFi, 2x USB 2.0, HDMI, Coaxial, AV |
| Compatible Devices | Television |
| Voltage | 12 Volts |
| Included Components | Receiver, remote with AAA batteries, external power supply, user manual |
10. Warranty and Support
Specific warranty details are not provided in the product description. For warranty claims, technical support, or further assistance, please contact the manufacturer, VIARK, or your point of purchase. Information regarding the availability of spare parts is not available.


