
CROSOFMI HCT-355
CROSOFMI Automatic Watering Timer
Model: HCT-355
Introduction
Thank you for choosing the CROSOFMI Automatic Watering Timer. This device is designed to simplify your garden irrigation, offering precise and flexible watering schedules to ensure your plants receive optimal hydration. With features like an automatic rain sensor, manual control, and child lock, this timer provides convenience and efficiency for various watering needs, from drip irrigation to sprinkler systems.

Figure 1: The CROSOFMI Automatic Watering Timer is versatile, suitable for drip irrigation, mist systems, pool filling, and sprinkler control.
Safety Information
- Do not use lithium batteries. Only use two 1.5V alkaline batteries.
- Ensure the battery compartment is sealed properly after battery installation to maintain waterproof integrity.
- Do not expose the device to extreme temperatures or direct sunlight for prolonged periods, as this may affect performance and lifespan.
- Keep out of reach of children when not in use, or activate the child lock feature.
- Do not disassemble or attempt to repair the device yourself. Contact customer support for assistance.
Product Overview
Familiarize yourself with the components and controls of your CROSOFMI Automatic Watering Timer.

Figure 2: The CROSOFMI Automatic Watering Timer, its packaging, and included accessories such as different hose connectors and sealing washers.
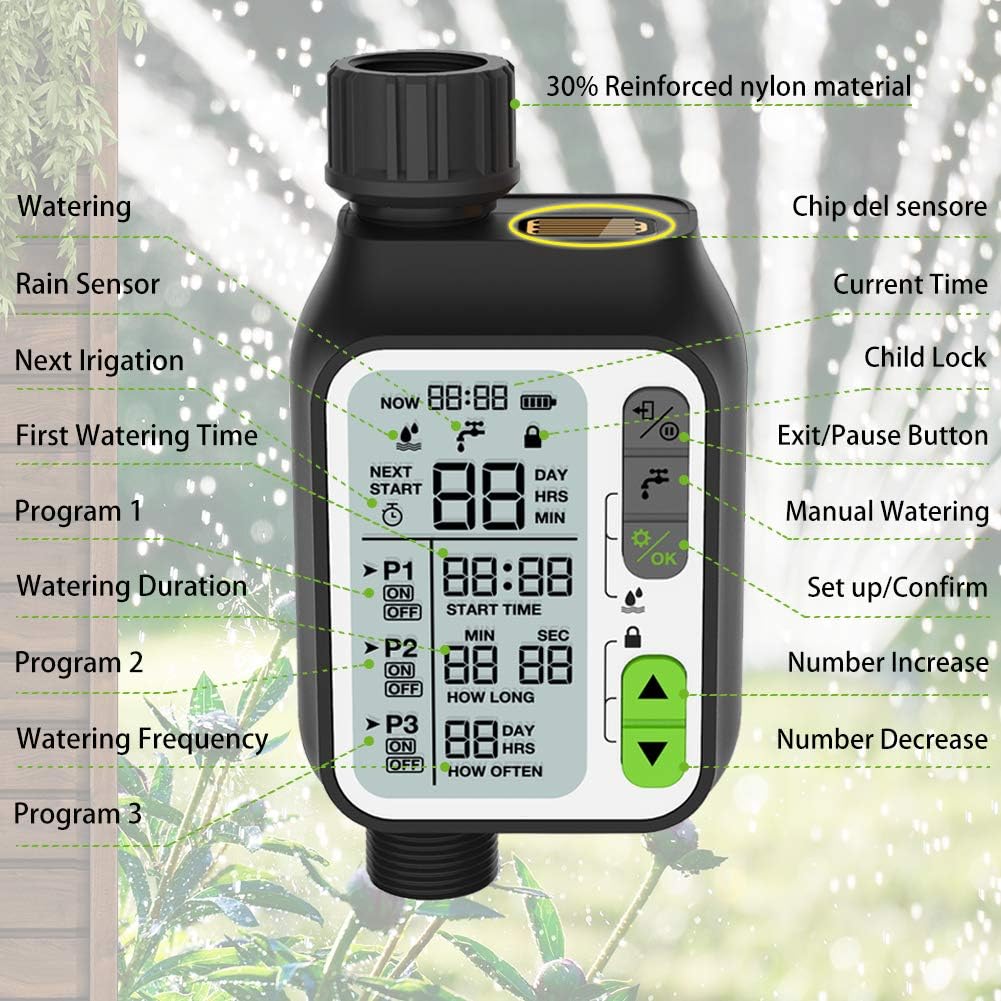
Figure 3: Front view of the timer showing the LCD display and control buttons. Key elements include the rain sensor chip, current time display, child lock indicator, exit/pause button, manual watering button, setup/confirm button, number increase/decrease buttons, and indicators for Program 1, 2, and 3, along with their watering duration and frequency settings.
Components:
- Main Unit: The timer body with LCD display and control buttons.
- Rain Sensor: Integrated chip on top for automatic rain detection.
- Inlet Connector: Connects to the water faucet (standard 3/4" or 1/2" with adapter).
- Outlet Connector: Connects to your garden hose or irrigation system.
- Battery Compartment: Located at the back, requires 2 x 1.5V AA alkaline batteries.
Setup
1. Battery Installation:
- Remove the battery cover on the back of the timer.
- Insert two new 1.5V AA alkaline batteries, ensuring correct polarity (+/-).
- Securely replace the battery cover to ensure a waterproof seal.
2. Connecting to Water Faucet:
The timer comes with fittings for both 3/4" NH standard (USA-type) and 1/2" BS standard (EU-type) hose faucets.

Figure 4: Connection diagram for NH standard (USA-type) 3/4" hose faucet and BS standard (EU-type) 1/2" hose faucet. Ensure the 3mm sealing ring is in place for a leak-free connection.
- Ensure the black sealing ring (3mm) is properly seated inside the inlet connector.
- If your faucet is 1/2", use the provided 1/2" adapter.
- Screw the timer onto your outdoor water faucet. Hand-tighten only to prevent damage.
3. Connecting to Hose/Irrigation System:
- Attach your garden hose or irrigation system to the outlet connector at the bottom of the timer.
- Ensure a secure connection to prevent leaks.
Operating Instructions
1. Setting Current Time:
- Press the SETUP/OK button to enter time setting mode. The hour digit will flash.
- Use the UP/DOWN arrows to adjust the hour.
- Press SETUP/OK again to move to minutes, then adjust with UP/DOWN arrows.
- Press SETUP/OK to confirm and exit.
2. Programming Watering Schedules (P1, P2, P3):
The timer allows for up to three independent watering programs. Each program can have a different start time, duration, and frequency.

Figure 5: Example of three distinct watering programs (P1, P2, P3) that can be set for various daily routines or needs.
- Press the SETUP/OK button repeatedly to cycle through P1, P2, P3 settings.
- Set Start Time: When the "START TIME" flashes, use UP/DOWN arrows to set the desired start hour and minute. Press SETUP/OK to confirm.
- Set Watering Duration: When "HOW LONG" flashes, use UP/DOWN arrows to set the watering duration from 1 second to 99 minutes. Press SETUP/OK to confirm.
- Set Watering Frequency: When "HOW OFTEN" flashes, use UP/DOWN arrows to set the frequency from 1 hour to 15 days. Press SETUP/OK to confirm.
- Repeat for P2 and P3 if desired. To disable a program, set its duration to "00:00".
3. Manual Watering:
- Press the MANUAL WATERING button (faucet icon).
- Use UP/DOWN arrows to set the desired manual watering duration.
- Press SETUP/OK to start manual watering. The timer will water for the set duration and then return to its programmed schedule.
- To stop manual watering early, press the EXIT/PAUSE button.
4. Automatic Rain Sensor:
The built-in rain sensor automatically detects rainfall and pauses the watering schedule to prevent overwatering and save water.

Figure 6: The automatic rain sensor chip on top of the timer. When rain is detected, the timer will automatically delay watering until the sensor is dry, resuming the schedule afterward.
- The rain sensor is always active. When the sensor detects sufficient moisture, it will automatically suspend scheduled watering.
- Watering will resume automatically once the sensor dries out.
5. Child Lock Function:
The child lock feature prevents accidental changes to your programmed settings.

Figure 7: The child lock feature, activated by pressing and holding the UP and DOWN arrow buttons simultaneously for 3 seconds. This prevents unintended program changes.
- To activate the child lock: Press and hold both the UP and DOWN arrow buttons simultaneously for 3 seconds. A lock icon will appear on the display.
- To deactivate the child lock: Press and hold both the UP and DOWN arrow buttons simultaneously for 3 seconds again. The lock icon will disappear.
Maintenance
- Cleaning: Wipe the exterior of the timer with a soft, damp cloth. Do not use abrasive cleaners or solvents.
- Battery Replacement: Replace batteries when the low battery indicator appears on the display. Always use new 1.5V AA alkaline batteries.
- Winter Storage: Before the first frost, disconnect the timer from the faucet and drain any remaining water. Store the timer indoors in a dry, frost-free location. Remove batteries if storing for an extended period.
- Filter Cleaning: Periodically check the filter screen inside the inlet connector for debris. Clean if necessary to ensure proper water flow.
Troubleshooting
| Problem | Possible Cause | Solution |
|---|---|---|
| Timer not watering. |
|
|
| Water leaking from connections. |
|
|
| Display is blank or dim. |
|
|
Specifications
| Feature | Detail |
|---|---|
| Model Number | HCT-355 |
| Brand | CROSOFMI |
| Color | Grey |
| Material | Rubber (likely referring to seals/gaskets), Reinforced Nylon Fiber (for connector) |
| Product Dimensions (L x W x H) | 21.08 x 12.95 x 6.6 cm |
| Item Weight | 530 grams |
| Watering Duration | 1 second to 99 minutes |
| Watering Frequency | 1 hour to 15 days |
| Programs | 3 independent programs |
| Power Source | 2 x 1.5V AA Alkaline Batteries (not included) |
| Special Features | Automatic Rain Sensor, Manual Watering, Child Lock |
| Waterproof Rating | IPX5 (implied by "Waterproof" and common for such devices) |
Warranty and Support
Specific warranty information is not provided in the product details. For warranty claims, technical support, or any questions regarding your CROSOFMI Automatic Watering Timer, please contact the retailer or CROSOFMI customer service directly. Refer to your purchase documentation for contact details.
For more information, you may visit the CROSOFMI Brand Store.
No Official Product Videos Available
Based on the provided product information, there are no official product videos from the seller available for embedding in this manual.
Ask a question about this manual
Ask about setup, troubleshooting, compatibility, parts, safety, or missing instructions. Manuals+ will review the question and use this page’s manual context to help answer it.