
1. Introduction
Thank you for choosing NORDRIVE Silence Aluminum Roof Bars. This manual provides essential information for the safe and correct installation, operation, and maintenance of your N15084 roof bars. Please read these instructions carefully before installation and retain them for future reference.
2. Safety Guidelines
- Maximum Load Capacity: Do not exceed the maximum load capacity specified for your vehicle's roof or the roof bars, whichever is lower. Refer to your vehicle's owner's manual for specific load limits.
- Secure Fastening: Ensure all components are securely fastened before driving. Check the tightness of all bolts and connections regularly, especially after the first few kilometers of driving and after driving on rough roads.
- Weight Distribution: Distribute the load evenly across the roof bars. Place heavier items at the bottom and center.
- Driving Speed: Adjust your driving speed to suit the load and road conditions. High speeds, sudden braking, or sharp turns can affect vehicle stability with a roof load.
- Height Clearance: Be aware of the increased height of your vehicle when roof bars and cargo are installed, especially when entering garages, car washes, or low-clearance areas.
- Aerodynamics and Noise: The aerodynamic profile is designed to minimize noise, but some wind noise may occur. Ensure all rubber seals are correctly seated.
- Regular Inspection: Periodically inspect the roof bars for any signs of wear, damage, or corrosion. Replace damaged parts immediately.
3. Package Contents
The NORDRIVE N15084 Silence Aluminum Roof Bar package typically includes:
- 2 x NORDRIVE Silence Aluminum Roof Bars (108 cm)
- Mounting feet and hardware (specific to vehicle fitment, sold separately or as part of a complete kit)
- Instruction manual
4. Installation Instructions
Follow these steps for proper installation of your NORDRIVE Silence roof bars. Ensure you have all necessary tools and vehicle-specific mounting kits before beginning.
4.1. Prepare the Roof Bars
- Unpack all components and verify against the package contents list.
- Identify the front and rear roof bars. The aerodynamic profile is designed for optimal airflow.
4.2. Attach Foot Assemblies to Roof Bars
The NORDRIVE Silence roof bars feature a lower groove for inserting and sliding the retractable foot attachments, along with a graduated positioning scale for simple and quick assembly.
- Slide the foot attachments into the lower groove of each roof bar.
- Use the integrated graduated scale on the side of the roof bar to ensure symmetrical positioning of the feet. This scale aids in precise alignment for your vehicle.
- Lightly tighten the foot attachments to allow for minor adjustments during vehicle mounting.

The side of the NORDRIVE Silence roof bar features a clear, graduated scale. This scale assists in precise and symmetrical positioning of the foot attachments, ensuring correct installation on the vehicle.
4.3. Mount Roof Bars to Vehicle
Refer to your vehicle-specific mounting kit instructions for precise attachment points and torque settings.
- Carefully place the assembled roof bars onto your vehicle's roof, aligning the foot assemblies with the designated mounting points.
- Adjust the position of the feet as needed to achieve a secure and level fit.
- Tighten all mounting bolts according to the torque specifications provided with your vehicle-specific kit. Ensure even tightening on both sides.
- After tightening, ensure the roof bars are firmly secured and do not move.

This image demonstrates the NORDRIVE Silence roof bars securely installed on the roof of a car. It provides a visual reference for the final appearance and positioning of the bars on a vehicle.
4.4. Using the T-Slot System
The NORDRIVE Silence roof bars feature a robust anodized aluminum alloy profile with a T-slot in the upper groove, designed for quick attachment of accessories. It includes a new patented PTO (Press-to-Open) system.
- To insert T-connectors for accessories, simply press down on the rubber profile in the T-slot. The PTO system allows insertion without removing the end cap.
- Slide the T-connector into the desired position.
- Once the accessory is secured, ensure the rubber profile is properly seated back into the groove to seal it and maintain aerodynamic efficiency.

This image shows a detailed view of the NORDRIVE Silence roof bar's end cap, highlighting the T-slot channel and the innovative 'Press-to-Open' (PTO) system for quick accessory attachment. A T-bolt is shown separately, ready for insertion.

A top-down view of the NORDRIVE Silence roof bar, showcasing the full length of the bar and the integrated rubber sealing strip. This strip covers the T-slot channel, protecting it from debris and further reducing wind noise.
5. Operation and Usage
- Loading Cargo: Always secure cargo firmly to the roof bars using appropriate straps or cargo carriers. Ensure no part of the cargo obstructs the driver's view or extends dangerously beyond the vehicle's dimensions.
- Check Fastenings: Before each journey, especially when carrying cargo, check that all roof bar and cargo fastenings are tight and secure.
- Wind Noise: The aerodynamic design and rubber profiles are engineered to minimize wind noise. Ensure all rubber strips are correctly seated in the T-slots to maintain this feature.
6. Maintenance and Care
- Cleaning: Clean the aluminum bars and rubber components regularly with mild soap and water. Avoid abrasive cleaners or solvents that could damage the finish or rubber.
- Inspection: Periodically inspect the roof bars for any signs of wear, cracks, corrosion, or loose components. Pay close attention to the rubber seals and end caps.
- Storage: If removing the roof bars for extended periods, store them in a dry, protected area to prevent damage and prolong their lifespan.
7. Troubleshooting
- Excessive Wind Noise: Ensure all rubber sealing profiles are correctly inserted into the T-slots. Check that the roof bars are installed symmetrically and are not twisted.
- Loose Fit: Re-check all mounting bolts and ensure they are tightened to the recommended torque specifications. Verify that the foot attachments are correctly seated on your vehicle's mounting points.
- Difficulty Inserting T-Connectors: Ensure the PTO (Press-to-Open) system is engaged by pressing down on the rubber strip. If the strip is damaged, it may need replacement.
8. Technical Specifications
| Feature | Specification |
|---|---|
| Model Number | N15084 |
| Length | 108 cm (S size) |
| Material | Anodized Aluminum Alloy, Rubber |
| Profile Dimensions (Cross-section) | 83 mm (width) x 28 mm (height) |
| Mounting Type | U-Bolt (with vehicle-specific feet) |
| Compatibility | Universal fit for cars (with appropriate vehicle-specific mounting kit) |
| Special Features | Aerodynamic profile, T-slot system, Patented PTO (Press-to-Open) system, Graduated positioning scale |
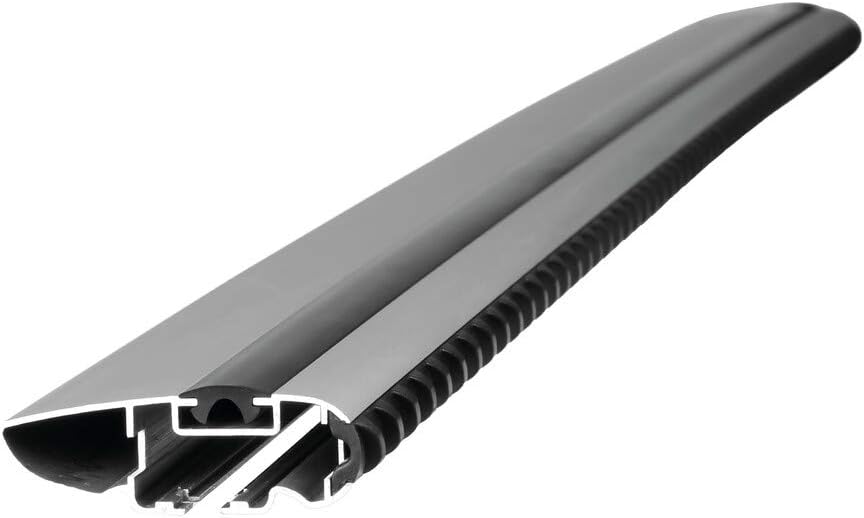
This image displays a cross-sectional view of the NORDRIVE Silence roof bar, illustrating its aerodynamic design. The internal structure includes channels for mounting and the rubber strip on top designed to reduce wind noise and improve airflow.

A technical diagram detailing the cross-sectional dimensions of the NORDRIVE Silence roof bar. It indicates a width of 83 mm and a height of 28 mm, crucial for compatibility with various accessories and vehicle roof types.
9. Warranty and Customer Support
For warranty information, please refer to the documentation provided with your purchase or contact your retailer. For technical support or inquiries, please reach out to NORDRIVE customer service through their official website or your point of purchase.