1. Introduction
This manual provides detailed instructions for the assembly, operation, and maintenance of your Tectake Bird Cage Model 402288-NL. This spacious aviary, designed with an elegant sloped roof, offers a comfortable and secure environment for small birds. Its thoughtful design includes features for easy access, cleaning, and mobility.
Please read these instructions carefully before assembly and use to ensure safe and correct operation of the product.
Included Components:
- Bird Cage Frame and Panels
- 4 Perches
- Feeder
- Water Dispenser
- Sand Tray
- Bottom Grid
- 4 Lockable Wheels
- Assembly Hardware

Figure 1: Fully assembled Tectake Bird Cage with birds.
2. Setup and Assembly
Follow these steps to assemble your Tectake Bird Cage. It is recommended to have two people for easier assembly.
- Unpack Components: Carefully remove all parts from the packaging and verify against the included components list. Place all parts on a clean, flat surface.
- Assemble the Base Frame: Connect the base frame components using the provided hardware. Ensure all connections are secure.
- Attach Wheels: Insert the four lockable wheels into the designated slots on the bottom of the base frame. Ensure they are firmly seated.
- Install Side Panels: Attach the side mesh panels to the base frame. Pay attention to the orientation of the panels, ensuring the door openings are correctly positioned.
- Install Front and Back Panels: Secure the front and back mesh panels to the base frame and side panels.
- Attach Roof: Place the sloped roof onto the top of the assembled cage structure and secure it with the appropriate hardware.
- Insert Bottom Grid and Sand Tray: Slide the bottom grid into its designated position above the base. Then, slide the sand tray into the slot beneath the bottom grid.
- Install Perches: Position the four perches at various heights and locations within the cage, as desired by your birds. Ensure they are securely fastened to the cage bars.
- Attach Feeder and Water Dispenser: Secure the feeder and water dispenser to the cage bars, typically near the doors for easy access.
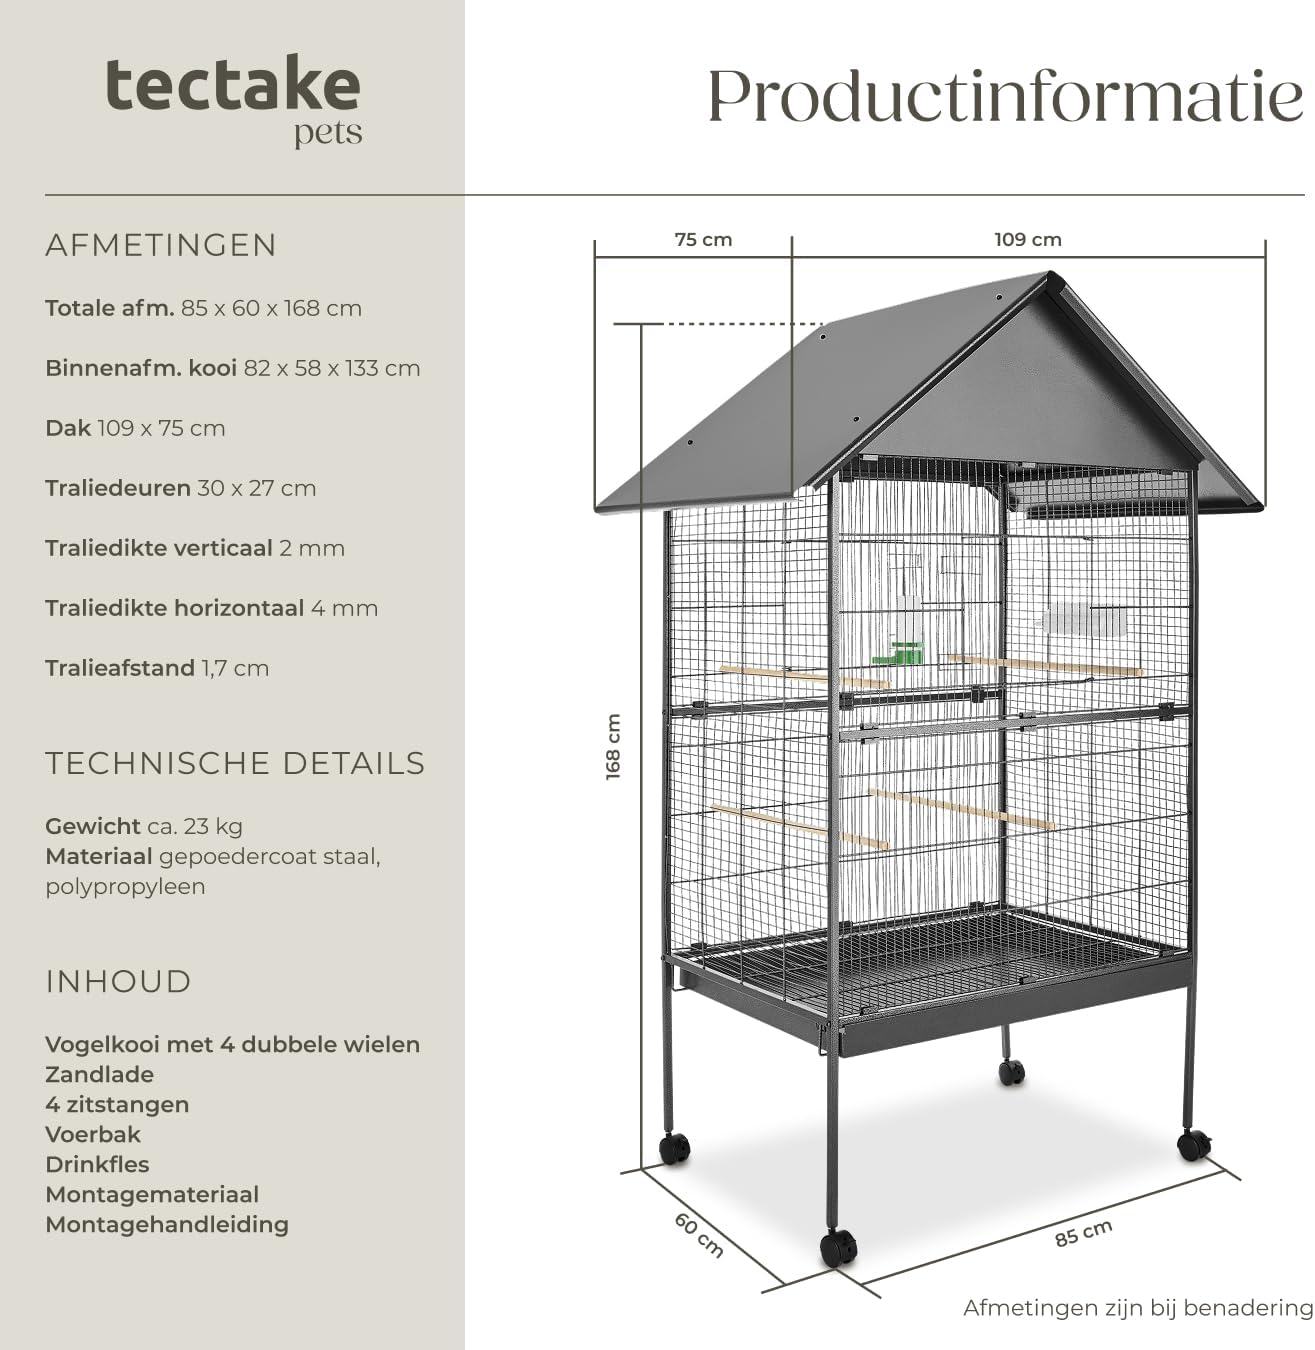
Figure 2: Assembly diagram and list of contents.
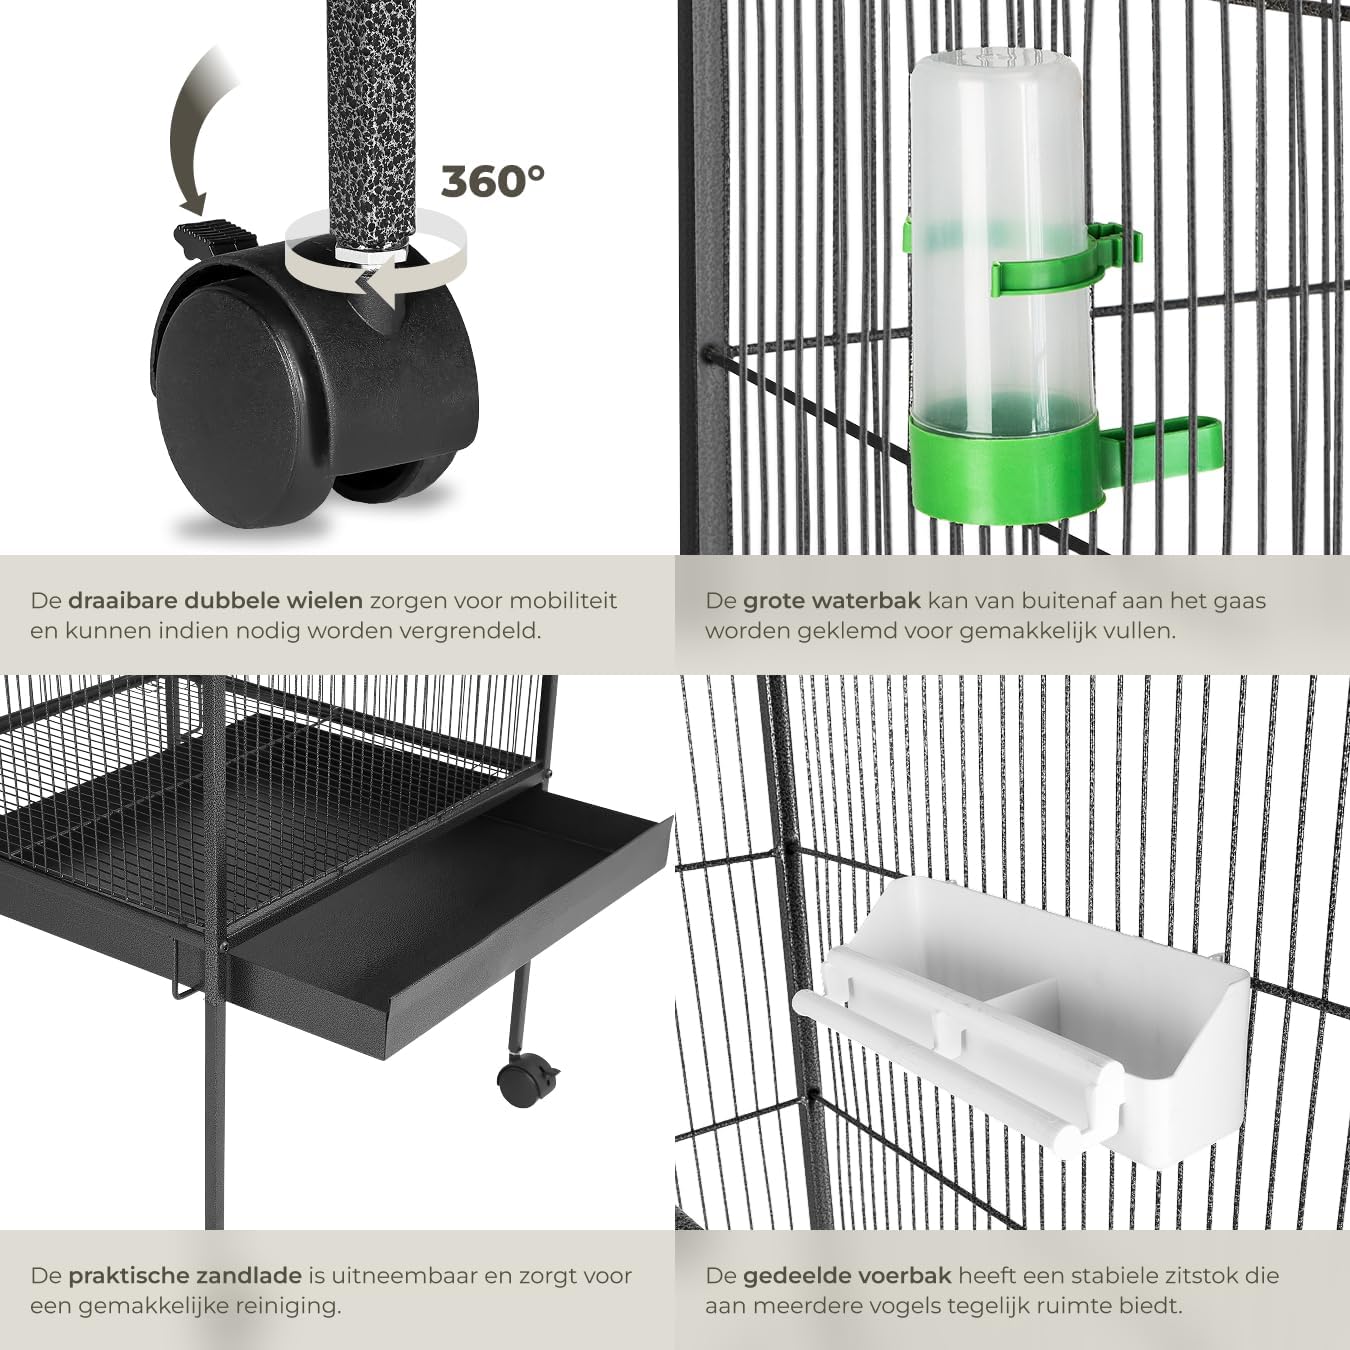
Figure 3: Detailed view of key components: wheels, water dispenser, sand tray, and feeder.
3. Operating Instructions
3.1 Placement
The Tectake Bird Cage is designed for indoor use. Place the cage in a quiet, well-lit area away from direct drafts, extreme temperatures, and direct sunlight. Ensure the location is stable and secure.
3.2 Mobility and Stability
The cage is equipped with four swivel wheels for easy movement. To move the cage, unlock the wheels. Once the cage is in the desired position, engage the wheel locks to prevent accidental movement and ensure stability.
3.3 Access Doors
The cage features two large rectangular mesh doors for convenient access to your birds and for placing/removing items. Gently slide the doors open and close. Always ensure the doors are securely closed to prevent birds from escaping.
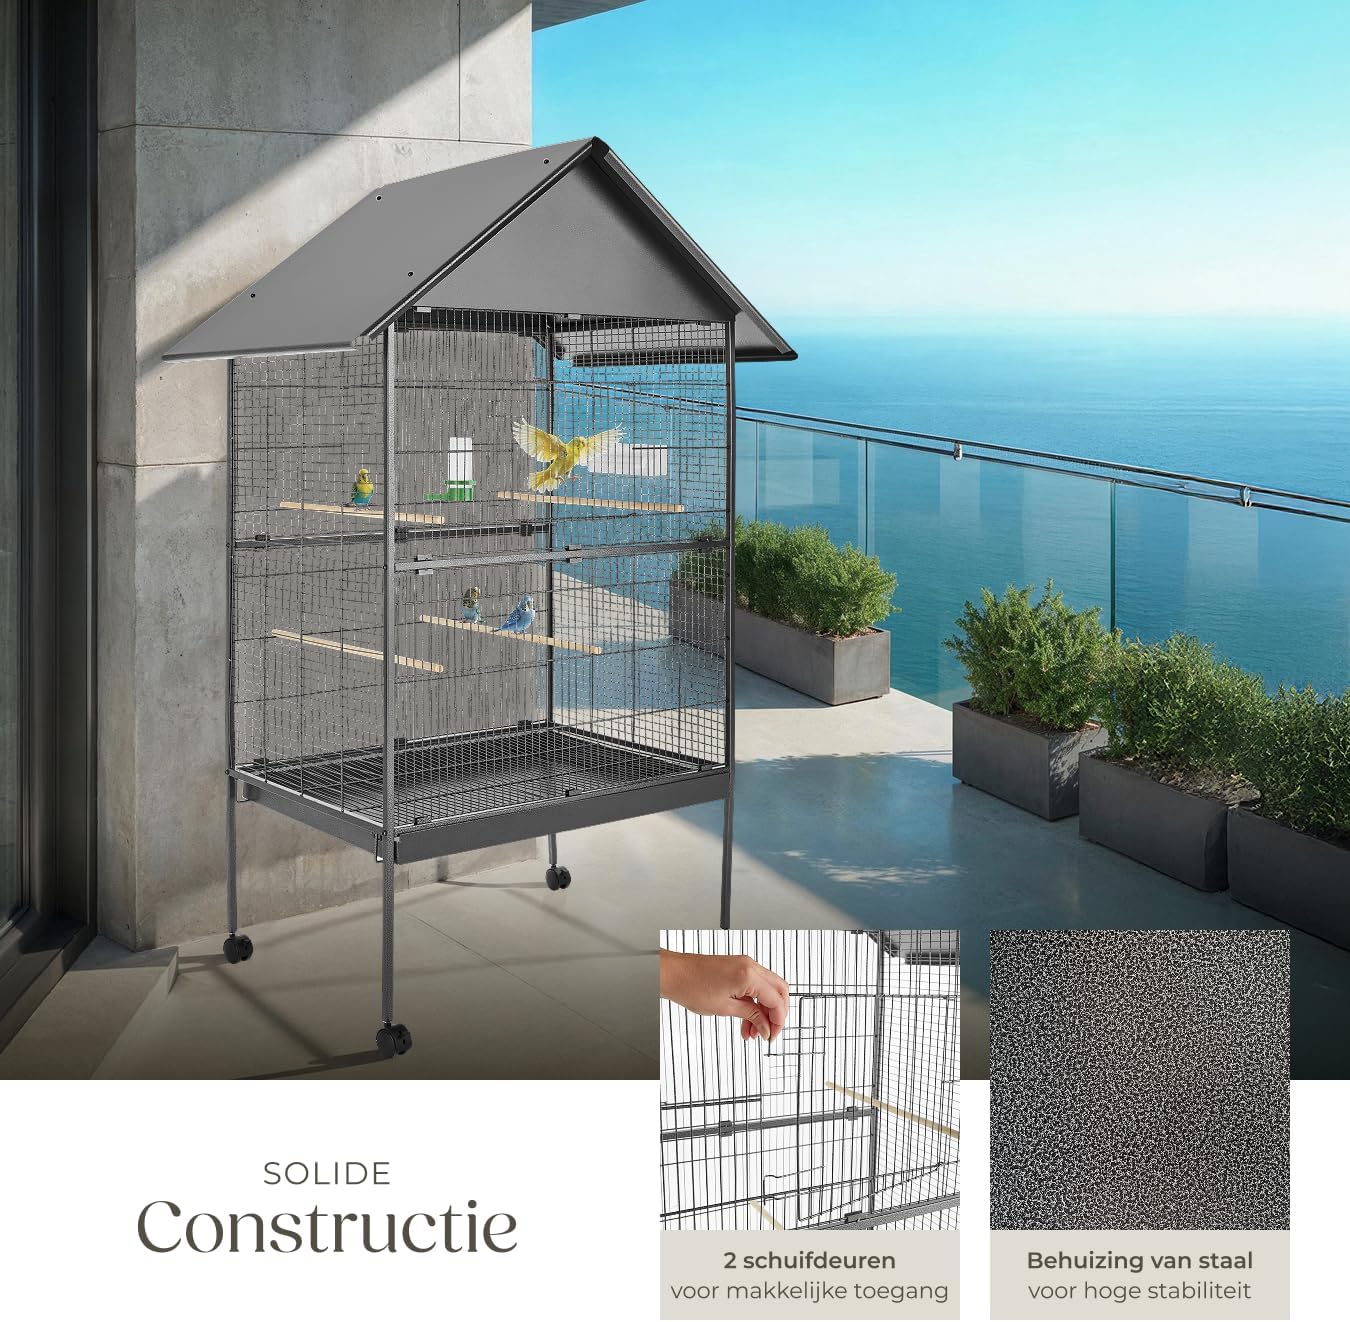
Figure 4: View of the cage doors and material finish.
3.4 Feeder and Water Dispenser
Fill the feeder with appropriate bird food and the water dispenser with fresh water daily. Both are designed for easy refilling and cleaning without needing to open the main cage doors extensively.
4. Maintenance
Regular cleaning and maintenance are essential for the health and well-being of your birds.
4.1 Daily Cleaning
- Replace food and water daily.
- Remove any uneaten fresh food.
4.2 Weekly Cleaning
- Sand Tray: The sand tray can be easily pulled out from the bottom of the cage for quick cleaning or sand replacement. Dispose of old sand and clean the tray with bird-safe disinfectant before adding fresh sand.
- Bottom Grid: Remove the bottom grid and clean it thoroughly to prevent accumulation of droppings and debris.
- Perches: Clean perches to remove droppings and ensure a hygienic surface for your birds.
- Feeder and Water Dispenser: Wash thoroughly with warm, soapy water and rinse completely.
4.3 General Cleaning
Periodically wipe down the entire cage structure with a damp cloth and a bird-safe cleaning solution. Ensure all surfaces are dry before returning birds to the cage. Inspect the cage regularly for any signs of wear or damage.
5. Troubleshooting
- Difficulty during assembly: If you encounter misaligned holes or difficulty fitting parts, double-check the orientation of the components against the assembly diagram. Do not force parts together.
- Damaged or missing parts: If any components are damaged upon arrival or missing from the package, please contact Tectake customer support immediately for assistance.
- Doors not closing properly: Ensure the cage frame is assembled squarely. Check for any obstructions or bent bars that might prevent the doors from sliding smoothly.
- Wheels not locking: Verify that the locking mechanism on each wheel is fully engaged. If a wheel is damaged, contact support for a replacement.
6. Specifications
| Feature | Detail |
|---|---|
| Model Number | 402288-NL |
| Overall Dimensions (H x W x D) | 168 x 85 x 60 cm |
| Interior Dimensions (H x W x D) | 133 x 82 x 58 cm |
| Roof Dimensions (W x D) | 109 x 75 cm |
| Mesh Door Dimensions (H x W) | 27 x 30 cm |
| Vertical Grid Thickness | 2 mm |
| Horizontal Grid Thickness | 4 mm |
| Grid Spacing | 1.7 cm |
| Weight | Approx. 23 kg |
| Material | Powder-coated Steel |
| Color | Anthracite |
| Recommended Species | Small birds (e.g., budgies, canaries) |
| Special Features | Spacious, adjustable perches, lockable wheels, small grid spacing, removable sand tray |
| Usage | Indoor |
7. Warranty and Support
For any questions, concerns, or issues regarding your Tectake Bird Cage, please contact Tectake customer support. Keep your purchase receipt as proof of purchase for any warranty claims.
Contact information can typically be found on the Tectake official website or on your purchase documentation.


