1. Introduction
This manual provides detailed instructions for the IINE NSW Mini Wireless Controller (Model L289). This controller is designed for use with Nintendo Switch, PC, and Android devices, offering features such as wireless connectivity, R-Fire (turbo) function, 6-axis motion control, and vibration feedback. Please read this manual thoroughly before use to ensure proper operation and to maximize your gaming experience.
2. Package Contents
Verify that all items listed below are present in your package:
- IINE NSW Mini Wireless Controller (Model L289)
- USB-C Charging Cable
- User Manual
3. Controller Layout
Familiarize yourself with the buttons and features of your IINE Mini Wireless Controller.

Image 3.1: Front View of Controller. This image displays the front of the IINE Mini Wireless Controller, highlighting the left and right analog sticks, D-pad, A/B/X/Y action buttons, Home button, Capture button, Plus (+) and Minus (-) buttons, and four player indicator LEDs.
- A/B/X/Y Buttons: Standard action buttons.
- D-Pad: Directional pad for precise movement.
- Left/Right Analog Sticks: For 360-degree movement and camera control.
- HOME Button: Powers on the controller, returns to the home screen on Switch.
- CAPTURE Button: Takes screenshots on Nintendo Switch.
- PLUS (+) / MINUS (-) Buttons: System menu buttons.
- L/R Buttons: Shoulder buttons.
- ZL/ZR Buttons: Trigger buttons.
- Player Indicator LEDs: Four LEDs indicating player number and connection status.
- USB-C Port: For charging the controller.
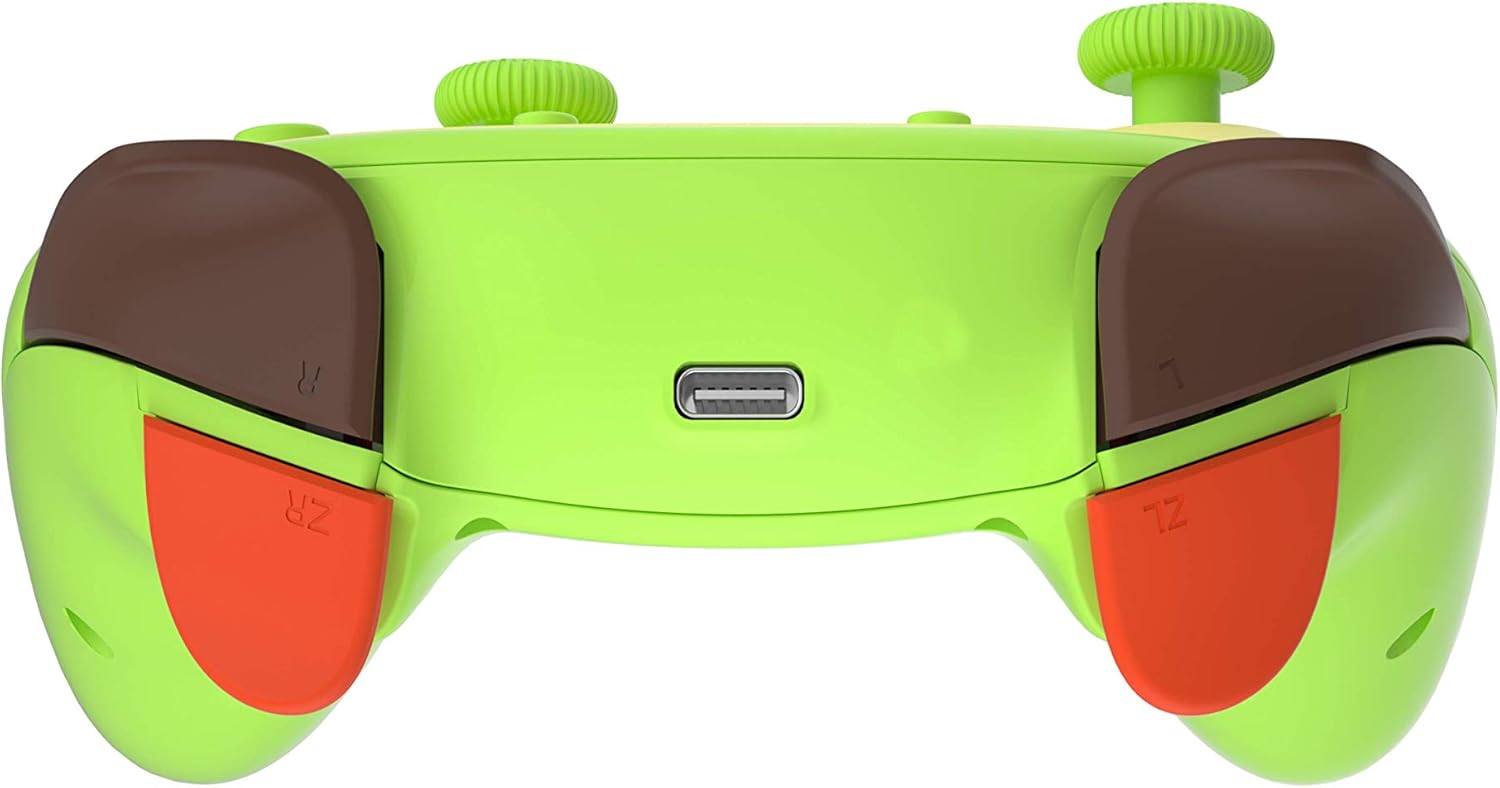
Image 3.2: Top View of Controller. This image shows the top edge of the controller, clearly displaying the USB-C charging port located between the L and R shoulder buttons, and the ZL and ZR trigger buttons.
4. Setup and Pairing
4.1. Charging the Controller
Before initial use, fully charge the controller. Connect the USB-C charging cable to the controller's USB-C port and the other end to a USB power source (e.g., Nintendo Switch dock, PC, USB wall adapter). The player indicator LEDs will flash during charging and turn off when fully charged.
4.2. Pairing with Nintendo Switch
- From the Nintendo Switch HOME Menu, select "Controllers" > "Change Grip/Order".
- On the controller, press and hold the HOME button + Y button simultaneously for 3-5 seconds until the player indicator LEDs begin to flash rapidly.
- Once paired, the corresponding player indicator LED(s) on the controller will remain lit.
- To reconnect, simply press the HOME button once. The controller will automatically attempt to connect to the last paired Switch console.
4.3. Pairing with PC (Windows)
The controller can be connected to a PC via Bluetooth or a USB-C cable.
4.3.1. Bluetooth Connection (DINPUT)
- Ensure your PC has Bluetooth enabled.
- On the controller, press and hold the HOME button + A button simultaneously for 3-5 seconds until the player indicator LEDs begin to flash rapidly.
- On your PC, go to "Bluetooth & other devices" settings and select "Add Bluetooth or other device".
- Choose "Bluetooth" and select the controller from the list of available devices (it may appear as "Pro Controller" or similar).
- Once connected, the player indicator LEDs will remain lit. This mode typically operates as DINPUT.
4.3.2. Wired Connection (XINPUT)
- Connect the controller to your PC using the USB-C charging cable.
- The PC should automatically detect and install the necessary drivers. The controller will typically operate in XINPUT mode, compatible with most PC games.
4.4. Pairing with Android Devices
- Enable Bluetooth on your Android device.
- On the controller, press and hold the HOME button + A button simultaneously for 3-5 seconds until the player indicator LEDs begin to flash rapidly.
- On your Android device, search for new Bluetooth devices and select the controller (it may appear as "Pro Controller" or similar).
- Once connected, the player indicator LEDs will remain lit.
5. Operating Instructions
5.1. Turbo (R-Fire) Function
The controller supports a Turbo function for rapid button presses.
- To Set Turbo: Press and hold the desired action button (A/B/X/Y/L/R/ZL/ZR), then press the Turbo button (often a dedicated button or a combination, refer to specific controller markings if available, otherwise assume a generic Turbo button). The button will now rapidly repeat its input when held down.
- To Clear Turbo for a Single Button: Press and hold the button with Turbo enabled, then press the Turbo button again.
- To Clear All Turbo Settings: Press and hold the Turbo button for 5 seconds.
5.2. Vibration Adjustment
The controller features adjustable vibration feedback. Specific adjustment methods may vary. Typically, this involves holding a combination of buttons (e.g., Turbo + Up/Down on D-pad) to cycle through vibration intensities. Refer to the controller's specific markings or included quick start guide for precise instructions if available.
5.3. Motion Control (6-Axis Gyro)
The integrated 6-axis gyroscope allows for motion-sensing gameplay, particularly useful in compatible Nintendo Switch titles. This feature activates automatically when connected to a compatible system that supports motion controls.
6. Maintenance
- Cleaning: Use a soft, dry cloth to clean the controller. For stubborn dirt, slightly dampen the cloth with water. Avoid using harsh chemicals or abrasive cleaners.
- Storage: Store the controller in a cool, dry place away from direct sunlight and extreme temperatures.
- Battery Care: To prolong battery life, avoid fully discharging the controller frequently. Charge it regularly, even if not in use for extended periods.
- Avoid Impact: Do not drop or subject the controller to strong impacts, as this can damage internal components.
7. Troubleshooting
7.1. Controller Does Not Power On
- Ensure the controller is charged. Connect it to a power source using the USB-C cable and allow it to charge for at least 30 minutes.
- Try pressing the HOME button.
7.2. Controller Does Not Connect/Pair
- For Nintendo Switch: Ensure the Switch is in "Change Grip/Order" mode. Try restarting the Switch console.
- For PC/Android: Ensure Bluetooth is enabled on your device. Remove any previous pairings of the controller from your device's Bluetooth settings and attempt to pair again.
- Ensure the controller is in the correct pairing mode (HOME+Y for Switch, HOME+A for PC/Android Bluetooth).
- Try connecting the controller via USB-C cable to a PC to verify basic functionality.
7.3. Input Lag or Disconnections
- Ensure there are no obstructions between the controller and the console/device.
- Move closer to the console/device.
- Avoid strong electromagnetic interference from other wireless devices.
- Ensure the controller is fully charged.
8. Specifications
| Model: | L289 |
| Brand: | IINE |
| Connectivity: | Wireless (Bluetooth), Wired (USB-C) |
| Compatibility: | Nintendo Switch, PC (Windows), Android |
| Features: | R-Fire (Turbo), 6-Axis Gyroscope, Vibration Feedback |
| Dimensions: | 14.8 x 14 x 5.6 cm |
| Weight: | 223 g |
| Input: | 5V 400mA |

Image 8.1: Bottom View with Product Label. This image shows the underside of the controller, featuring the product label with model number L289, input specifications, and a QR code. The QR code links to http://weixin.qq.com/r/gkwnP-DEd60IrbRc9xmQ.
9. Warranty and Support
IINE products are manufactured to high-quality standards. For information regarding warranty coverage, technical support, or service inquiries, please refer to the warranty card included with your product or visit the official IINE website. Keep your purchase receipt as proof of purchase for warranty claims.


