1. Introduction
Thank you for choosing the XZZ FX-210 Intelligent Lead-Free Soldering Station. This professional-grade soldering station is designed for precision soldering tasks, particularly for phone and PCB repair, offering rapid heating and precise temperature control. This manual provides essential information for the safe and effective operation, maintenance, and troubleshooting of your new soldering station. Please read this manual thoroughly before use and retain it for future reference.
2. Safety Information
Always adhere to the following safety precautions to prevent injury or damage to the equipment.
- Ventilation: Use the soldering station in a well-ventilated area to avoid inhaling fumes. Consider using a fume extractor.
- Eye Protection: Always wear safety glasses to protect your eyes from solder splashes or flying debris.
- Hot Surfaces: The soldering iron tip and surrounding metal parts become extremely hot during operation. Avoid direct contact. Use the designated holder for the iron when not in use.
- Electrical Safety: Ensure the power supply matches the specified voltage (220V for this model). Do not operate with damaged cords or plugs. Disconnect power before cleaning or maintenance.
- Flammable Materials: Keep flammable liquids, gases, and materials away from the soldering area.
- Children and Pets: Keep the soldering station and all related tools out of reach of children and pets.
- Proper Use: Use the soldering station only for its intended purpose. Do not modify the unit.
3. Product Overview
3.1 Components
The XZZ FX-210 Soldering Station typically includes the following components:
- Main Soldering Station Unit with LCD display
- Soldering Iron Handle (compatible with JBC T210/C210 series tips)
- Soldering Iron Holder
- Tip Cleaner (brass wool)
- Sponge for tip cleaning
- Power Cord
- Assorted Soldering Tips (e.g., XZZ C210-020, XZZ C210-018, XZZ C210-002)

Figure 3.1: Standard equipment included with the XZZ FX-210 Soldering Station, showing the main unit, handle, and various soldering tips.

Figure 3.2: Front view of the XZZ FX-210 Soldering Station, highlighting the LCD display and control buttons.
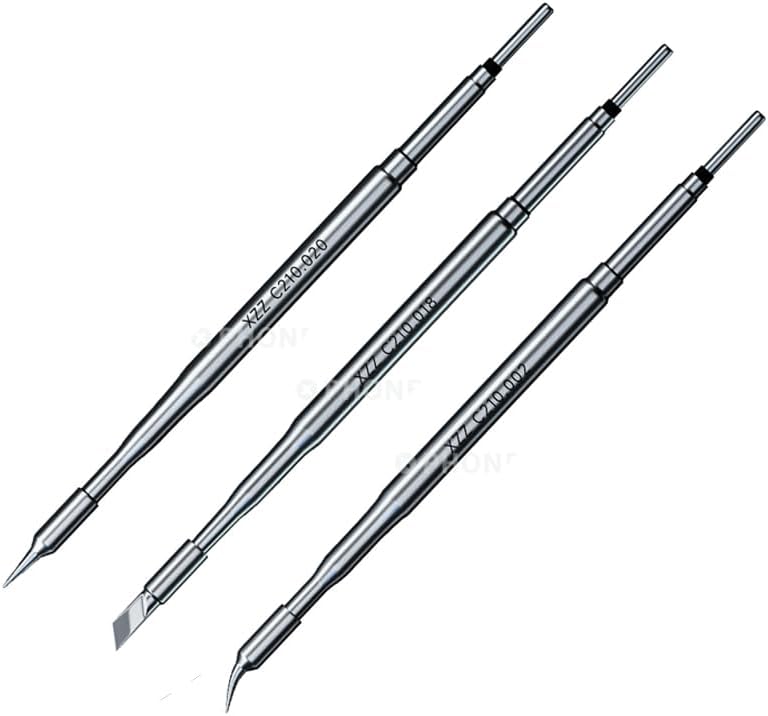
Figure 3.3: Various soldering tips compatible with the FX-210 station, including fine point and chisel tips.
3.2 Key Features
- Precision Integrated Welding Platform: Compatible with JBC T210 soldering handles and JBC C210 series soldering iron tips, ensuring high precision and versatility.
- Precise Temperature Control: Features a single-chip microcomputer control system for rapid temperature rise, allowing operation at lower temperatures for improved soldering quality.
- 2-Second Rapid Heating: The station heats up quickly, enabling users to begin soldering within approximately 2 seconds.
- Intelligent Temperature Boost: For large solder joints, tapping the bracket twice with the handle will temporarily increase the temperature by 80°C for 15 seconds, then automatically revert to the set temperature.
- Sleep Mode Function: If unused for more than 10 minutes, the iron enters sleep mode, maintaining a low idling temperature to reduce wear and extend the lifespan of soldering tips and heating elements.
- Memory Channels: Three memory channels (CH1, CH2, CH3) allow users to store and recall frequently used temperature settings.
- Temperature Unit Toggle: Easily switch the temperature display between Fahrenheit and Celsius.
- LCD Display: Clear LCD for displaying temperature and other operational information.
4. Setup
- Unpacking: Carefully remove all components from the packaging. Inspect for any signs of damage.
- Placement: Place the soldering station on a stable, heat-resistant, and non-flammable surface. Ensure adequate ventilation around the unit.
- Connect Soldering Iron Handle: Connect the soldering iron handle cable to the designated port on the front or side of the main station unit. Ensure a secure connection.
- Insert Soldering Tip: Select the desired soldering tip and insert it firmly into the soldering iron handle.
- Prepare Tip Cleaner: Place the brass wool tip cleaner in its designated slot on the station. If a sponge is provided, dampen it slightly with distilled water and place it in its tray.
- Connect Power Cord: Connect the power cord to the power input socket on the rear of the soldering station.
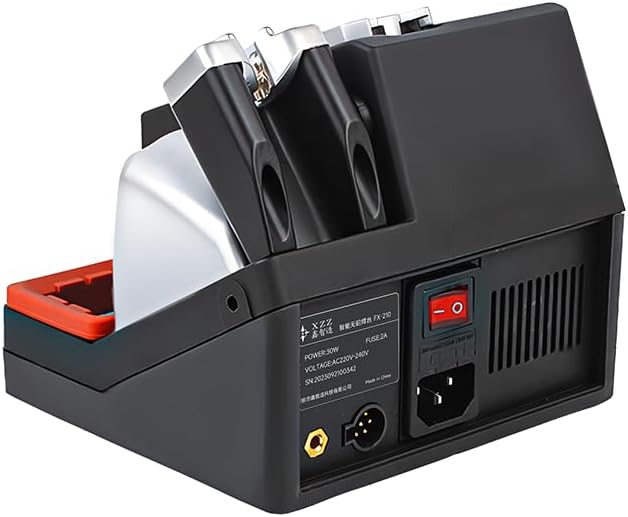
Figure 4.1: Rear view of the soldering station, illustrating the power input and main power switch.
- Connect to Power Outlet: Plug the power cord into a grounded 220V AC power outlet.
- Power On: Flip the main power switch (usually located on the rear of the unit) to the "ON" position. The LCD display will illuminate.
5. Operating Instructions
5.1 Basic Operation
- Power On: Ensure the station is properly set up and connected to power. Turn on the main power switch. The display will show the current temperature and settings.
- Setting Temperature:
- Use the UP and DOWN arrow buttons to adjust the desired temperature.
- Press the OK button to confirm the temperature setting. The iron will rapidly heat up to the set temperature.
- Using Memory Channels (CH1, CH2, CH3):
- To save a temperature setting: Adjust the temperature to your desired value, then press and hold the corresponding channel button (e.g., CH1) until the display indicates it has been saved.
- To recall a temperature setting: Simply press the desired channel button (CH1, CH2, or CH3) to instantly switch to the saved temperature.
- Temperature Unit Toggle: Refer to the station's specific interface for switching between Celsius (°C) and Fahrenheit (°F). This is typically done via a menu option or a dedicated button.
5.2 Advanced Features
- Intelligent Temperature Boost: When working on large solder joints that require more heat, gently tap the soldering iron handle against its holder/bracket twice. The station will automatically increase the tip temperature by 80°C for 15 seconds. After this period, the temperature will automatically return to your original setting. This feature eliminates the need for manual temperature adjustments during demanding tasks.
- Sleep Mode: The FX-210 features an automatic sleep mode. If the soldering iron is placed in its holder and remains inactive for approximately 10 minutes, the station will automatically lower the tip temperature to an idling state. This reduces oxidation and wear on the tip, significantly extending its lifespan. To exit sleep mode, simply pick up the soldering iron.
6. Maintenance
Regular maintenance ensures optimal performance and extends the lifespan of your soldering station and tips.
- Tip Cleaning:
- During operation, frequently clean the soldering tip using the brass wool tip cleaner. This removes excess solder and oxidation.
- If using a damp sponge, ensure it is only slightly damp, not soaking wet, to avoid thermal shock to the tip.
- Always tin the tip with a small amount of fresh solder after cleaning and before placing it back in the holder, especially when putting it into sleep mode or turning off the station. This protects the tip from oxidation.
- Replacing Soldering Tips:
- Ensure the soldering iron is cool before attempting to change tips.
- Carefully pull the old tip out of the handle.
- Insert the new tip firmly into the handle until it is seated correctly.
- Station Cleaning:
- Before cleaning, always unplug the station from the power outlet and allow it to cool completely.
- Wipe the exterior of the station with a soft, dry cloth. Do not use abrasive cleaners or solvents.
- Periodically clean the brass wool and sponge tray.
- Storage: When not in use for extended periods, store the soldering station in a clean, dry environment, away from dust and moisture.
7. Troubleshooting
If you encounter issues with your XZZ FX-210 Soldering Station, refer to the following common problems and solutions.
| Problem | Possible Cause | Solution |
|---|---|---|
| Station does not power on. | Power cord not connected; Power switch off; No power from outlet. | Ensure power cord is securely plugged in. Turn on the main power switch. Check the power outlet with another device. |
| Soldering iron not heating up. | Iron handle not properly connected; Faulty heating element/tip; Station in sleep mode. | Check the connection of the iron handle to the station. Ensure the tip is correctly inserted. Pick up the iron to exit sleep mode. If problem persists, contact support. |
| Temperature is unstable or inaccurate. | Poor tip contact; Oxidized tip; Sensor issue. | Ensure the tip is fully seated. Clean and re-tin the soldering tip. If the issue continues, the internal sensor might be faulty, requiring professional service. |
| Solder does not melt easily. | Temperature set too low; Oxidized tip; Incorrect tip for task. | Increase the set temperature. Clean and re-tin the soldering tip. Use a tip with appropriate thermal mass for the joint size. |
For issues not listed above or if troubleshooting steps do not resolve the problem, please contact DIYPHONE customer support.
8. Specifications
| Attribute | Detail |
|---|---|
| Model | FX-210 |
| Brand | DIYPHONE |
| Power Source | Corded Electric |
| Voltage | 220 Volts |
| Wattage | 130 watts |
| Item Weight | 8.8 pounds (approx. 4 kg) |
| Package Dimensions | 1.18 x 0.79 x 0.79 inches (Note: This seems to be for a small component, not the full package. Actual package dimensions may vary.) |
| Material | Plastic + Metal |
| Special Features | 2.5S Rapid Heating, Intelligent Temperature Boost, Sleep Mode, Memory Channels |
| Included Components | Soldering Station, Handle, Assorted Tips, Tip Cleaner |
| UPC | 699911207587 |
| Display Type | LCD |
| Country of Origin | China |
9. Warranty and Support
For specific warranty terms and conditions, please refer to the documentation provided with your purchase or contact the seller directly.
For technical support, inquiries, or service requests, please contact DIYPHONE customer service through their official channels or the retailer from whom you purchased the product.


