Introduction
The ThiEYE CarView 3 Mirror Dash Cam is an advanced vehicle recording system designed to enhance driving safety and provide comprehensive video evidence. This manual provides detailed instructions for installation, operation, and maintenance to ensure optimal performance of your device.

Figure 1: ThiEYE CarView 3 Mirror Dash Cam. This image displays the main unit of the dash cam, designed to replace or clip over your existing rearview mirror, along with its compact front camera.
Package Contents
Verify that all items listed below are included in your package:
- Mirror Dash Cam (Main Unit)
- Rear Camera
- 8m Rear Camera Cable
- 20cm Rear Camera Cable
- Mounting Strap (x4)
- Car Charger with Additional USB
- 32GB Micro SD Card
- SD Card Reader
- Pry Tool
- User Manual

Figure 2: All components included in the ThiEYE CarView 3 package. This image shows the main mirror dash cam unit, rear camera, various cables, mounting straps, car charger, 32GB Micro SD card, SD card reader, pry tool, and user manual.
Product Overview
Key Features
- 2.5K Ultra HD Front and Rear Recording: Features a 2.5K (2560*1440) front camera with Sony IMX335 Starvis sensor and Hisilicon Hi3556 processor, plus a 6G cam lens. The rear camera records in 1080P.
- Enhanced Night Vision & Wide Dynamic Range: Captures more details in low-light conditions.
- 10" IPS Full Touch Screen: Provides a sensitive and enjoyable visual experience, also functions as an original mirror when the display is off.
- Dual 170° Wide Angle Lenses: Both front and rear cameras offer a broad field of view to reduce blind spots.
- Versatile Rear Camera Installation: Can be installed on the rear car window or used as an inside car camera with included 8-meter and 20cm cables.
- IP68 Waterproof Rear Camera: Ensures clear views in various weather conditions.
Video Quality & Wide Angle View

Figure 3: Comparison of 2.5K Quad HD video resolution for front and 1080P for rear cameras. This image illustrates the superior clarity and detail captured by the ThiEYE CarView 3 compared to standard resolutions.

Figure 4: Enhanced Super Night Mode for improved low-light recording. This image demonstrates the dash cam's ability to capture clearer and more detailed footage in dark conditions.

Figure 5: Both front and rear cameras offer a 170-degree wide-angle view. This image visually compares the extensive field of view provided by the ThiEYE CarView 3's dual 170° wide-angle lenses against a narrower view.
Official Product Video
Video 1: ThiEYE Carview 3 2.5K 10" Touch Screen Mirror Dash Cam. This official video provides a comprehensive overview of the product's features, design, and capabilities, including demonstrations of its high-resolution recording and touch screen interface.
Setup
1. Installing the Mirror Dash Cam
- Attach the mounting straps to the back of the mirror dash cam.
- Carefully place the dash cam over your vehicle's existing rearview mirror.
- Secure the dash cam by stretching the mounting straps around your rearview mirror and hooking them onto the designated points on the dash cam. Ensure it is firmly attached and does not obstruct your view.
2. Installing the Rear Camera
The rear camera offers flexible installation options:
- Rear Window Installation: Mount the rear camera on the inside of your rear car window for a clear view of traffic behind you.
- In-Car Recording: Utilize the 20cm cable to install the rear camera on the front windshield for in-car recording, valuable for rideshare drivers or family monitoring.

Figure 6: The rear camera can be installed on the rear window for external view or on the front windshield for internal cabin recording. This image illustrates the two primary installation methods for the rear camera, highlighting its versatility.
3. Wiring and Power Connection
- Connect the main unit to the car charger.
- Plug the car charger into your vehicle's 12V power outlet (cigarette lighter socket).
- Connect the rear camera cable to the main unit. Route the cable neatly along the vehicle's interior trim to avoid obstruction. The included pry tool can assist in tucking the cable.
4. Inserting the Memory Card
Insert the provided 32GB Micro SD Card into the designated slot on the side of the main unit. Ensure it clicks into place. The device supports up to 128GB SD cards.
Operating Instructions
1. Power On/Off
The dash cam will automatically power on and begin recording when your vehicle's ignition is turned on. It will power off automatically when the ignition is turned off.
2. Touch Screen Operation
The 10-inch IPS full touch screen allows for intuitive control:
- Swipe Left/Right: Switch between front camera view, rear camera view, or split-screen display.
- Swipe Up/Down: Adjust the display brightness or the view angle (for the rear camera).
- Tap Icons: Access various settings and functions directly from the screen interface.
3. Recording Modes
- Loop Recording: The dash cam continuously records video in segments. When the memory card is full, it automatically overwrites the oldest footage to make space for new recordings.
- G-Sensor (Emergency Recording): The built-in G-sensor detects sudden shakes or collisions. In such events, it automatically locks the current video segment, preventing it from being overwritten by loop recording.
- Parking Monitor: When enabled, the dash cam will automatically start recording if it detects a collision or impact while the vehicle is parked.
4. Reversing Aid System
When you shift your vehicle into reverse, the dash cam display will automatically switch to the rear camera view, providing guidelines to assist with parking and reversing maneuvers.
5. Optional GPS Functionality
The ThiEYE CarView 3 supports an optional GPS antenna (sold separately, search for B088TCNN13). When connected, the GPS antenna allows the dash cam to record your driving route, location, and speed in real-time. This information can be viewed using dedicated GPS player software on a computer.
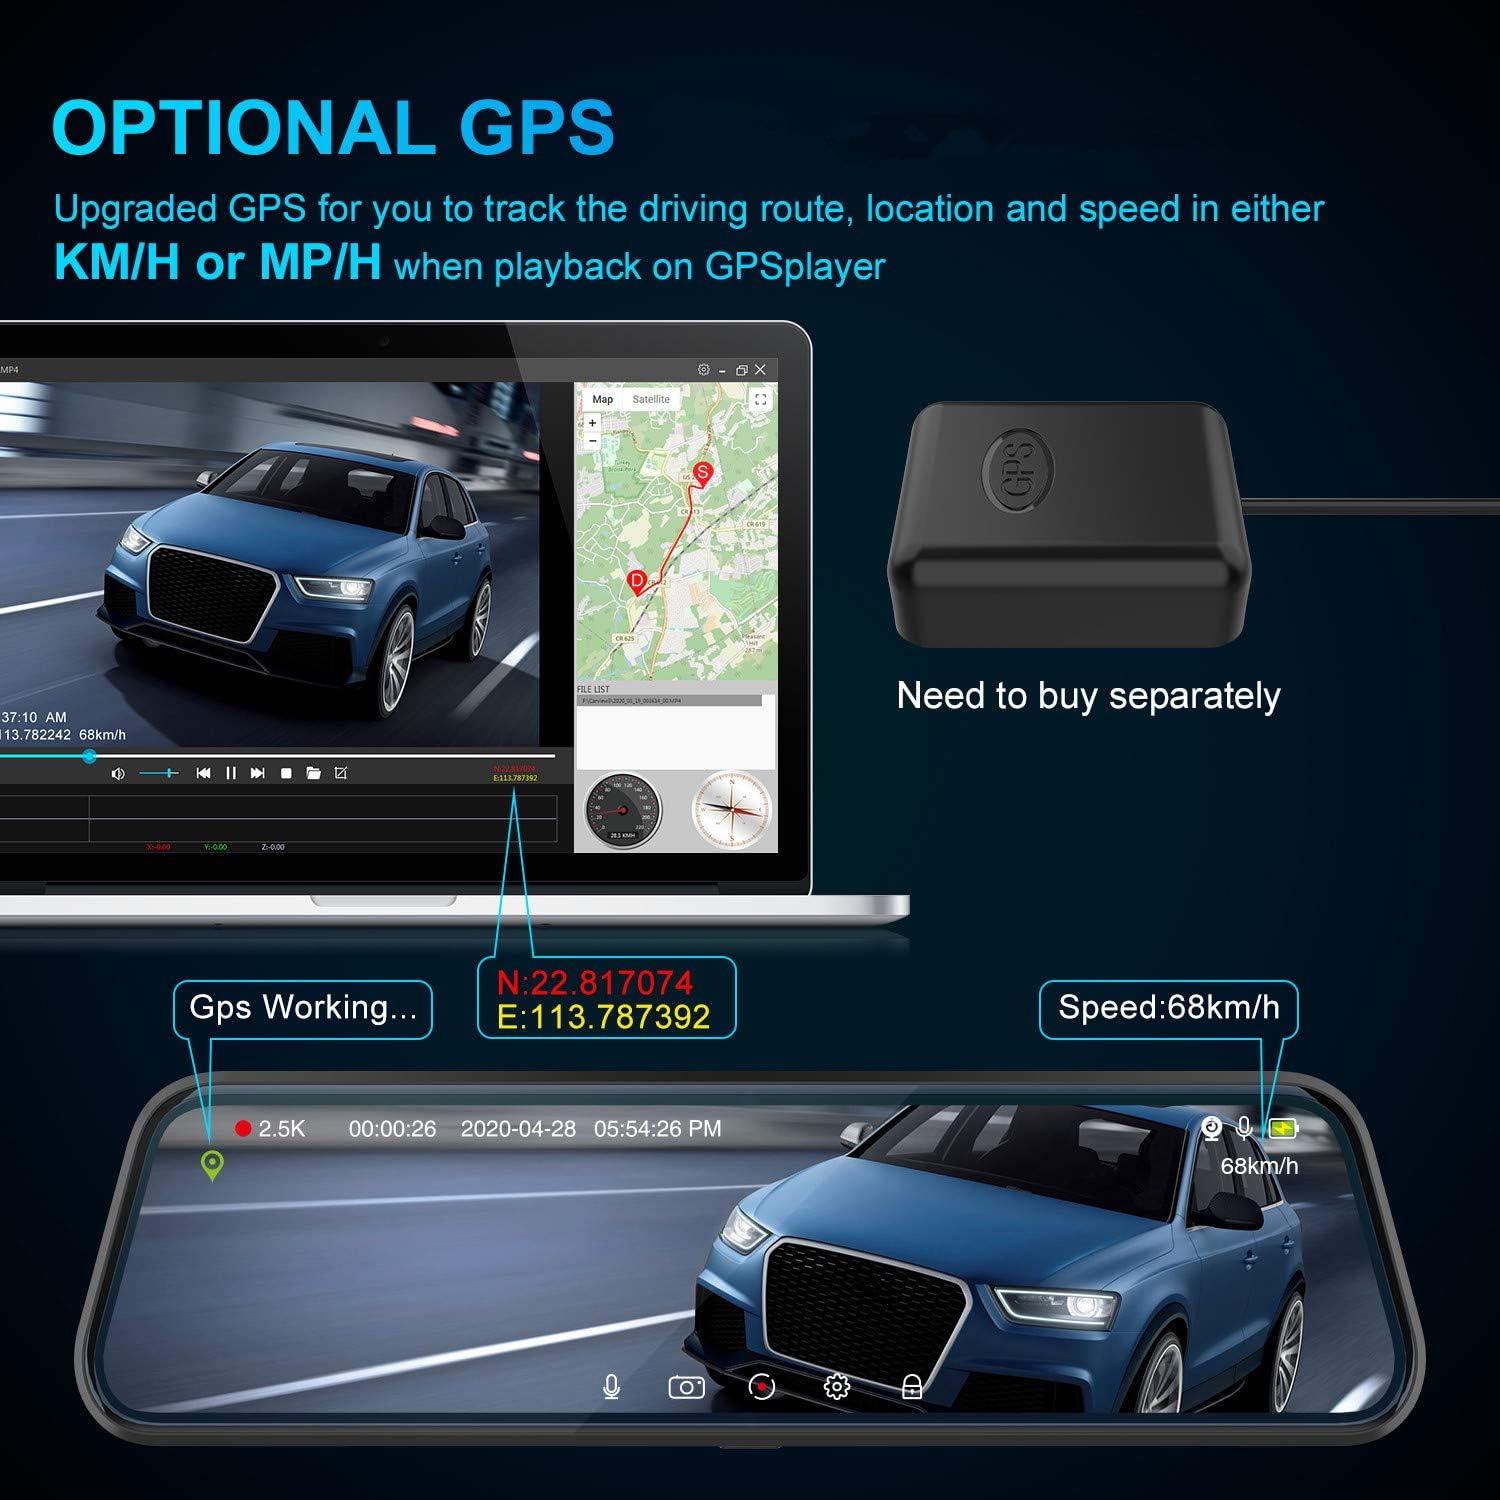
Figure 7: The dash cam supports an optional GPS antenna for tracking driving data. This image shows the dash cam displaying GPS information like coordinates and speed, along with the separate GPS antenna unit.
Maintenance
1. Memory Card Management
- Regularly format your Micro SD card (at least once a month) to ensure optimal performance and prevent data corruption.
- Ensure the memory card is a high-speed Class 10 or higher for reliable recording. The included 32GB card meets this requirement.
2. Cleaning
- Use a soft, dry cloth to clean the dash cam screen and lenses. Avoid abrasive materials or chemical cleaners.
- Keep the camera lenses free from dust and smudges to ensure clear video quality.
Troubleshooting
If you encounter issues with your ThiEYE CarView 3, refer to the following common problems and solutions:
- Video Overwriting Issues: Ensure loop recording is enabled and the G-sensor sensitivity is set appropriately. If important files are being overwritten, manually lock them or transfer them to another device regularly.
- Poor Video Quality: Check that the lenses are clean and free from obstructions. Ensure the resolution settings are at their highest (2.5K front, 1080P rear). Verify that the memory card is a high-speed Class 10 or higher.
- Device Not Powering On: Check the car charger connection and ensure the vehicle's 12V power outlet is functioning.
- Unstable Mounting: Ensure the mounting straps are securely fastened and adjusted tightly around your rearview mirror.
For further assistance, please contact ThiEYE customer service.
Specifications
| Brand | ThiEYE |
| Model Name | Carview 3 |
| Item Model Number | emareg-292 |
| Package Dimensions | 12.68 x 5.71 x 2.99 inches |
| Item Weight | 1.9 pounds |
| Batteries | 1 Lithium Ion batteries required (included) |
| Connectivity Technology | USB |
| Video Capture Resolution | 1080p (Rear), 2.5K (Front) |
| Mounting Type | Adhesive Mount |
| Field Of View | 170 Degrees |
| Control Method | Touch |
Warranty and Support
ThiEYE CarView 3 Mirror Dash Cam includes a 30-Days return policy and a 365-Days product period. For any inquiries or support, please contact ThiEYE customer service within 24 hours.


