1. Introduction
Thank you for choosing the Aigostar Misty-2 Humidifier. This manual provides essential information for the safe and efficient operation, maintenance, and troubleshooting of your new humidifier. Please read it thoroughly before first use and keep it for future reference.
The Aigostar Misty-2 Humidifier is designed to improve air quality by adding moisture to the air, helping to alleviate dry skin, irritated sinuses, and other discomforts caused by dry environments. It features adjustable mist levels, an aroma diffuser, 7-color LED lights, and an intelligent timer function.

The Aigostar Misty Humidifier, showcasing its transparent water tank and control panel.
2. Safety Instructions
To reduce the risk of electric shock, fire, or injury, always follow these basic safety precautions:
- Do not operate the humidifier with a damaged cord or plug.
- Always place the humidifier on a firm, flat, waterproof surface away from direct sunlight and heat sources.
- Keep the humidifier out of reach of children and pets.
- Do not immerse the base unit in water or other liquids.
- Unplug the humidifier before filling, cleaning, or moving it.
- Only use clean, cool tap water. Do not add hot water.
- Do not add essential oils directly into the water tank; use the designated aroma diffuser tray.
- Do not block the mist outlet.
- If the humidifier emits unusual sounds or odors, unplug it immediately.
3. Product Overview
Familiarize yourself with the components of your Aigostar Misty-2 Humidifier:
- Mist Nozzle: Rotates 360 degrees to direct mist.
- Water Tank: Transparent tank with 2.5L capacity.
- Base Unit: Contains electronic components and water reservoir.
- Control Panel: Digital display and touch buttons for operation.
- Aroma Diffuser Tray: For adding essential oils.
- Power Cord: For electrical connection.

Overview of the humidifier's user-friendly features, including mist modes, timer, LED lights, and constant humidity function.
4. Setup
- Unpack: Carefully remove all packaging materials and ensure all components are present.
- Placement: Place the humidifier on a flat, stable, and waterproof surface at least 15 cm away from walls and furniture. Ensure the mist outlet is not directed at walls or electronics.
- Fill Water Tank: Remove the top cover. Fill the water tank directly from the top with clean, cool tap water. Do not exceed the maximum fill line. Replace the top cover securely.
- Connect Power: Plug the power cord into a suitable electrical outlet. The humidifier will enter standby mode.
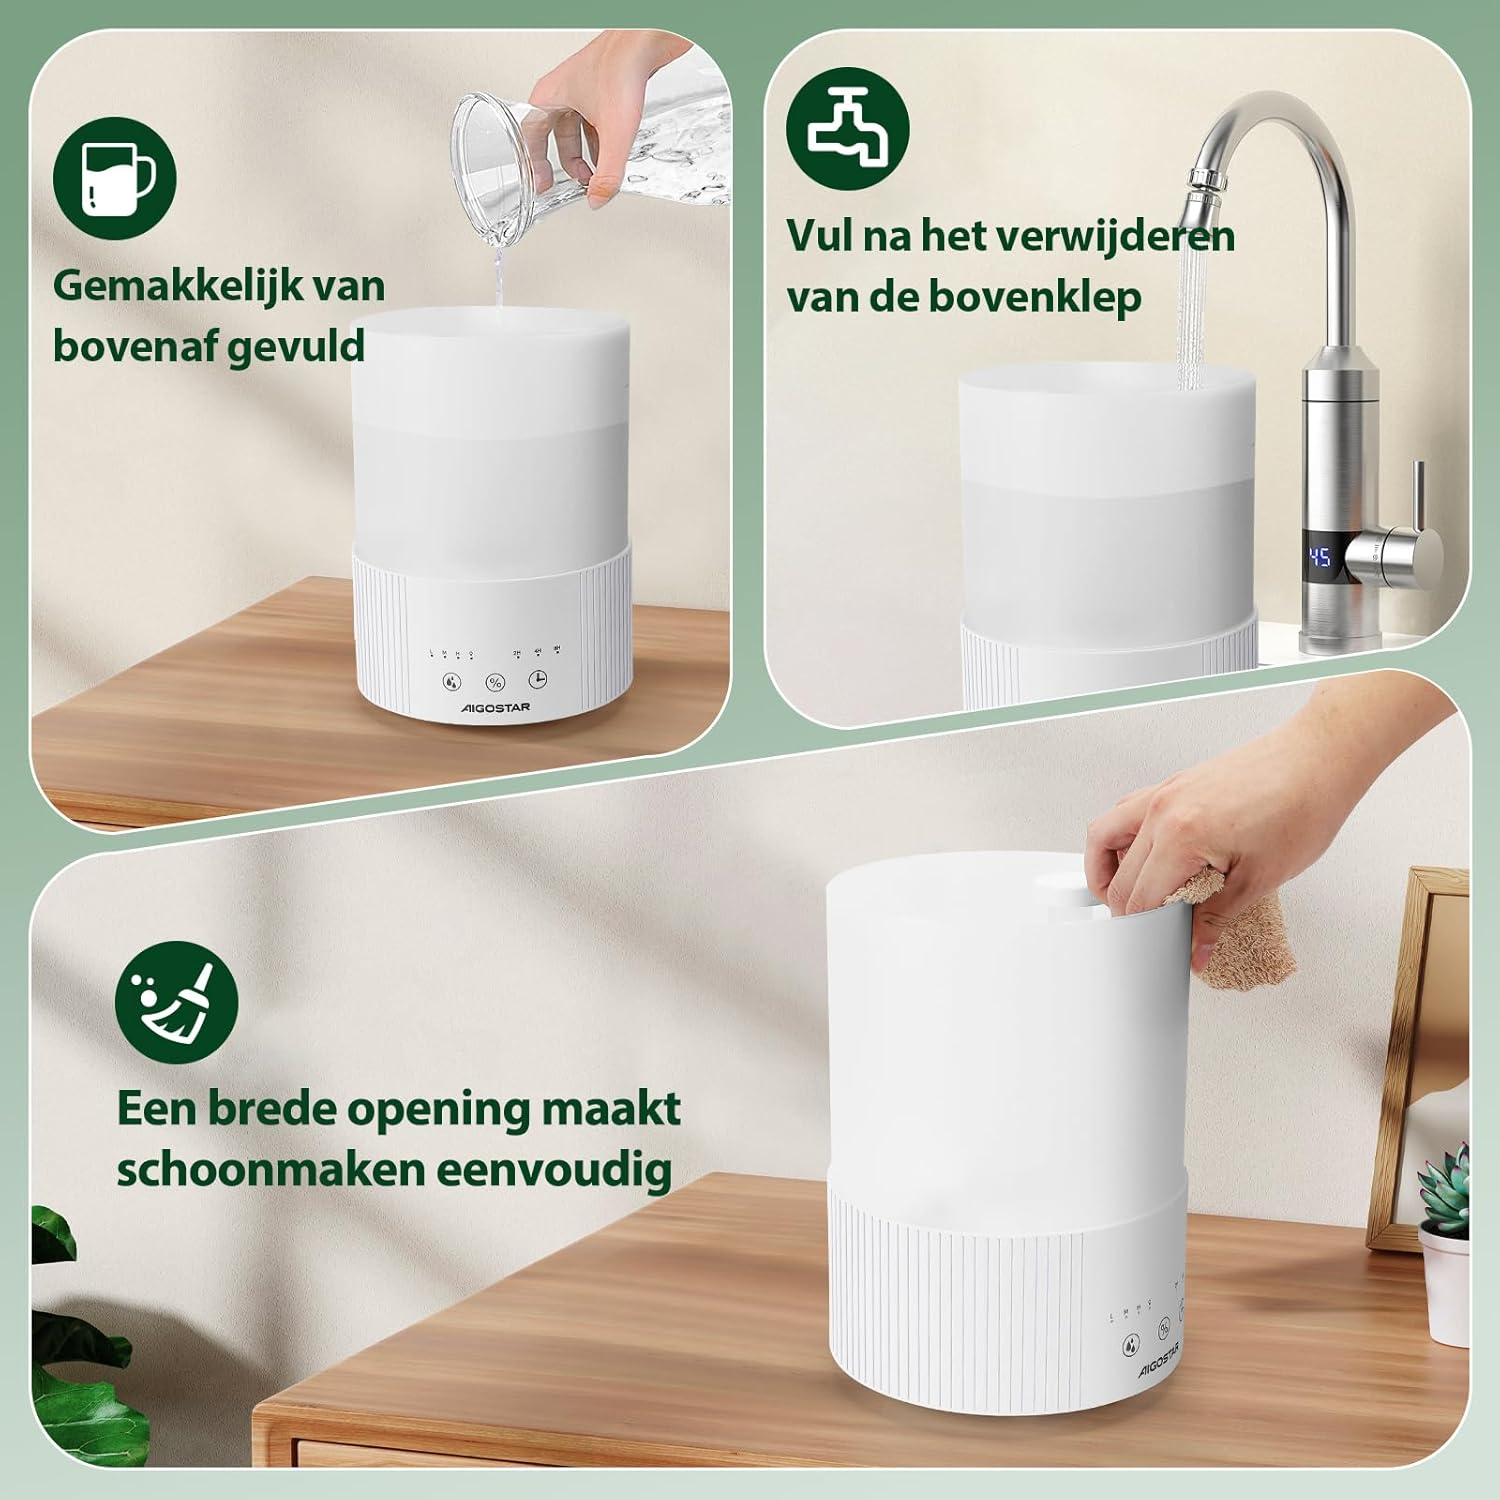
Illustrations of the humidifier's convenient top-fill design and wide opening for effortless cleaning.
5. Operating Instructions
Power On/Off
- Touch the power button (O/I) to turn the humidifier on or off.
Mist Level Adjustment
- Touch the mist button (M) repeatedly to cycle through three mist levels: Low (80 ml/h), Medium (130 ml/h), and High (170 ml/h). The selected level will be indicated on the display.
Timer Function
- Touch the timer button (L) to set the operating time for 2, 4, or 8 hours. The humidifier will automatically turn off after the set time.
Intelligent Humidification
- Press and hold the humidity button (%) for 3 seconds to activate the constant humidity function.
- Once activated, tap the humidity button to adjust the target humidity in 5% increments from 40% to 90%. The humidifier will automatically maintain a healthy humidity range of 45% to 65%.
- To deactivate, press and hold the humidity button for 3 seconds again.

The humidifier's ability to adjust humidity levels between 40% and 90%, maintaining an optimal range.
LED Light Control
- Touch the light button (Q) to turn on the 7-color LED light. Tap again to cycle through colors or turn off.
Aroma Diffuser Function
- Locate the aroma diffuser tray on the side or back of the base unit.
- Add a few drops of your preferred essential oil onto the aroma pad.
- The mist will carry the fragrance into the air.
Automatic Shut-off
- The humidifier is equipped with an automatic shut-off feature that activates when the water level is too low, ensuring safety and preventing damage.

The automatic shut-off safety feature that activates when the water level is low.
6. Maintenance and Cleaning
Regular cleaning is crucial for optimal performance and hygiene.
Daily Maintenance
- Unplug the humidifier.
- Empty any remaining water from the tank and base.
- Wipe the tank and base dry with a clean, soft cloth.
Weekly Cleaning
- Descaling: Mix 1 teaspoon of white vinegar with 1 cup of water. Pour the solution into the water tank and base, letting it soak for 15-20 minutes.
- Use the provided cleaning brush to gently scrub the ultrasonic transducer (the small disc in the base) and the inside of the tank.
- Rinse thoroughly with clean water until the vinegar smell is gone.
- Wipe all surfaces dry.
Storage
- Before storing, ensure the humidifier is completely clean and dry.
- Store in a cool, dry place.
7. Troubleshooting
| Problem | Possible Cause | Solution |
|---|---|---|
| No mist or low mist output | Lack of water; clogged transducer; mist outlet blocked. | Refill water tank; clean transducer; ensure mist outlet is clear. |
| Unusual odor | Dirty water or tank; new unit smell. | Clean tank and change water; the smell should dissipate after initial uses. |
| Water leakage | Tank not properly seated; overfilled tank; damaged tank. | Ensure tank is correctly placed; do not overfill; inspect for damage. |
| Humidifier turns off unexpectedly | Water shortage (auto-off); timer expired. | Refill water tank; check timer settings. |
8. Specifications
| Feature | Specification |
|---|---|
| Model | Misty-2 |
| Capacity | 2.5 Liters |
| Mist Output | Low: 80 ml/h, Medium: 130 ml/h, High: 170 ml/h |
| Power | 25 Watts |
| Voltage | 240 Volts |
| Noise Level | 28 dB |
| Dimensions (L x W x H) | 21.01 x 21.01 x 27.99 cm |
| Weight | 1.6 kg |
| Material | Polypropylene |
| Timer Settings | 2H, 4H, 8H |
| Special Features | Auto-off, Aroma Diffuser, 7-Color LED Lights, Intelligent Humidification |
9. Warranty and Support
The Aigostar Misty-2 Humidifier comes with a standard manufacturer's warranty. Please refer to the warranty card included in your product packaging for specific terms and conditions.
For technical support, troubleshooting assistance, or warranty claims, please contact your retailer or the Aigostar customer service department. Contact details can typically be found on the product packaging or the official Aigostar website.


