1. Product Overview
The Hover-1 Chrome 2.0 is a versatile self-balancing scooter designed for personal transportation and recreation. It features dual 200W motors, LED lighting, and an integrated Bluetooth speaker. This model is often paired with a Go-Kart attachment for an alternative riding experience. The device is UL2272 certified, ensuring it meets safety standards.
Key Features:
- Powerful Performance: Dual 200W motors for a top speed of 6 mph and up to 7 miles range on a single charge.
- LED Lighting: Features bright LED headlights, wheel lights, and fender lights for visibility and style.
- Integrated Bluetooth Speaker: Connect your smartphone to play audio while riding.
- Long-Lasting Battery: Equipped with a 25.2V/4Ah lithium-ion rechargeable battery, charging in approximately 4.5-5 hours.
- Self-Balancing Design: Provides stability, making it suitable for various rider skill levels.
- Safety Certified: UL2272 certified, with MSDS & UN 38.3 tested components.

Image: The Hover-1 Chrome 2.0 Self-Balancing Scooter with its Go-Kart attachment, showcasing its design and features like 400W motor, multi-color LED, and 6 miles max distance.

Image: The Hover-1 Chrome 2.0 Self-Balancing Scooter with the Go-Kart attachment, alongside the hoverboard unit by itself, illustrating both configurations.
Video: Official product video demonstrating the Hover-1 Chrome 2.0 Electric Hoverboard and its conversion to an electric Go-Kart, highlighting ease of setup, hand-operated controls, light-up wheels, and Bluetooth compatibility.
2. What's in the Box
Upon opening your Hover-1 Chrome 2.0 package, please ensure all the following components are present:
- Hoverboard
- Go-Kart Attachment
- Charger
- Instruction Manual
3. Safety Information
Your safety is paramount when operating the Hover-1 Chrome 2.0. Please read and understand all safety instructions before use.
- Protective Gear: Always wear a helmet, knee pads, and elbow pads when riding.
- Weight Limit: Adhere to the maximum weight limit of 220 lbs (100 kg).
- Surface Conditions: Ride on smooth, flat, and dry surfaces. Avoid uneven terrain, loose debris, steep inclines, or wet conditions.
- Speed Control: The scooter can reach speeds up to 6 mph. Always maintain a safe speed and be aware of your surroundings.
- Public Roads: Do not ride on public roads with vehicular traffic.
- UL2272 Certified: The Hover-1 Chrome 2.0 is UL2272 certified, indicating it meets electrical safety standards.
- Battery Safety: Use only the provided charger. Do not attempt to modify the battery or charger.
- Environmental Conditions: Do not operate in extreme temperatures or heavy rain.
- Awareness: Be mindful of pedestrians, obstacles, and other riders.
4. Setup
4.1 Initial Charging
- Before first use, fully charge your Hover-1 Chrome 2.0.
- Connect the charger to the charging port on the hoverboard.
- Plug the charger into a standard wall outlet. The indicator light on the charger will change (e.g., red to green) when fully charged.
- A full charge typically takes 4.5 to 5 hours. Do not overcharge.
4.2 Go-Kart Attachment Assembly (Optional)
If using the Go-Kart attachment, follow these steps:
- Unpack all Go-Kart components.
- Attach the seat to the main frame using the provided hardware.
- Secure the front wheel assembly to the adjustable bar.
- Adjust the length of the Go-Kart frame to fit your height.
- Place the Hover-1 Chrome 2.0 onto the Go-Kart frame and secure it using the adjustable straps. Ensure the straps are tight and the hoverboard is firmly in place.

Image: A person riding the Hover-1 Chrome 2.0 with the Go-Kart attachment, demonstrating its use in a seated position.

Image: A top-down view of the Hover-1 Chrome 2.0 with the Go-Kart attachment, showing the overall layout and controls.
5. Operating Instructions
5.1 Powering On/Off
- To power on, press and hold the power button located on the hoverboard.
- To power off, press and hold the power button again until the lights turn off.
5.2 Riding the Hoverboard (Without Go-Kart)
- Place the hoverboard on a flat surface.
- Step onto one footpad, ensuring the board is level.
- Quickly step onto the second footpad. Maintain balance by keeping your body upright and relaxed.
- Lean slightly forward to move forward, and lean backward to slow down or reverse.
- To turn, apply more pressure with one foot than the other.
- To dismount, step off one foot at a time, ensuring the board is stable.

Image: The Hover-1 Chrome 2.0 Self-Balancing Scooter highlighting its LED wheel and fender lights, along with performance specifications.
5.3 Operating with Go-Kart Attachment
- Ensure the Go-Kart attachment is securely fastened to the hoverboard.
- Sit comfortably in the Go-Kart seat.
- Use the hand-operated levers to control movement. Push both levers forward to move forward, pull both back to reverse.
- To turn, push one lever forward while pulling the other back.
5.4 Bluetooth Speaker
- Turn on the Hover-1 Chrome 2.0.
- Enable Bluetooth on your smartphone or audio device.
- Search for "Hover-1 Chrome 2.0" in your device's Bluetooth settings and pair.
- Once connected, audio will play through the integrated speaker.
6. Maintenance
6.1 Cleaning
- Turn off the device before cleaning.
- Wipe the exterior with a damp cloth. Avoid using harsh chemicals or abrasive cleaners.
- Do not spray water directly onto the device.
6.2 Battery Care
- Charge the battery fully after each use.
- If storing for an extended period, charge the battery to 50-70% every 3 months to prolong its lifespan.
- Store in a cool, dry place away from direct sunlight.
6.3 Tire and Wheel Inspection
- Regularly inspect the wheels and tires for wear, damage, or debris.
- Ensure all fasteners are tight before each ride.
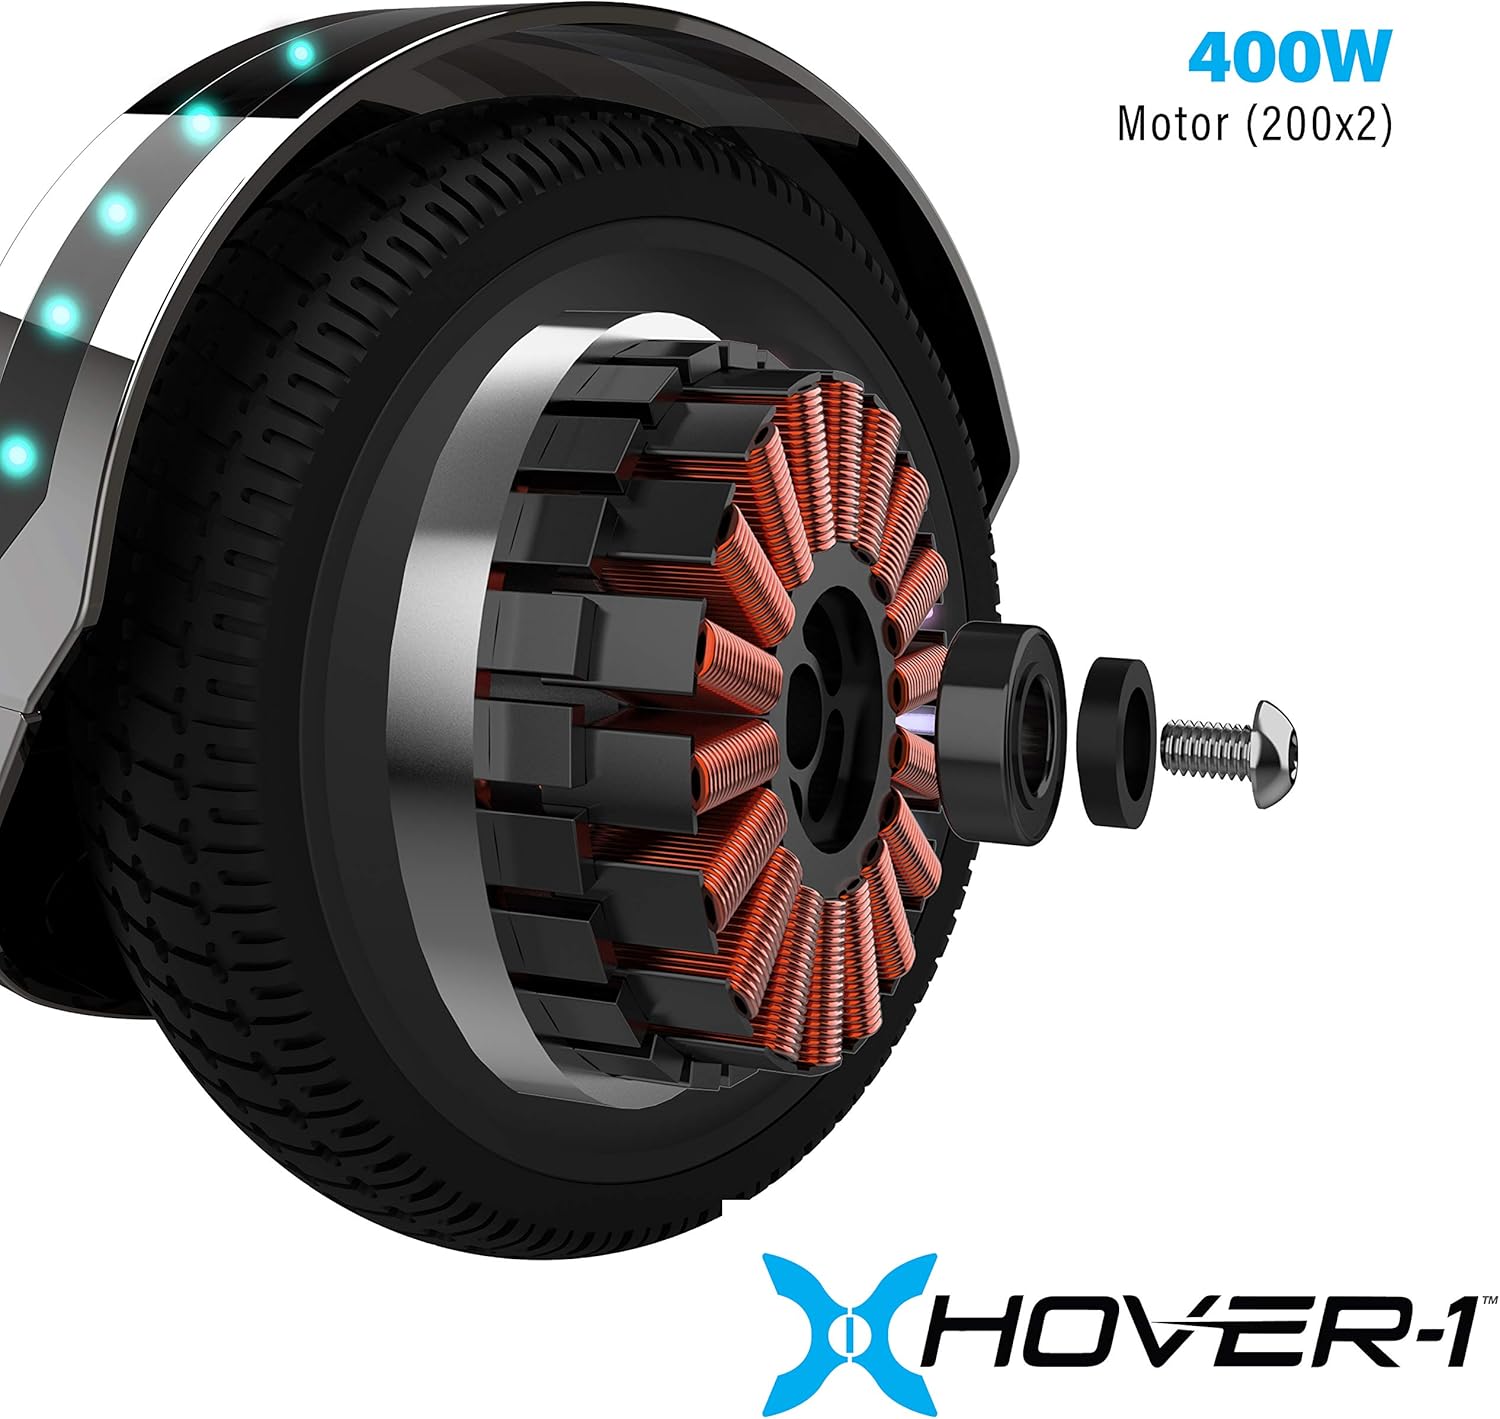
Image: An internal view of the Hover-1 Chrome 2.0 wheel, showing the 400W motor components.
7. Troubleshooting
If you encounter issues with your Hover-1 Chrome 2.0, refer to the following common problems and solutions:
| Problem | Possible Cause | Solution |
|---|---|---|
| Device does not turn on. | Low battery or power button issue. | Ensure the device is fully charged. Press and hold the power button firmly. |
| Difficulty balancing or erratic movement. | Calibration issue or uneven surface. | Recalibrate the hoverboard on a flat surface (refer to the full manual for specific calibration steps). Ensure you are on a smooth, level surface. |
| Bluetooth speaker not connecting. | Bluetooth not enabled or device not discoverable. | Ensure the hoverboard is on and your phone's Bluetooth is enabled and searching. Try restarting both devices. |
| Reduced range or speed. | Low battery, heavy load, or riding conditions. | Charge the battery fully. Ensure rider weight is within limits. Avoid riding uphill or on rough terrain. |
For more detailed troubleshooting or issues not listed here, please consult the full product manual or contact Hover-1 customer support.
8. Specifications
| Model Name | H1-CME-CMB |
| Brand | Hover-1 |
| Item Weight | 33 Pounds (14.97 kg) |
| Item Dimensions (LxWxH) | 36 x 24 x 18.5 inches (91.44 x 60.96 x 46.99 cm) |
| Package Weight | 16.26 Kilograms (35.85 lbs) |
| Color | Black |
| Material | Aluminium, Plastic |
| Suggested Users | Unisex-Youth |
| Manufacturer | DGL Group |
| Special Feature | LED Light |
| Top Speed | 6 MPH |
| Max Range | 7 Miles |
| Battery Type | 25.2V/4.0 Ah Li-ion rechargeable |
| Charge Time | 4.5 - 5 hours |
| Safety Certification | UL2272 Certified |
9. Warranty and Support
The Hover-1 Chrome 2.0 comes with a 90-day warranty from the date of purchase, covering manufacturing defects. Please retain your proof of purchase for warranty claims.
For technical support, warranty inquiries, or to purchase replacement parts and accessories, please visit the official Hover-1 website or contact their customer service department. You can also find additional information and products at the Hover-1 Brand Store.