1. Introduction
Thank you for choosing the Juskys Namur 3-Bin Garbage Can Enclosure. This robust and weather-resistant metal enclosure is designed to neatly store up to three 120-liter garbage bins or a combination of two 120-liter bins and one 240-liter bin. It can also serve as a secure storage solution for bicycles or garden tools. This manual provides essential information for the proper assembly, operation, and maintenance of your new enclosure, ensuring its longevity and optimal performance.

Image 1.1: The Juskys Namur 3-Bin Garbage Can Enclosure with its top lid open, showcasing the spacious interior and sturdy metal construction.
2. Safety Information
- Always assemble the enclosure on a flat, stable, and level surface to ensure stability and proper door/lid alignment.
- It is recommended that two people assemble this product due to its size and weight.
- Wear appropriate safety gear, such as gloves, during assembly to prevent cuts or pinches.
- Keep all small parts and packaging materials away from children and pets to prevent choking hazards.
- Do not climb on or lean heavily against the enclosure once assembled.
- Ensure the enclosure is securely closed and locked when not in use, especially if storing valuable items or in windy conditions.
3. Package Contents
Before beginning assembly, verify that all components are present and undamaged. While specific part counts may vary, typical contents include:
- Side panels (left, right, back)
- Front doors (typically two)
- Roof panel(s)
- Base frame components
- Hardware pack (screws, bolts, nuts, washers)
- Gas spring(s) for lid
- Lid chain(s)
- Locking mechanism and keys
If any parts are missing or damaged, please contact Juskys customer support before proceeding with assembly.
4. Setup and Assembly
Although the Juskys Namur enclosure is designed for user-friendly assembly, careful attention to the following steps will ensure a stable and functional unit. No specialized professional assembly is required.
4.1 Site Preparation
Choose a level, firm surface for installation. This could be concrete, paving stones, or a compacted gravel base. Ensure adequate space around the enclosure for opening doors and the lid.
4.2 Assembly Steps (General)
- Assemble the Base Frame: Connect the base frame components using the provided hardware. Ensure all connections are secure.
- Attach Side and Back Panels: Securely fasten the side and back panels to the assembled base frame. Work systematically, ensuring panels are aligned before tightening screws.
- Install Front Doors: Attach the front doors to the designated hinges on the frame. Test the door swing to ensure smooth operation. Install the locking mechanism as per the included diagrams.
- Mount the Roof: Position the roof panel(s) on top of the assembled structure. Secure it using the provided hardware. Install the gas spring(s) and the lid chain(s) that connect the enclosure's lid to the bin lids, allowing for simultaneous opening.
- Final Checks: Verify that all screws and bolts are tightened. Check that doors and the lid open and close smoothly and that the locking mechanism functions correctly.
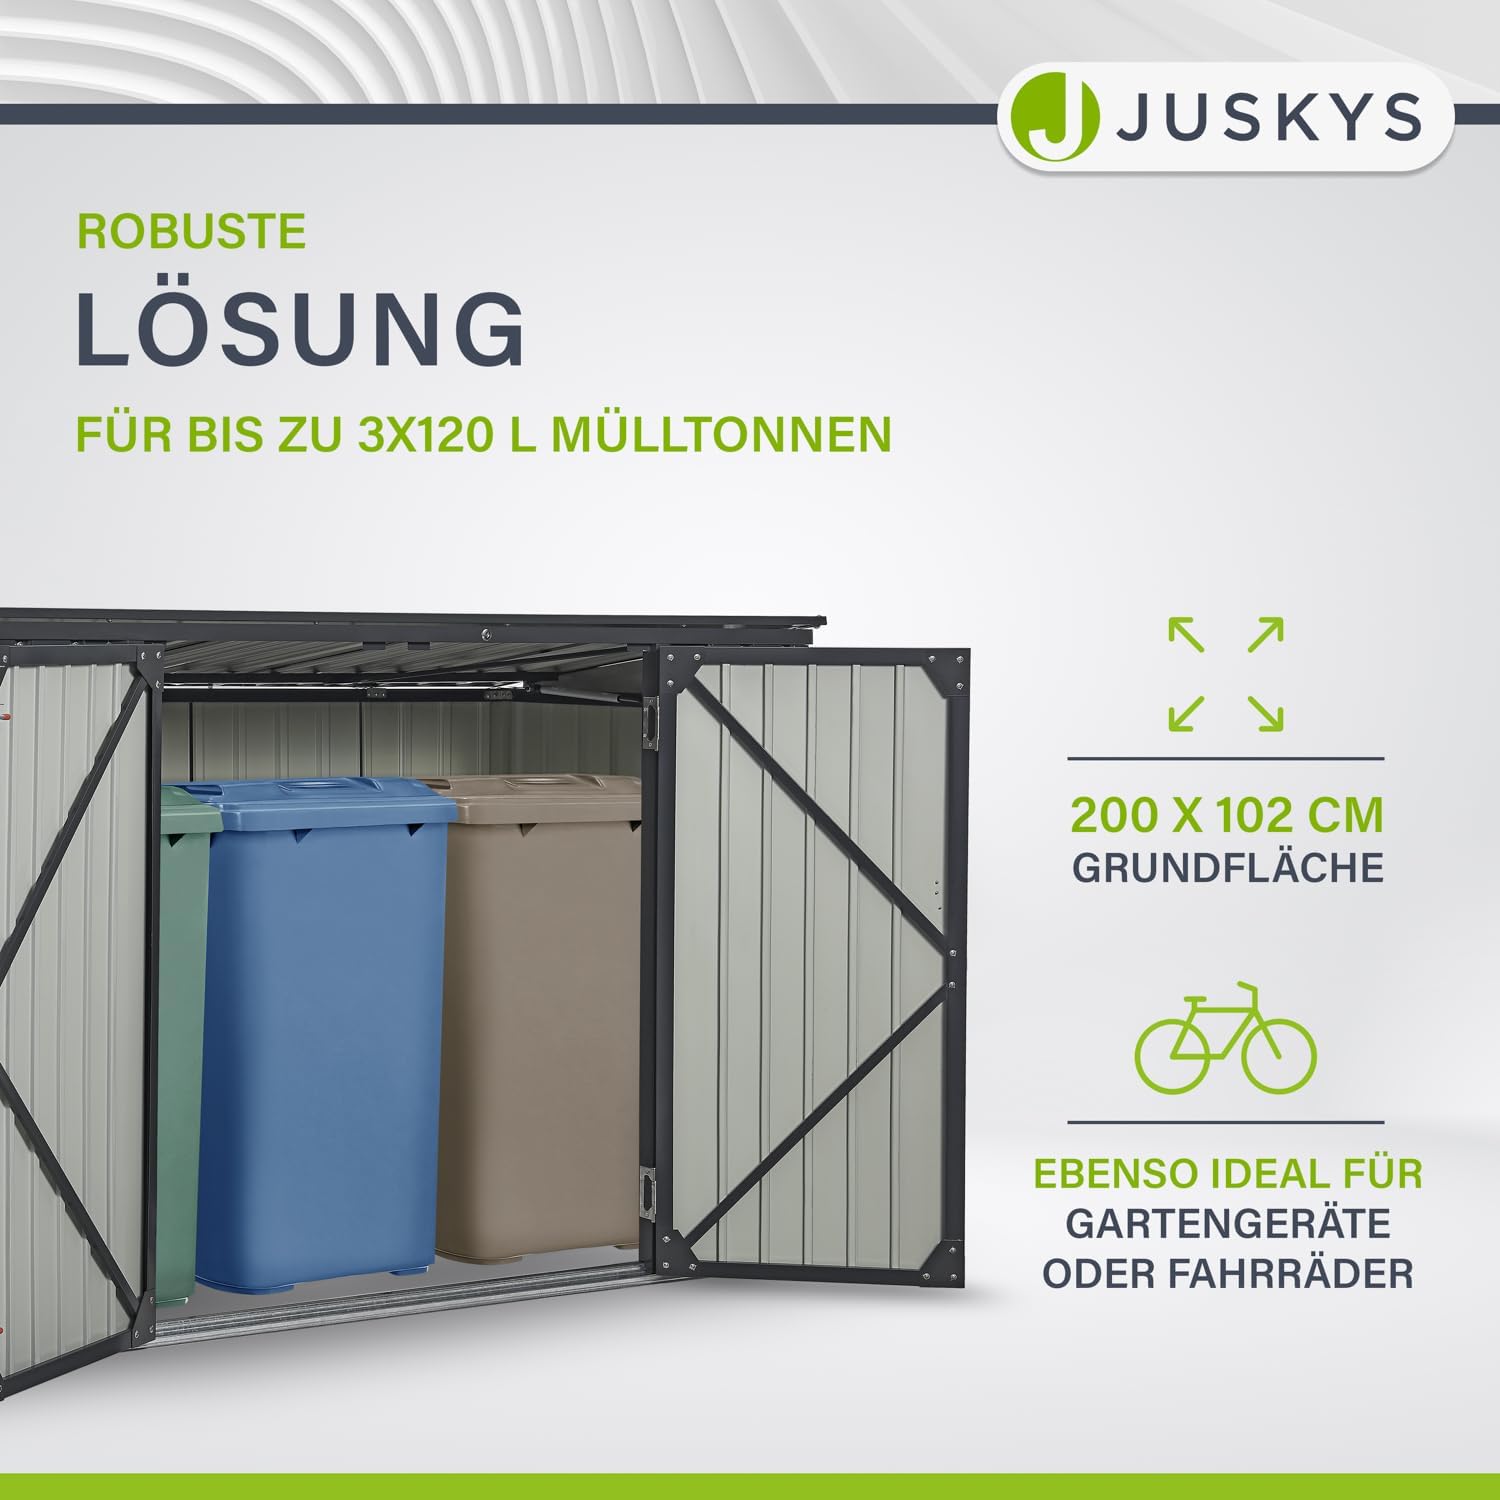
Image 4.1: The Juskys Namur enclosure demonstrating its robust design and capacity to hold multiple garbage bins, or even bicycles, highlighting its versatile storage capabilities.
5. Operation
Operating your Juskys Namur enclosure is straightforward and designed for convenience.
5.1 Opening and Closing
- Front Doors: Unlock the front doors using the provided key. The double doors swing open wide for easy access to the bins or stored items.
- Top Lid: The top lid is equipped with a gas spring for smooth and effortless opening. Simply lift the lid, and the gas spring will hold it open.
- Simultaneous Opening: For added convenience, attach the provided chains from the enclosure's lid to the handles of your garbage bin lids. This allows the bin lids to open simultaneously with the enclosure's top lid, making waste disposal quick and easy.
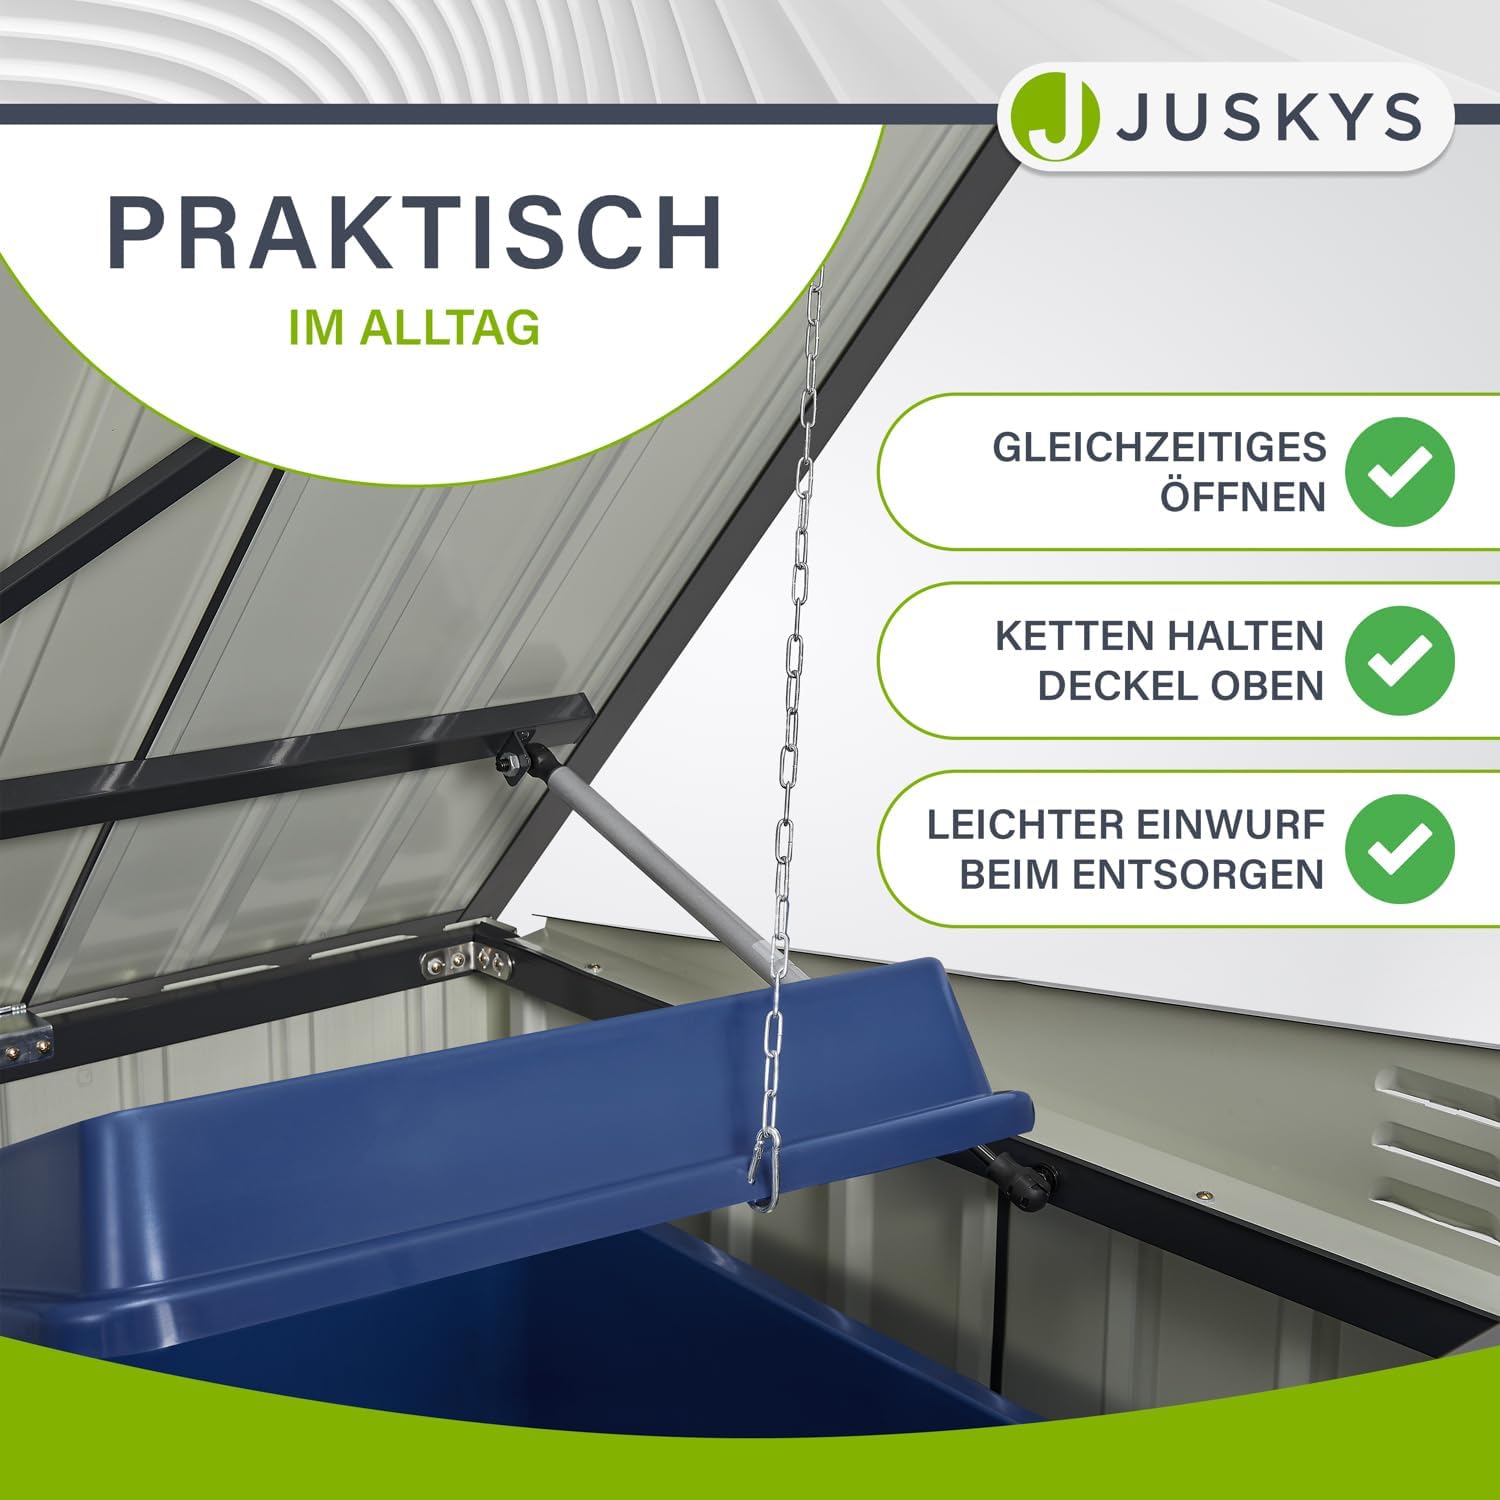
Image 5.1: A close-up view of the practical chain mechanism inside the Juskys Namur enclosure, illustrating how the bin lid can be connected to the main lid for simultaneous opening.
5.2 Locking Mechanism
The enclosure features a robust locking mechanism on the front doors to secure your bins and contents. Always ensure the doors are properly closed and locked to prevent unauthorized access or displacement by wind.
6. Maintenance
The Juskys Namur enclosure is constructed from galvanized metal, making it highly durable, UV-resistant, weather-resistant, and water-repellent. Regular maintenance will ensure its appearance and functionality for many years.
- Cleaning: Clean the enclosure periodically with a soft cloth and mild soapy water. Rinse thoroughly with clean water and dry to prevent water spots. Avoid abrasive cleaners or harsh chemicals that could damage the galvanized finish.
- Ventilation: The enclosure is designed with ventilation slits to ensure good air circulation and prevent unpleasant odors. Ensure these slits remain clear of debris.
- Hardware Check: Periodically inspect all screws, bolts, and hinges for tightness. Re-tighten any loose fasteners to maintain structural integrity.
- Lubrication: If the door hinges or locking mechanism become stiff, apply a small amount of silicone-based lubricant.

Image 6.1: The Juskys Namur enclosure highlighting its UV and weather-resistant properties, ensuring durability and year-round usability in various outdoor conditions.
7. Troubleshooting
Here are solutions to common issues you might encounter:
| Problem | Possible Cause | Solution |
|---|---|---|
| Doors do not close properly or are misaligned. | Uneven ground; loose fasteners; bent hinges. | Ensure the enclosure is on a level surface. Check and tighten all assembly fasteners. Inspect hinges for damage and adjust if possible. |
| Lid does not stay open or closes too quickly. | Gas spring issue; incorrect installation. | Verify the gas spring is correctly installed and not damaged. If damaged, contact customer support for a replacement. |
| Unpleasant odors inside the enclosure. | Lack of air circulation; dirty bins. | Ensure ventilation slits are clear. Regularly clean the inside of the enclosure and your garbage bins. |
| Locking mechanism is stiff. | Lack of lubrication; debris. | Apply a small amount of silicone-based lubricant to the lock mechanism. Clear any debris from around the lock. |
8. Specifications
Detailed specifications for the Juskys Namur 3-Bin Garbage Can Enclosure:
- Model: Namur
- Material: Galvanized Metal
- Color: Grey
- Product Dimensions (D x W x H): Approximately 1.21 m x 2.00 m x 1.28 m
- Overall Height: 134 cm
- Door Width: 97.5 cm
- Door Height: 121 cm
- Capacity: Up to three 120-liter garbage bins or two 120-liter bins + one 240-liter bin. Also suitable for bicycles or garden tools.
- Features: Lockable double doors, hinged lid with gas spring, simultaneous bin lid opening chain, ventilation slits, UV & weather-resistant, water-repellent.
- Assembly Required: User assembly (no professional assembly required).
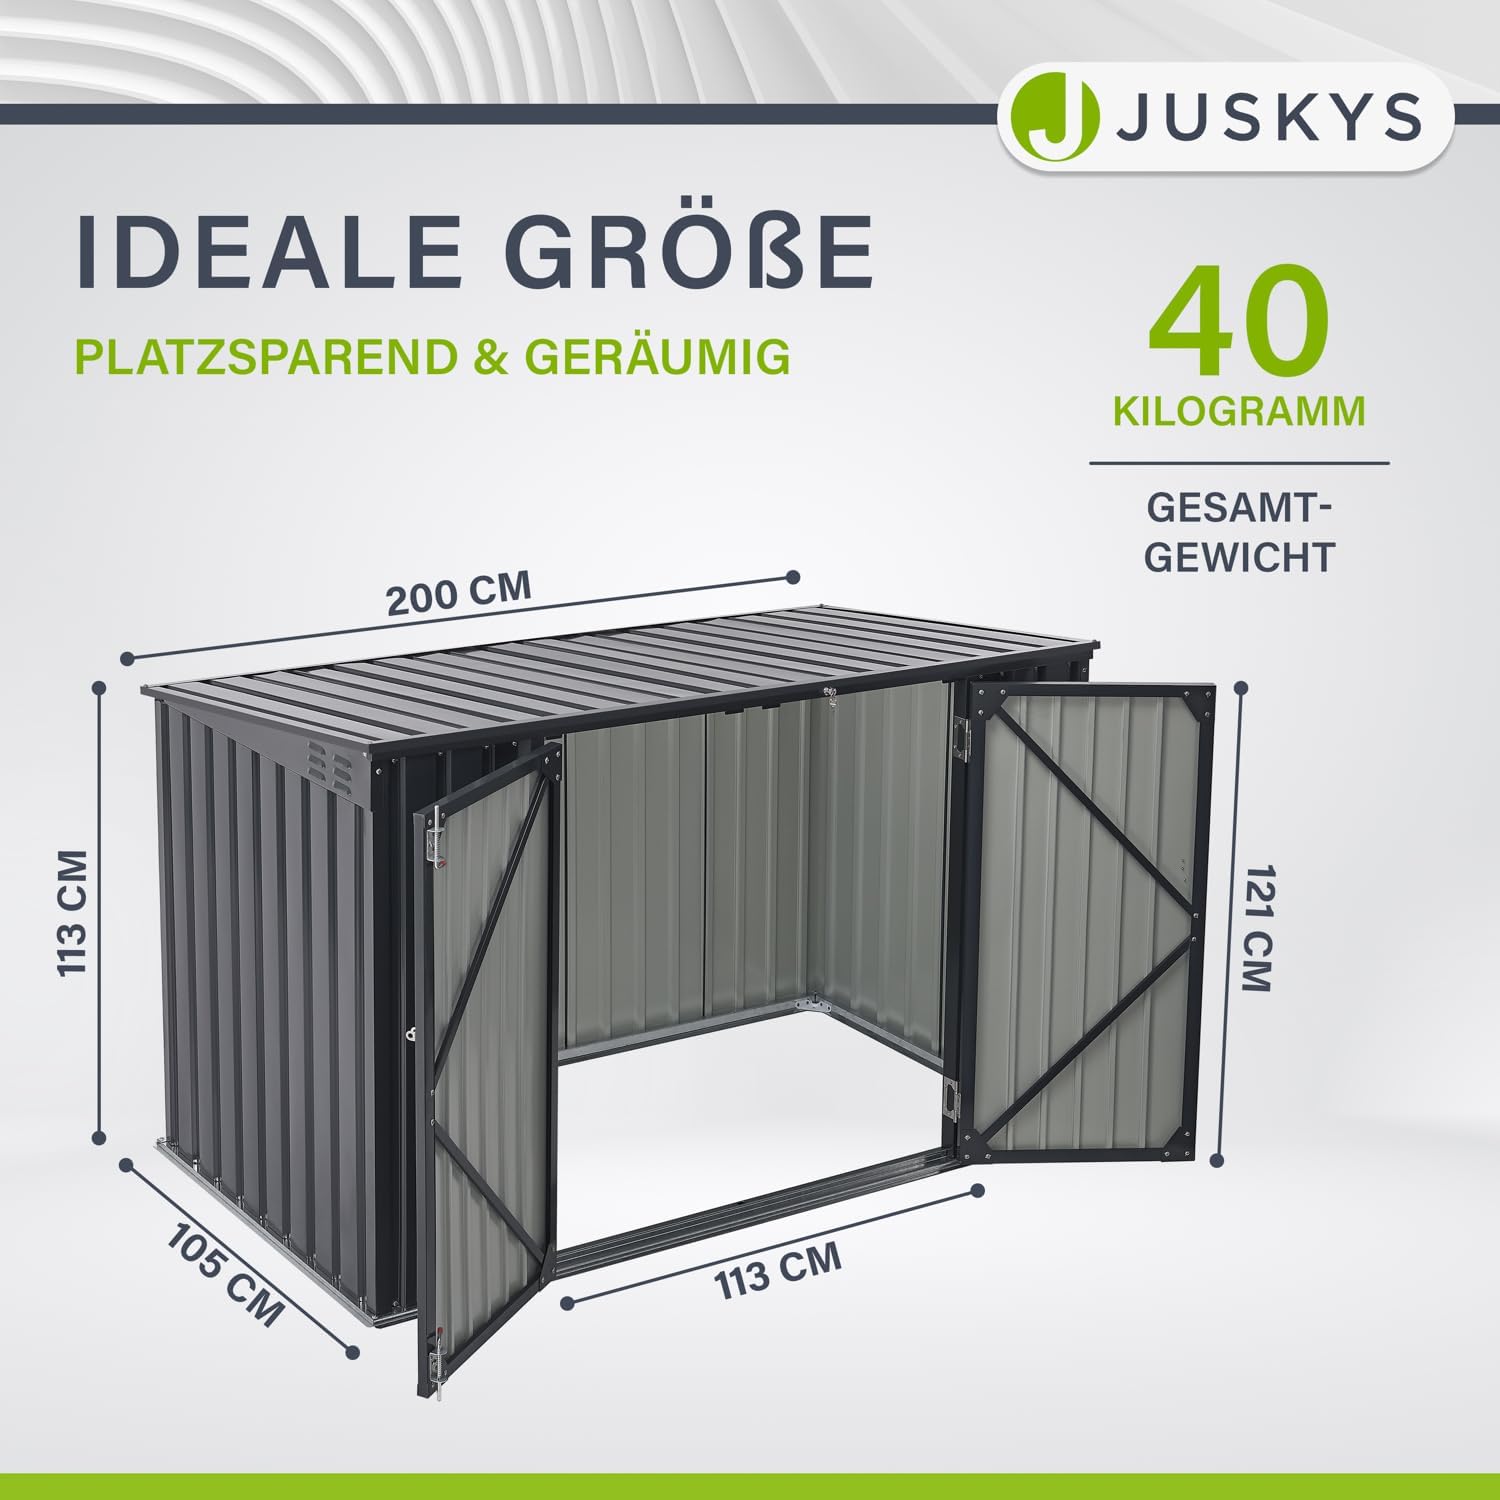
Image 8.1: A detailed diagram of the Juskys Namur enclosure, illustrating its key dimensions including width, depth, and height, for accurate planning and placement.
9. Warranty and Support
For warranty information, technical support, or to order replacement parts, please refer to the contact details provided with your purchase documentation or visit the official Juskys website. Please have your model number (Namur) and purchase date ready when contacting support.


